Aller au contenu principal
Suchen Sie etwas anderes?
The MTX-Router-Titan and MTX-Router-Titan mini can act as an OpenVPN client. By using a VPN service, all devices connected to the router’s Ethernet bus or the IP-RS232/485/USB gateways can be securely accessed from the othe rend of the VPN network. A VPN service is also useful to avoid problems generated from the use of proxies, firewalls, etc. and especially when using SIM cards that use IP addresses in the range 10.x.x.x.
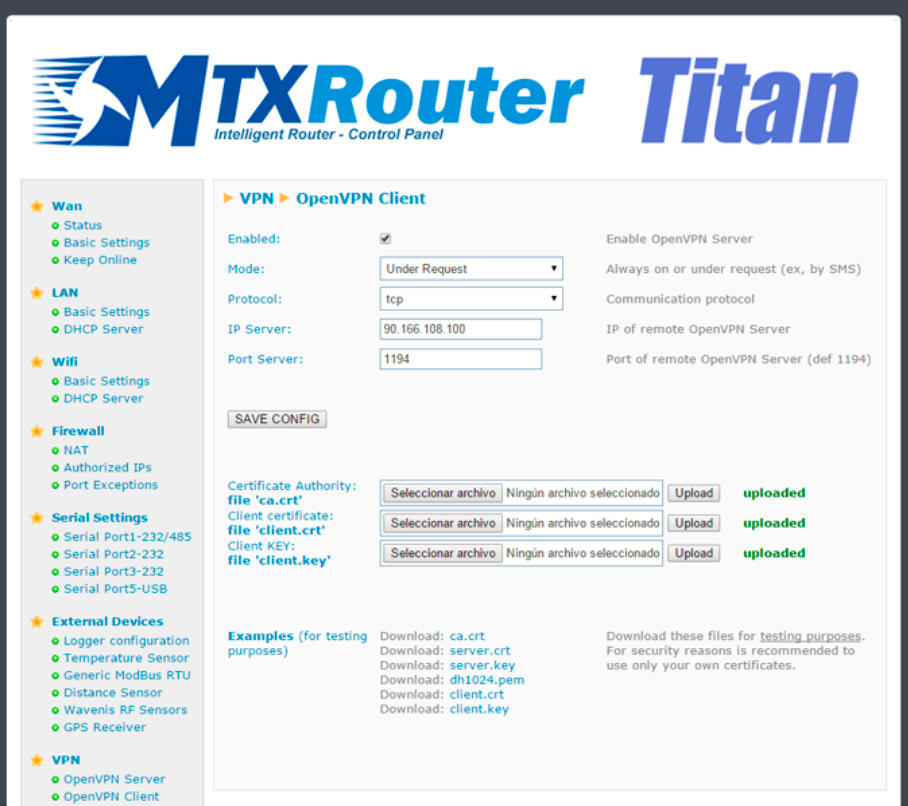
- Enabled: select this box if we wish to activate the OpenVN service in Client mode
- Mode: this option allows we to establish the connection mode for the VPN service. “Always On” will keep the VPN active at all times. “Under Request” will activate the VPN for the time we require. This option could be used in times of maintenance for example. If used, to activate the VPN service we will need to send an AT command via SMS, Telnet, Webserver, SNMP or Modbus TCP. Once the time configured for an active service has passed, the VPN will be disconnected
- Protocol: this option allows we to establish the protocol for the activation of the VPN service. Either UDP or TCP can be used
- Port: the standard port is 1194 but we can change this in this field
- IP server: indicate the public IP address of the remote server that will act as the OpenVPN server
- Necessary files for OpenVPN
- In order to be able to use the MTX-Router-Titan devices as an OpenVPN client, we will need to create and update the following files: ca.crt (certificate of authenticity), client.crt (server certificate) and client.key (server private key)
Towards the bottom of the screen we will see that we can download example files. These must only be used in test mode. In real applications we should always generate our own certificates.
ADDITIONAL NOTES
- Once the configuration is complete, press the “SAVE CONFIG” button to save the changes. Remember that the router should be reset in order for the changes to take effect.
 Les accès par défaut sont :
 Saisir le mode de connexion « Ethernet » ou « modem » :
 Dans le cas d’une configuration par Ethernet, veiller à ce que les paramètres IP soient compatibles avec l’accès au serveur d’après la configuration du réseau local du concentrateur. Dans le cas d’une connexion par Ethernet, la configuration doit être compatible avec la topologie du réseau local du concentrateur afin qu’il puisse accéder aux serveurs. Cette configuration se fait via la page de configuration « Networks » (voir chapitre 3.2.2.3 : « Réseaux (Networks) »).
Dans le cas d’une connexion par modem, la configuration du modem doit être correcte avant de pouvoir effectuer une connexion. Cette configuration se fait dans la page de configuration « Modem » (voir chapitre 3.2.2.4 : « Modem »).
Les paramètres des serveurs à configurer au minimum sont les suivants :
Dans le cas d’une configuration par Ethernet, veiller à ce que les paramètres IP soient compatibles avec l’accès au serveur d’après la configuration du réseau local du concentrateur. Dans le cas d’une connexion par Ethernet, la configuration doit être compatible avec la topologie du réseau local du concentrateur afin qu’il puisse accéder aux serveurs. Cette configuration se fait via la page de configuration « Networks » (voir chapitre 3.2.2.3 : « Réseaux (Networks) »).
Dans le cas d’une connexion par modem, la configuration du modem doit être correcte avant de pouvoir effectuer une connexion. Cette configuration se fait dans la page de configuration « Modem » (voir chapitre 3.2.2.4 : « Modem »).
Les paramètres des serveurs à configurer au minimum sont les suivants :
 Il faut donc configurer les champs : « Interface », « Type », « Server type », « Address », « Port », « Login » et « Password ».
Les autres champs peuvent être laissés aux valeurs par défaut à condition que les répertoires aient été créés correctement auparavant. Voir chapitre 3.1.2 : « Fichiers de configuration » pour plus de détails.
Il faut donc configurer les champs : « Interface », « Type », « Server type », « Address », « Port », « Login » et « Password ».
Les autres champs peuvent être laissés aux valeurs par défaut à condition que les répertoires aient été créés correctement auparavant. Voir chapitre 3.1.2 : « Fichiers de configuration » pour plus de détails.


 Attendre. Le concentrateur va redémarrer avec sa configuration usine.


