Aller au contenu principal
Suchen Sie etwas anderes?
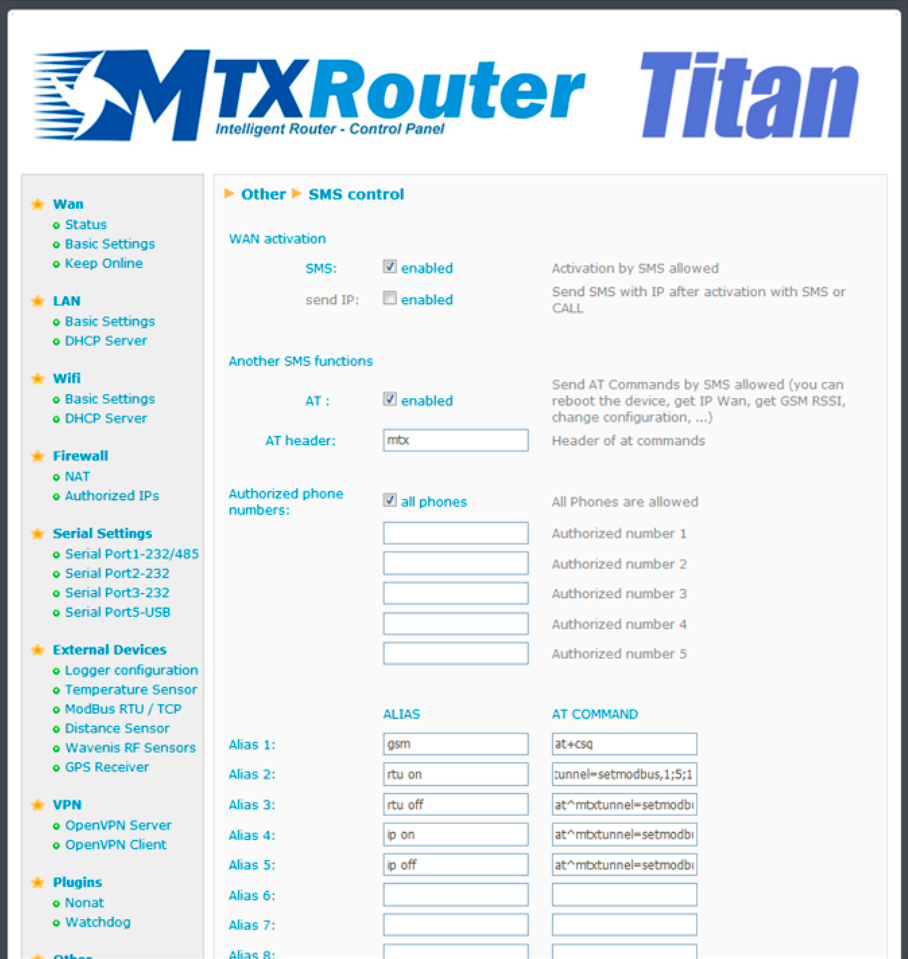
This section allows we to configure the router control via SMS or a missed call. For example, we can configure it so that the router connects to 3G after receiving an SMS, or we can specify the telephone numbers authorized for this.
- SMS enabled: activate this option if we wish to be able to activate a 2G/3G connection temporarily in the router after an SMS is received. Watch out! The SMS command must be specified
- Call enabled: activate this option if we wish to be able to activate a 2G/3G connection temporarily after a missed call is received. Ideal for telemaintenance where a connection to the router is only required at certain times
- Send IP: activate this option if we want the router to send an SMS with the IP address obtained after the SMS or missed call caused a connection to be made
- AT enabled: activate this option if we wisht o be able to send AT commands via SMS to the router, for example to find out the network coverage remotely, to carry out a reset, change a configuration, etc.
- AT header: write here the header text for the command SMS messages. For example, if we write “mtx” in this box, when an AT command is sent via SMS, let’s say the ATI command which is used to find out the router’s internal module, we would need to send an SMS with the text “mtx ATI”
- All phones: activate this option if we want all telephones to be able to send AT commands to the router. Do not activate this option if we only want a specified number of authorized telephones
- Authorized number X: in these boxes we can specify up to five authorized telephones
For firmware versions 3.x or later:
- Alias/ATCommand: up to 10 aliases can be introduced for the execution of AT commands. For example, if we wish to send an SMS to update a Modbus register on an external device, we can create an alias so that whenever the MTX device receives the text “reg on”, the AT command “at^mtxtunnel=setmodbus,1;5;2” is executed, writing the value “2” in register number 5 for the Modbus device with address 1
- Alias Result OK: text to be sent as a response when the execution of an alias command is successful. If required, a personalized response for each alias can created by indicating the response between the tags OkPerfect
- Alias Result ERROR: text to be sent as a response when the execution of an allias command produces an error. If required, a personalized response for each alias can created by indicating the response between the tags ErrorOops
ADDITIONAL NOTES
- Once the configuration is finished, click “SAVE CONFIG” to save the changes. Remember that the router should be restarted for the changes to take effect.
- Consult the Application Note ALIAS SMS for further information and examples.
 Les accès par défaut sont :
 Saisir le mode de connexion « Ethernet » ou « modem » :
 Dans le cas d’une configuration par Ethernet, veiller à ce que les paramètres IP soient compatibles avec l’accès au serveur d’après la configuration du réseau local du concentrateur. Dans le cas d’une connexion par Ethernet, la configuration doit être compatible avec la topologie du réseau local du concentrateur afin qu’il puisse accéder aux serveurs. Cette configuration se fait via la page de configuration « Networks » (voir chapitre 3.2.2.3 : « Réseaux (Networks) »).
Dans le cas d’une connexion par modem, la configuration du modem doit être correcte avant de pouvoir effectuer une connexion. Cette configuration se fait dans la page de configuration « Modem » (voir chapitre 3.2.2.4 : « Modem »).
Les paramètres des serveurs à configurer au minimum sont les suivants :
Dans le cas d’une configuration par Ethernet, veiller à ce que les paramètres IP soient compatibles avec l’accès au serveur d’après la configuration du réseau local du concentrateur. Dans le cas d’une connexion par Ethernet, la configuration doit être compatible avec la topologie du réseau local du concentrateur afin qu’il puisse accéder aux serveurs. Cette configuration se fait via la page de configuration « Networks » (voir chapitre 3.2.2.3 : « Réseaux (Networks) »).
Dans le cas d’une connexion par modem, la configuration du modem doit être correcte avant de pouvoir effectuer une connexion. Cette configuration se fait dans la page de configuration « Modem » (voir chapitre 3.2.2.4 : « Modem »).
Les paramètres des serveurs à configurer au minimum sont les suivants :
 Il faut donc configurer les champs : « Interface », « Type », « Server type », « Address », « Port », « Login » et « Password ».
Les autres champs peuvent être laissés aux valeurs par défaut à condition que les répertoires aient été créés correctement auparavant. Voir chapitre 3.1.2 : « Fichiers de configuration » pour plus de détails.
Il faut donc configurer les champs : « Interface », « Type », « Server type », « Address », « Port », « Login » et « Password ».
Les autres champs peuvent être laissés aux valeurs par défaut à condition que les répertoires aient été créés correctement auparavant. Voir chapitre 3.1.2 : « Fichiers de configuration » pour plus de détails.


 Attendre. Le concentrateur va redémarrer avec sa configuration usine.


