Suchen Sie etwas anderes?
Table of Contents
Introduction
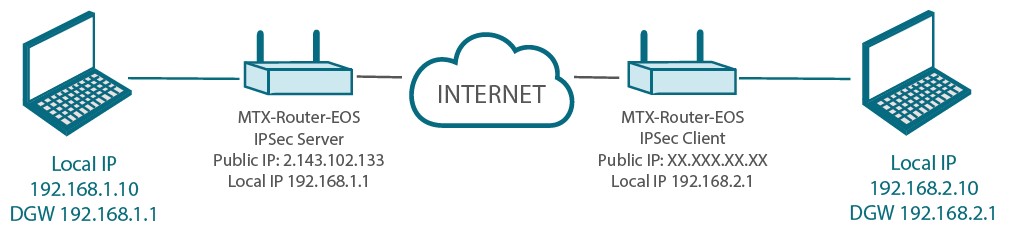
This application note will explain how to configure the MTX-Router-EOS in order to perform a client-server configuration using IPSec and shared key.
It is not part of this application note how to configure the network interfaces of the computers, nor windows firewall options and so on.
Server Configuration
From the VPN -IPSec menu, we are going to configure the server options:
- We enable the IPSEC server and assign it the name we want to give it.
- We choose the mode, in this case tunnel.
- Then we configure the local subnet, in this case that of the server is 192.168.1.0/24 and that of the other is 192.168.2.0/24.
- As an identifier we have chosen to do so by taking your IP address.
- In this case we will establish the tunnel using a shared key.
- We will leave the rest of the options by default, apply and save.
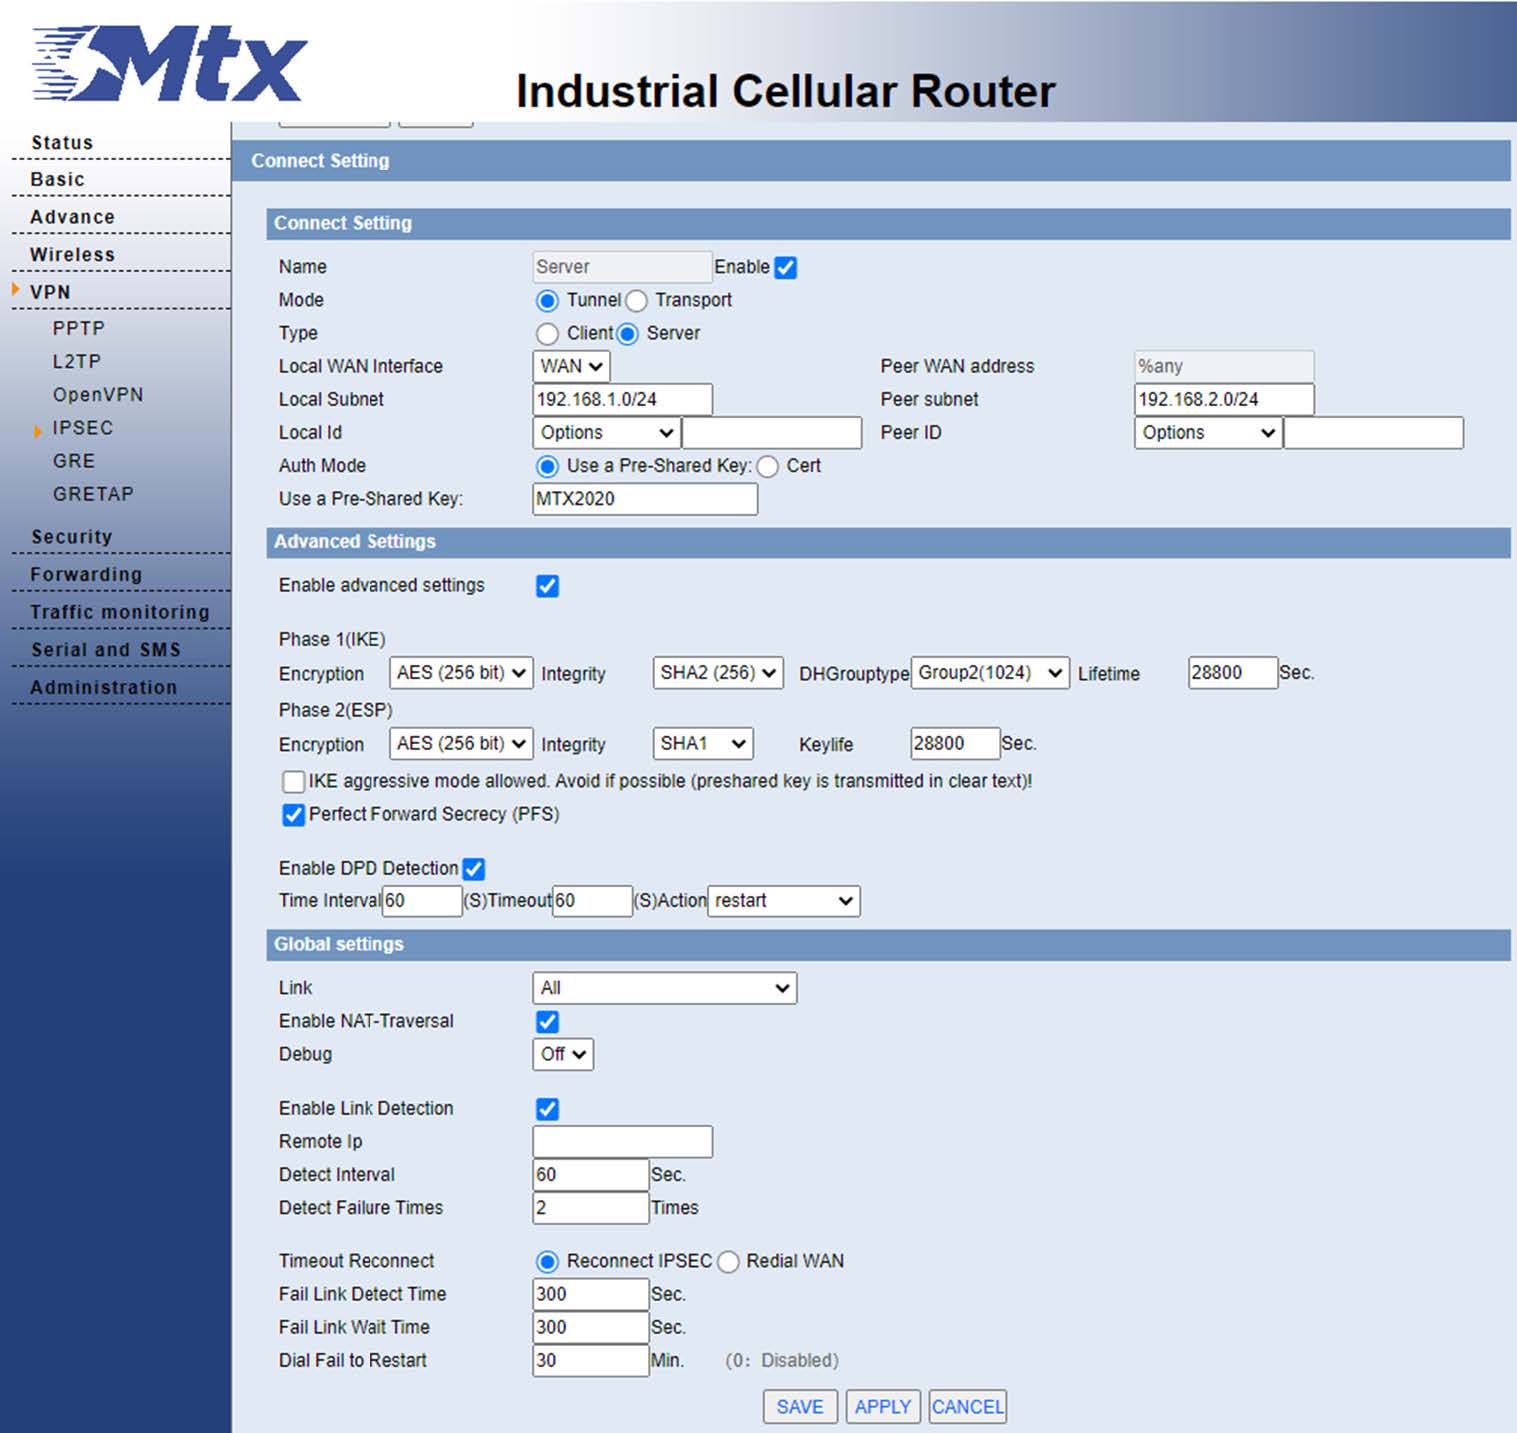
OpenVPN client configuration
From the VPN -IPSEC menu, we are going to configure the client options:
- We enable the IPSEC client.
- We fill in the IP of the IPSEC server, in our case 2.143.102.133.
- The local subner for the client is 192.168.2.0/24 and the one for the server we have said is 192.168.1.0/24
- We fill in the pre-shared key that we have configured on the server, in this case MTX2020.
- We leave the rest of the options by default, apply the changes and save.
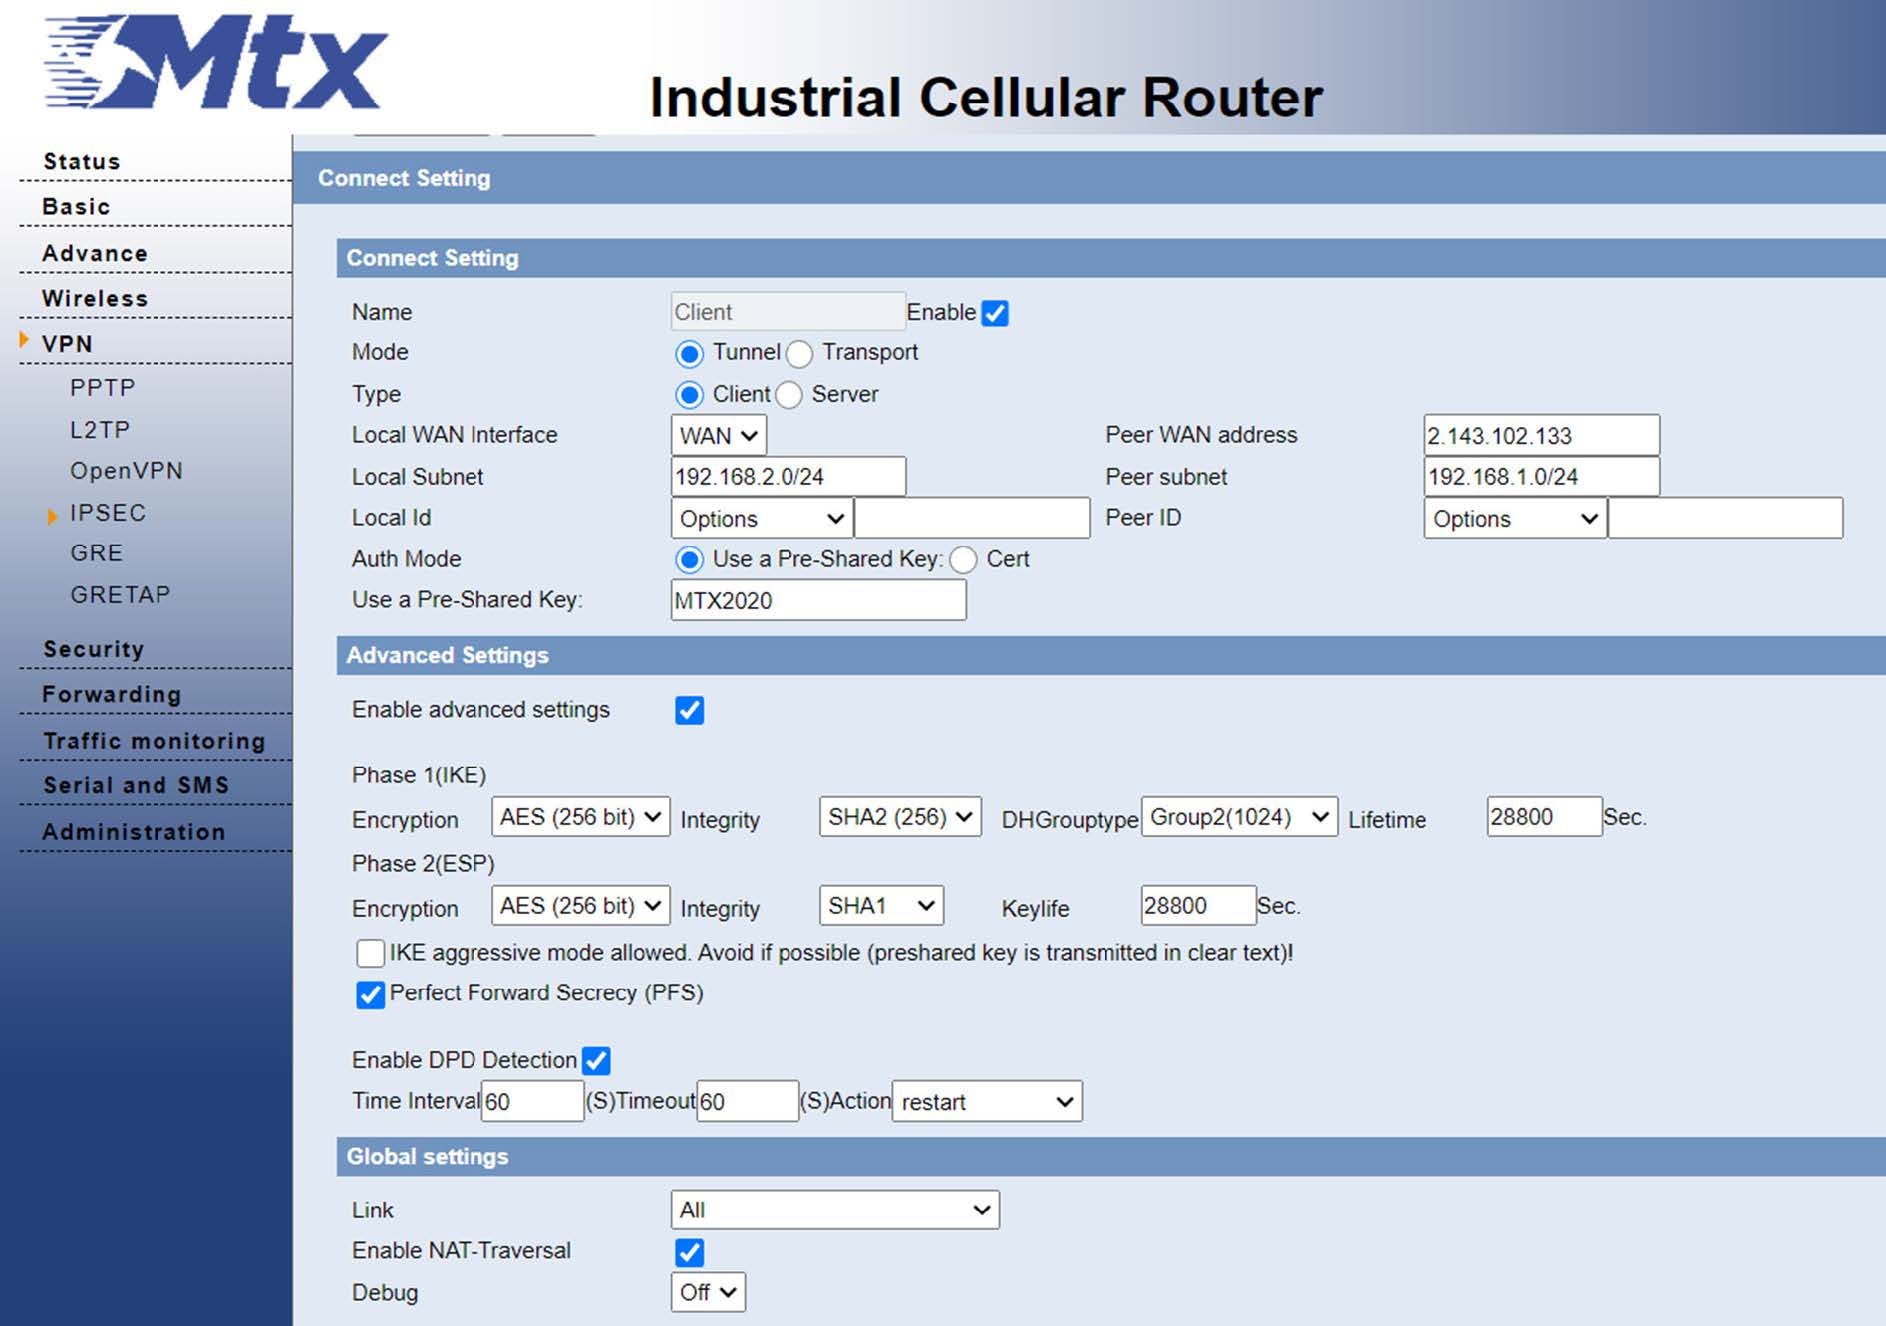
Once the changes are applied, we see how the tunnel appears as established:
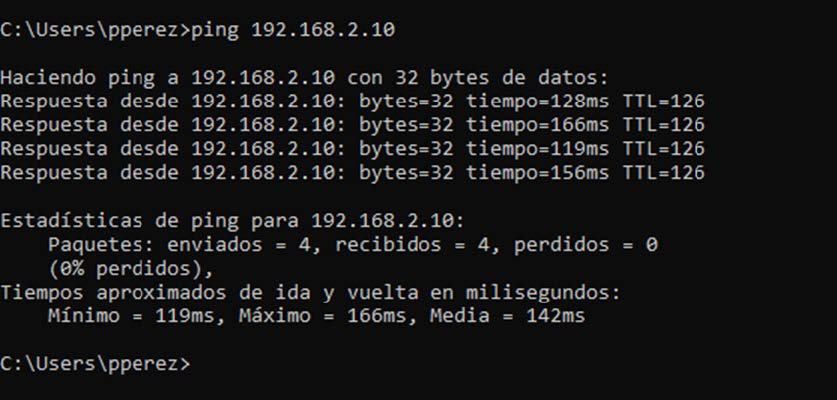
And we can ping the computer connected to the server:

All the traffic to the subnet that hangs from the server will go out through the ipsec0 interface and the rest will go out through the WAN interface with the public IP of the telephone operator:

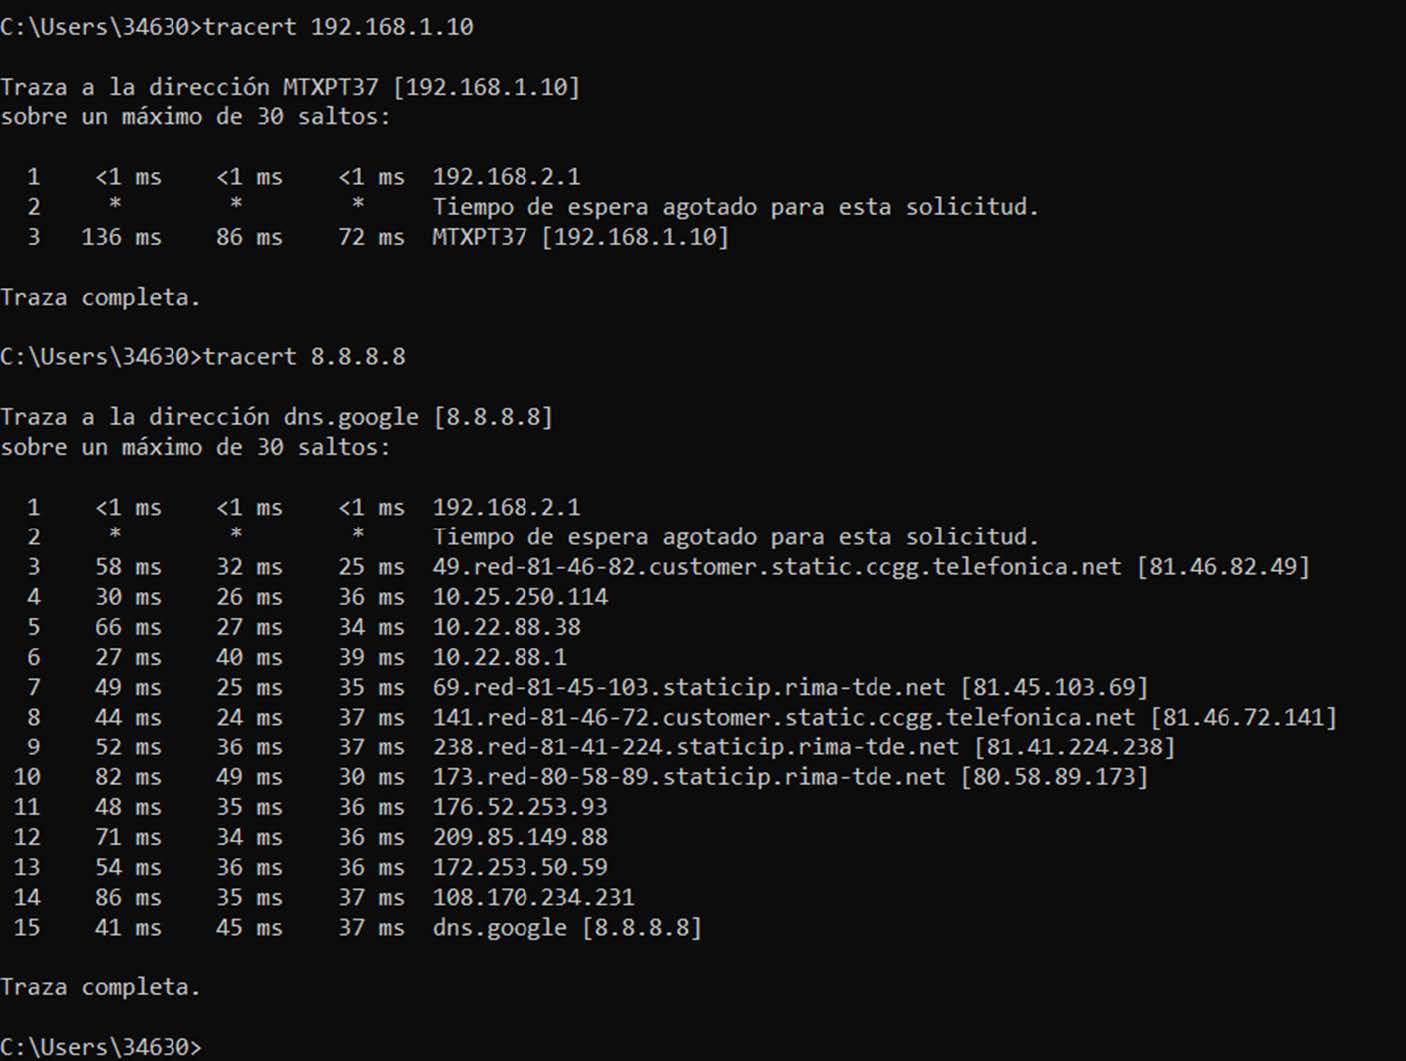
Similarly, from the point of view of the PC connected to the server, we can ping the client’s subnet:

 Les accès par défaut sont :
 Saisir le mode de connexion « Ethernet » ou « modem » :
 Dans le cas d’une configuration par Ethernet, veiller à ce que les paramètres IP soient compatibles avec l’accès au serveur d’après la configuration du réseau local du concentrateur. Dans le cas d’une connexion par Ethernet, la configuration doit être compatible avec la topologie du réseau local du concentrateur afin qu’il puisse accéder aux serveurs. Cette configuration se fait via la page de configuration « Networks » (voir chapitre 3.2.2.3 : « Réseaux (Networks) »).
Dans le cas d’une connexion par modem, la configuration du modem doit être correcte avant de pouvoir effectuer une connexion. Cette configuration se fait dans la page de configuration « Modem » (voir chapitre 3.2.2.4 : « Modem »).
Les paramètres des serveurs à configurer au minimum sont les suivants :
Dans le cas d’une configuration par Ethernet, veiller à ce que les paramètres IP soient compatibles avec l’accès au serveur d’après la configuration du réseau local du concentrateur. Dans le cas d’une connexion par Ethernet, la configuration doit être compatible avec la topologie du réseau local du concentrateur afin qu’il puisse accéder aux serveurs. Cette configuration se fait via la page de configuration « Networks » (voir chapitre 3.2.2.3 : « Réseaux (Networks) »).
Dans le cas d’une connexion par modem, la configuration du modem doit être correcte avant de pouvoir effectuer une connexion. Cette configuration se fait dans la page de configuration « Modem » (voir chapitre 3.2.2.4 : « Modem »).
Les paramètres des serveurs à configurer au minimum sont les suivants :
 Il faut donc configurer les champs : « Interface », « Type », « Server type », « Address », « Port », « Login » et « Password ».
Les autres champs peuvent être laissés aux valeurs par défaut à condition que les répertoires aient été créés correctement auparavant. Voir chapitre 3.1.2 : « Fichiers de configuration » pour plus de détails.
Il faut donc configurer les champs : « Interface », « Type », « Server type », « Address », « Port », « Login » et « Password ».
Les autres champs peuvent être laissés aux valeurs par défaut à condition que les répertoires aient été créés correctement auparavant. Voir chapitre 3.1.2 : « Fichiers de configuration » pour plus de détails.


 Attendre. Le concentrateur va redémarrer avec sa configuration usine.


