Aller au contenu principal
Suchen Sie etwas anderes?
Scenario details:
- 8 dry contact sensors need to be monitored
- In the event of a state change in any of them, an SMS message must be sent to several phone numbers. Each dry contact must have a personalized message that identifies the sensor that caused the alarms, as well as whether the alarm was activated (dry contact closed) or opened (dry contact open).
- The phone numbers that will receive the SMS alerts are +34666123456, + 34666123457 and +346661234568
- To avoid sending a high number of SMS (in case of rapid changes in a certain entry), a timeout of 60 seconds must be established per entry, that is, no more than 1 SMS per minute will be sent for changes in a certain entry
Solution: MTX-Tunnel firmware + MTX-IOT-S [4-N] 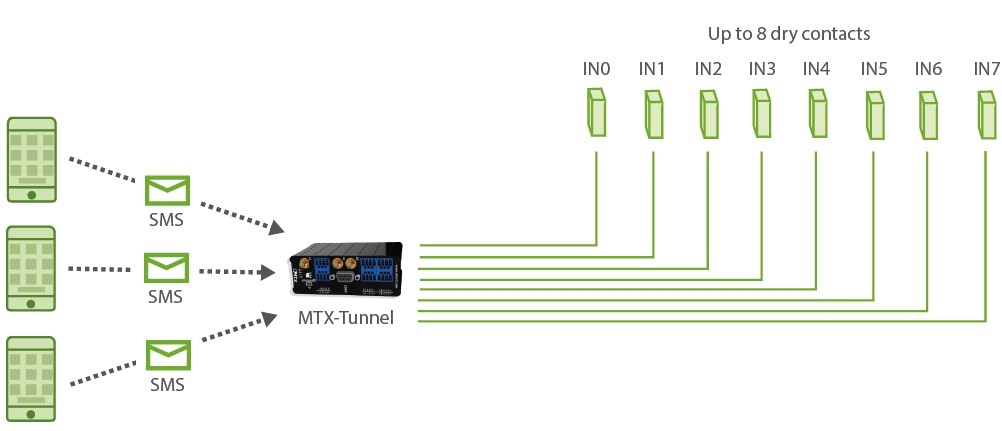
Configuration example (config.txt file) for the indicated scenario:
Details:
- The configuration of the inputs as “sms; 2; 30; GPIO0 ON alarm; GPIO0 OFF alarm” indicates the following:
“sms” > The input is configured to send alarm by SMS
“2” > The 2 indicates that the digital input is configured to send an SMS message both by activating the input (when it closes, bringing it to ground) and by deactivating the input (when it opens). If you want to send an SMS message only when closing the entry (taking it to ground), you should indicate a value of “1”
“60” > Indicates the timeout of the digital input. This means that, even if there are multiple changes in the digital input, more than 1 SMS will never be sent in those 60 seconds. Note: in the event that the entrance closes and it opens again after 5 seconds, an SMS will be received indicating the closure and, after 60 seconds, the opening
“Alarm GPIO0 ON” > Indicates a text message to be sent when the input is activated (when the input is ground)
“Alarm GPIO0 OFF” > Indicates a text message to be sent when the input is deactivated
 Les accès par défaut sont :
 Saisir le mode de connexion « Ethernet » ou « modem » :
 Dans le cas d’une configuration par Ethernet, veiller à ce que les paramètres IP soient compatibles avec l’accès au serveur d’après la configuration du réseau local du concentrateur. Dans le cas d’une connexion par Ethernet, la configuration doit être compatible avec la topologie du réseau local du concentrateur afin qu’il puisse accéder aux serveurs. Cette configuration se fait via la page de configuration « Networks » (voir chapitre 3.2.2.3 : « Réseaux (Networks) »).
Dans le cas d’une connexion par modem, la configuration du modem doit être correcte avant de pouvoir effectuer une connexion. Cette configuration se fait dans la page de configuration « Modem » (voir chapitre 3.2.2.4 : « Modem »).
Les paramètres des serveurs à configurer au minimum sont les suivants :
Dans le cas d’une configuration par Ethernet, veiller à ce que les paramètres IP soient compatibles avec l’accès au serveur d’après la configuration du réseau local du concentrateur. Dans le cas d’une connexion par Ethernet, la configuration doit être compatible avec la topologie du réseau local du concentrateur afin qu’il puisse accéder aux serveurs. Cette configuration se fait via la page de configuration « Networks » (voir chapitre 3.2.2.3 : « Réseaux (Networks) »).
Dans le cas d’une connexion par modem, la configuration du modem doit être correcte avant de pouvoir effectuer une connexion. Cette configuration se fait dans la page de configuration « Modem » (voir chapitre 3.2.2.4 : « Modem »).
Les paramètres des serveurs à configurer au minimum sont les suivants :
 Il faut donc configurer les champs : « Interface », « Type », « Server type », « Address », « Port », « Login » et « Password ».
Les autres champs peuvent être laissés aux valeurs par défaut à condition que les répertoires aient été créés correctement auparavant. Voir chapitre 3.1.2 : « Fichiers de configuration » pour plus de détails.
Il faut donc configurer les champs : « Interface », « Type », « Server type », « Address », « Port », « Login » et « Password ».
Les autres champs peuvent être laissés aux valeurs par défaut à condition que les répertoires aient été créés correctement auparavant. Voir chapitre 3.1.2 : « Fichiers de configuration » pour plus de détails.


 Attendre. Le concentrateur va redémarrer avec sa configuration usine.


