Aller au contenu principal
Suchen Sie etwas anderes?
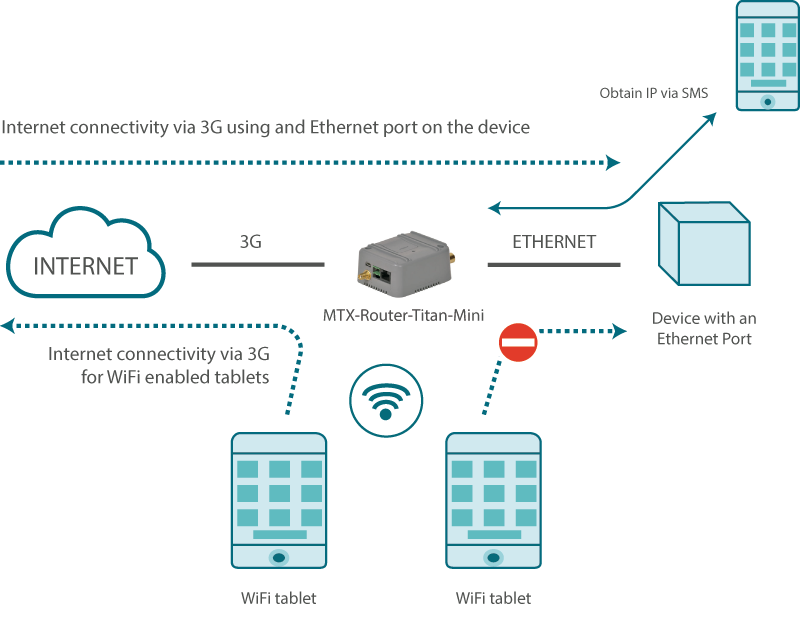
Details of the example scenario:
- We have a device with ETH port which we want to provide with Internet access to send data to the Cloud. The Ethernet device has a local IP address of 192.168.1.70
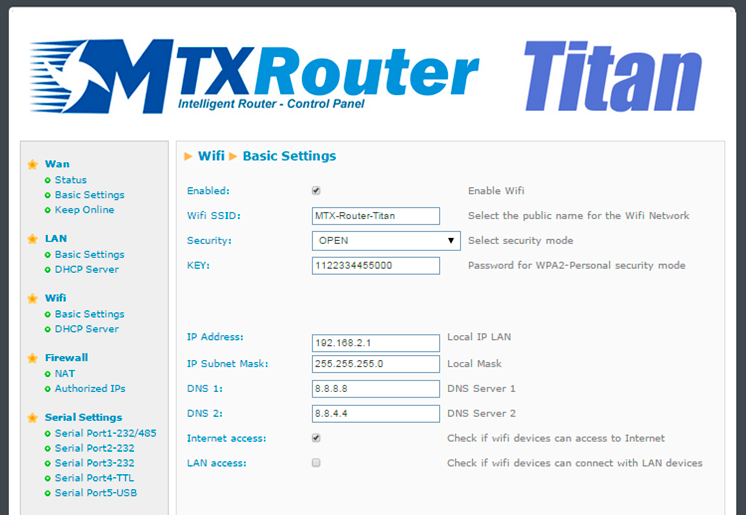
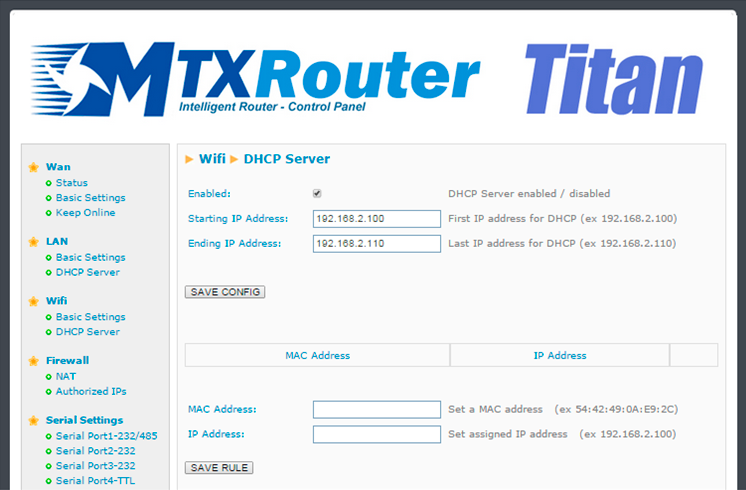
- We should also be able to provide several other WiFi devices (tablets) with Internet access. These devices will connect to the router using DHCP (given they do not have a fixed LAN IP address). The WiFi devices must not have access to the Ethernet device that is connected to the router; we must only provide them with Internet access
- We have to be able to access the router’s configuration remotely in the standard TCP port 80
- A SIM card with a dynamic IP address will be used. We do not want to use services such as DynDNS or No-IP therefore we need to be able to obtain the router’s IP address at any time via a missed call or SMS. Via this IP we will be able to access the router’s configuration at any time
Solution: MTX-Router-Titan mini
Configuration example ready for use:
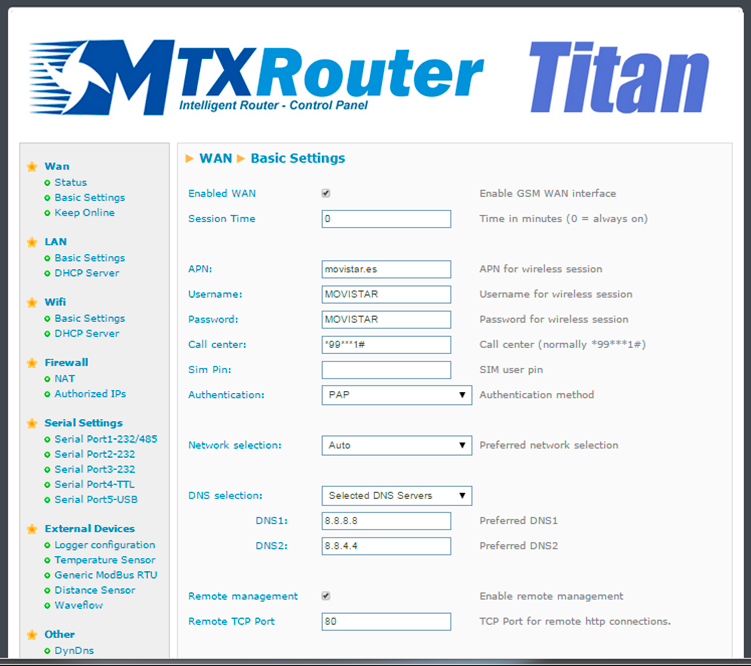
Load the example from the web configuration environment from the menu “Other>Backup/Examples”
Details:
- After the configuration is loaded in our router, we can access the router’s configuration with the default username and password: “admin” and “admin”, and the IP address“192.168.1.2”
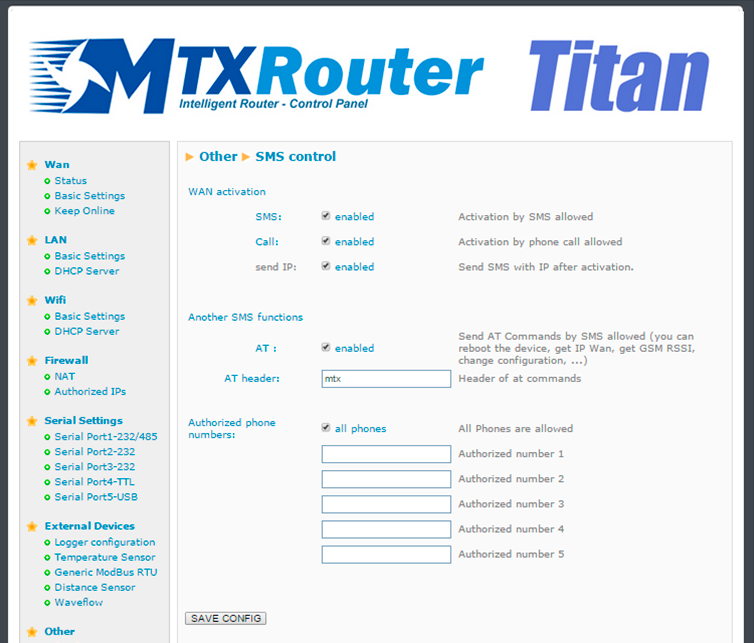
- Check the configuration in “Wan>Basic Settings”, “WiFi>Basic Settings”, “WiFi>DHCP Server”, “Other>Sms Control”
- We must specify the PLC’s Gateway IP address with the router’s LAN IP address: 192.168.1.2
- To obtain the IP address via a missed call, make sure the SIM card voice-calling services are activated. If voice-calling is restricted, it will only be possible to obtain the IP address via an SMS since these are not usually limited, although we should check this too
- Send SMS with “mtx AT+IP” or make a missed call to obtain the MTX router’s current IP address.
 Les accès par défaut sont :
 Saisir le mode de connexion « Ethernet » ou « modem » :
 Dans le cas d’une configuration par Ethernet, veiller à ce que les paramètres IP soient compatibles avec l’accès au serveur d’après la configuration du réseau local du concentrateur. Dans le cas d’une connexion par Ethernet, la configuration doit être compatible avec la topologie du réseau local du concentrateur afin qu’il puisse accéder aux serveurs. Cette configuration se fait via la page de configuration « Networks » (voir chapitre 3.2.2.3 : « Réseaux (Networks) »).
Dans le cas d’une connexion par modem, la configuration du modem doit être correcte avant de pouvoir effectuer une connexion. Cette configuration se fait dans la page de configuration « Modem » (voir chapitre 3.2.2.4 : « Modem »).
Les paramètres des serveurs à configurer au minimum sont les suivants :
Dans le cas d’une configuration par Ethernet, veiller à ce que les paramètres IP soient compatibles avec l’accès au serveur d’après la configuration du réseau local du concentrateur. Dans le cas d’une connexion par Ethernet, la configuration doit être compatible avec la topologie du réseau local du concentrateur afin qu’il puisse accéder aux serveurs. Cette configuration se fait via la page de configuration « Networks » (voir chapitre 3.2.2.3 : « Réseaux (Networks) »).
Dans le cas d’une connexion par modem, la configuration du modem doit être correcte avant de pouvoir effectuer une connexion. Cette configuration se fait dans la page de configuration « Modem » (voir chapitre 3.2.2.4 : « Modem »).
Les paramètres des serveurs à configurer au minimum sont les suivants :
 Il faut donc configurer les champs : « Interface », « Type », « Server type », « Address », « Port », « Login » et « Password ».
Les autres champs peuvent être laissés aux valeurs par défaut à condition que les répertoires aient été créés correctement auparavant. Voir chapitre 3.1.2 : « Fichiers de configuration » pour plus de détails.
Il faut donc configurer les champs : « Interface », « Type », « Server type », « Address », « Port », « Login » et « Password ».
Les autres champs peuvent être laissés aux valeurs par défaut à condition que les répertoires aient été créés correctement auparavant. Voir chapitre 3.1.2 : « Fichiers de configuration » pour plus de détails.


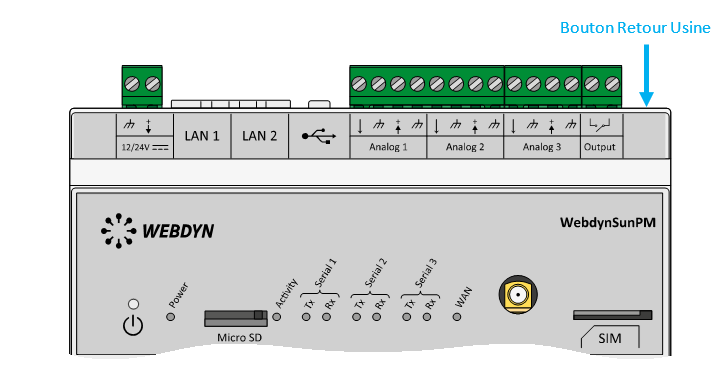 Attendre. Le concentrateur va redémarrer avec sa configuration usine.


