Suchen Sie etwas anderes?
Plugins are small, independent utilities that are included in the Titan routers. If we require a peculiar characteristic that cannot be found in the current characteristics, let us know at iotsupport@mtxm2m.com. Depending on the size of the project, this could be included as a plugin for free.
Given that the plugins are independent utilities, when a copy of the Titan configuration is created, it is not necessary for the plugin section to be replicated.
The Titan routers include watchdog hardware. In the unlikely event of severe problems, such as a blocked device, the watchdog will reset the Titan router completely. However, we must also know what happens when the block occurs in a device that is connected to the router, for example an IP camera, PLC, analyzer, meterological stations, etc.
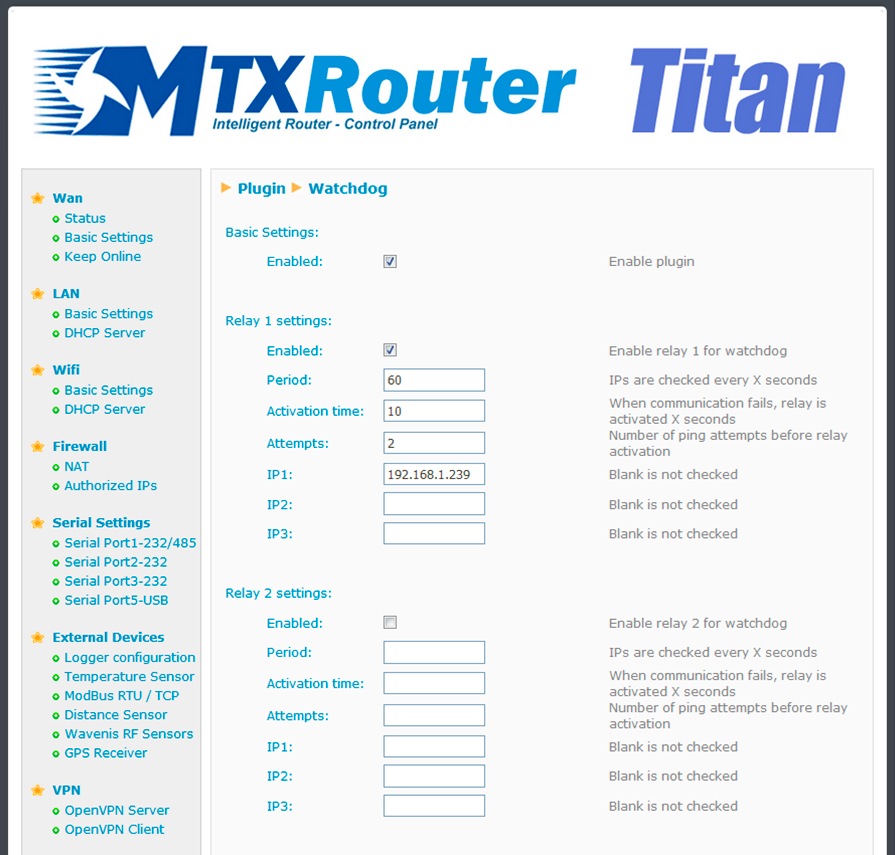
The Watchdog plugin allows a periodic ping to be configured. This will be sent by one of the Titan router’s interfaces (usually Ethernet, but it could also be WiFi or 3G). If the ping fails X times (where X is a configurable variable), a relay can be configured in the Titan device that restarts the external device that has caused the failure, either by carrying out a standard reset or by cutting off its poour supply for a specific period of time.
- Enable Plugin: this option activates the plugin
- Relay1 enable: this option configures Relay 1 so that it is activated when a block is detected in a connected device
- Period: this field specifies the number of seconds between pings made to the device
- Activation time: this field specifies the duration (in seconds) for which the relay should be activated in the event of a block being detected
- Attempts: this field indicates the number of ping attempts that should be made
- IP1, IP2, IP3: in this field, we should indicate the IP address of the device to be supervised
Either one or two relays can be configured, depending on the number included in our device (1 relay for the MTX-Router-Titan mini device and 2 relays for the MTX-Router-Titan device).
 Les accès par défaut sont :
 Saisir le mode de connexion « Ethernet » ou « modem » :
 Dans le cas d’une configuration par Ethernet, veiller à ce que les paramètres IP soient compatibles avec l’accès au serveur d’après la configuration du réseau local du concentrateur. Dans le cas d’une connexion par Ethernet, la configuration doit être compatible avec la topologie du réseau local du concentrateur afin qu’il puisse accéder aux serveurs. Cette configuration se fait via la page de configuration « Networks » (voir chapitre 3.2.2.3 : « Réseaux (Networks) »).
Dans le cas d’une connexion par modem, la configuration du modem doit être correcte avant de pouvoir effectuer une connexion. Cette configuration se fait dans la page de configuration « Modem » (voir chapitre 3.2.2.4 : « Modem »).
Les paramètres des serveurs à configurer au minimum sont les suivants :
Dans le cas d’une configuration par Ethernet, veiller à ce que les paramètres IP soient compatibles avec l’accès au serveur d’après la configuration du réseau local du concentrateur. Dans le cas d’une connexion par Ethernet, la configuration doit être compatible avec la topologie du réseau local du concentrateur afin qu’il puisse accéder aux serveurs. Cette configuration se fait via la page de configuration « Networks » (voir chapitre 3.2.2.3 : « Réseaux (Networks) »).
Dans le cas d’une connexion par modem, la configuration du modem doit être correcte avant de pouvoir effectuer une connexion. Cette configuration se fait dans la page de configuration « Modem » (voir chapitre 3.2.2.4 : « Modem »).
Les paramètres des serveurs à configurer au minimum sont les suivants :
 Il faut donc configurer les champs : « Interface », « Type », « Server type », « Address », « Port », « Login » et « Password ».
Les autres champs peuvent être laissés aux valeurs par défaut à condition que les répertoires aient été créés correctement auparavant. Voir chapitre 3.1.2 : « Fichiers de configuration » pour plus de détails.
Il faut donc configurer les champs : « Interface », « Type », « Server type », « Address », « Port », « Login » et « Password ».
Les autres champs peuvent être laissés aux valeurs par défaut à condition que les répertoires aient été créés correctement auparavant. Voir chapitre 3.1.2 : « Fichiers de configuration » pour plus de détails.


 Attendre. Le concentrateur va redémarrer avec sa configuration usine.


