Suchen Sie etwas anderes?
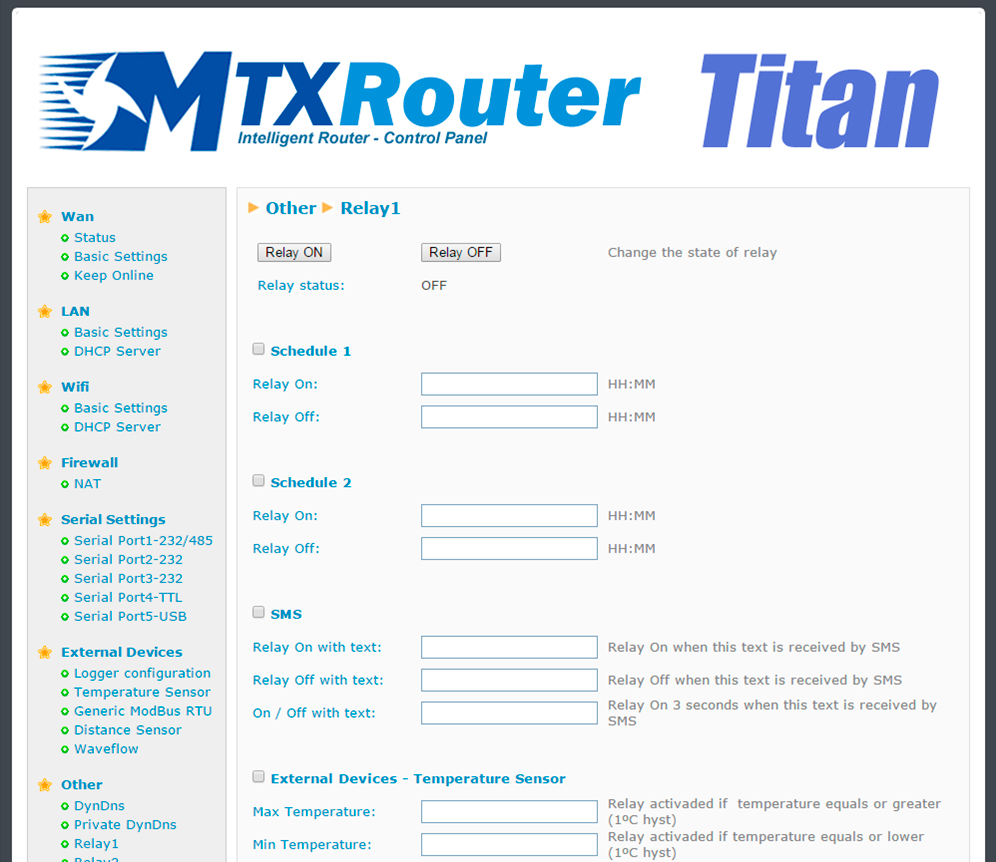
The MTX-Router-Titan II, MTX-Router-Titan and MTX-Router-Titan mini devices contain relays. These relays can be changed manually via a web console, Telnet, and SMS, as well as via temporization or according to a measured temperature or distance. The different configurations are applied to each relay independently; i.e. each relay can be configured in a different way.
- Schedule1: activate this option if we wish to use schedule 1
- Schedule1 > Relay on: indicates the time the relay for schedule 1 shall change
- Schedule1 > Relay off: indicates the time the relay for schedule 1 shall change
- Schedule2: activate this option if we wish to use schedule 2
- Schedule2 > Relay on: indicates the time the relay for schedule 2 shall change
- Schedule2 > Relay off: indicates the time the relay for schedule 2 shall change
- SMS: activate this option if we wish to change relays by sending an SMS
- SMS > Relay On with text: SMS text used to activate the relay
- SMS > Relay Off with text: SMS text used to deactivate the relay
- SMS > On / Off with text: SMS text used to activate the relay for 3 seconds. Used to carry out resets of external devices with just one SMS
- External Devices > Temperature Sensor: activate this option if we wish to change a relay according to the temperature of a sensor connected to the router’s serial port
- External Devices > Temperature Sensor > Max Temperature: maximum temperature, after which the relay is activated. The hysteresis is 1 degree
- External Devices > Temperature Sensor > Min Temperature: minimum temperature, after which the relay is activated. The hysteresis is 1 degree
- External Devices > Distance Sensor: activate this option if we wish to change a relay according to the distance of a Maxbotix sensor connected to the router’s serial port
- External Devices > Distance Sensor > Max Distance: maximum distance, after which the relay is activated. The hysteresis is 25cm
- External Devices > Distance Sensor > Min Distance: minimum distance, after which the relay is activated. The hysteresis is 25cm
- Jamming detection: activate this option if we want to change the relays when suspect jamming (GSM inhibitor) is detected
- Jamming > Seconds: how often the relay should be activated after suspect jamming is detected
- Astronomical clock: activate this option if we wish to change relays via an astronomical clock (the exact time of sunrise or sunset)
- Astronomical clock > Titan Latitude: in this field indicate the latitude of where the Titan is located for the astronomical clock calculations
- Astronomical clock > Titan Longitude: in this field indicate the longitud of where the Titan is located for the astronomical clock calculations
- Movement Detection: activate this option if we wish to change the relay when movement is detected (only available for Titan mini models)
- Movement Detection > Seconds: time (in seconds) during which the relay will be active after detecting movement
- GPS Area: activate this option if we wish to change the relay when the Titan router is located within a GPS area defined in the section “External Devices > GPS Receiver”
- BTC (Experimental): activate this option if we wish to change the relay when a bank transfer is detected in a specified Bitcoin address
- BTC > Address: incoming Bitcoin address
- BTC > Confirmations: number of necessary confirmations
- BTC > Price: number of Bitcoins per second that activate the relay. For example, if the price is 0.001, an incoming transfer of 0.060 BTC would activate the relay for 60 seconds
- Logger: activate this option if we wish to register and send the changes of a relay to our website via a JSON object
ADDITIONAL NOTES
- Once the configuration is finished, click “SAVE CONFIG” to save the changes. Remember that the router should be restarted for the changes to take effect.
- Sample format of the JSON string sent:
{“IMEI”:”354740050367237”,”TS”:”17/02/2014 19:02:46”,”TYPE”:”RELAY”,“P”:”1234”,”ID”:1,”VAL”:0,”WHY”,”AT”,WHYH”,””}
Where:
– IMEI: router’s ID number. Unique for each device
– TS: time stamp DD:MM:YYYY HH:MM:SS
– TYPE: type of string. In this case modbus
– P: logger’s ID field (External Devices > Logger configuration)
– ID: relay ID (0 or 1)
– WHY: reason why the relay has been changed
– “SCHE1” > relay changed because of Schedule 1
– “SCHE2” > relay changed because of Schedule 2
– “TEMP” > relay changed because of temperature
– “DIST” > relay changed because of distance
– “AT” > relay changed because of AT command
– “JAMM” > relay changed because of suspect jamming
– “ACCEL” > relay changed because of detected movement
– “GPS” > relay changed because of the GPS cell
– “ASTRO” > relay changed because of the astronomic relay
– “BITCOIN” > relay changed because of a received transfer
– WHYH: if the relay has been changed due to temperature or distance, indicate the temperature or distance that caused the change
 Les accès par défaut sont :
 Saisir le mode de connexion « Ethernet » ou « modem » :
 Dans le cas d’une configuration par Ethernet, veiller à ce que les paramètres IP soient compatibles avec l’accès au serveur d’après la configuration du réseau local du concentrateur. Dans le cas d’une connexion par Ethernet, la configuration doit être compatible avec la topologie du réseau local du concentrateur afin qu’il puisse accéder aux serveurs. Cette configuration se fait via la page de configuration « Networks » (voir chapitre 3.2.2.3 : « Réseaux (Networks) »).
Dans le cas d’une connexion par modem, la configuration du modem doit être correcte avant de pouvoir effectuer une connexion. Cette configuration se fait dans la page de configuration « Modem » (voir chapitre 3.2.2.4 : « Modem »).
Les paramètres des serveurs à configurer au minimum sont les suivants :
Dans le cas d’une configuration par Ethernet, veiller à ce que les paramètres IP soient compatibles avec l’accès au serveur d’après la configuration du réseau local du concentrateur. Dans le cas d’une connexion par Ethernet, la configuration doit être compatible avec la topologie du réseau local du concentrateur afin qu’il puisse accéder aux serveurs. Cette configuration se fait via la page de configuration « Networks » (voir chapitre 3.2.2.3 : « Réseaux (Networks) »).
Dans le cas d’une connexion par modem, la configuration du modem doit être correcte avant de pouvoir effectuer une connexion. Cette configuration se fait dans la page de configuration « Modem » (voir chapitre 3.2.2.4 : « Modem »).
Les paramètres des serveurs à configurer au minimum sont les suivants :
 Il faut donc configurer les champs : « Interface », « Type », « Server type », « Address », « Port », « Login » et « Password ».
Les autres champs peuvent être laissés aux valeurs par défaut à condition que les répertoires aient été créés correctement auparavant. Voir chapitre 3.1.2 : « Fichiers de configuration » pour plus de détails.
Il faut donc configurer les champs : « Interface », « Type », « Server type », « Address », « Port », « Login » et « Password ».
Les autres champs peuvent être laissés aux valeurs par défaut à condition que les répertoires aient été créés correctement auparavant. Voir chapitre 3.1.2 : « Fichiers de configuration » pour plus de détails.


 Attendre. Le concentrateur va redémarrer avec sa configuration usine.


