Suchen Sie etwas anderes?
Table of Contents
Scene Details
Every day are more common applications of telecontrol, meter telemetry etc. In mny of these scenarios an IP connection is required from one or more control stations to the modem, which the device to be read is connected. Sometimes this type of communication is not possible, because the GSM operator does not allow or block that connectivity (from the control station to the modems) for multiple reasons.
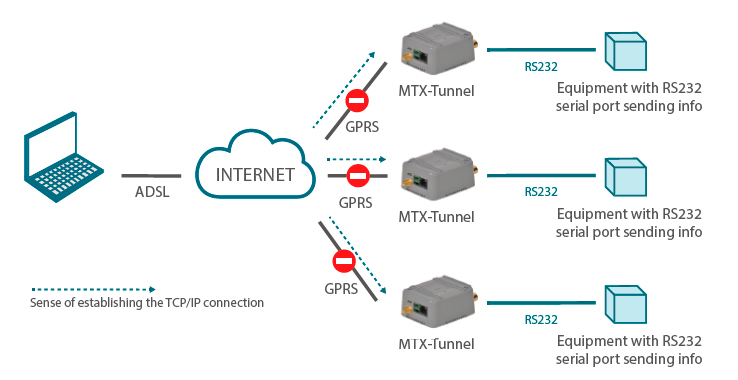
What is always possible to do is to establish a connection FROM the modem TO the control station. Unfortunately, although the connection is possible, many software applications are only prepared to make an ip connection TO a counter, and not to accept connections from them.
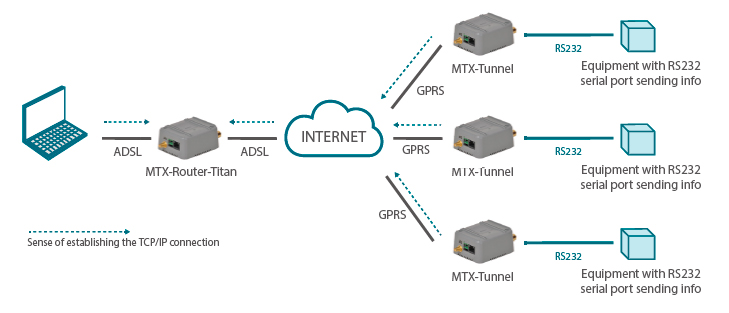
Trying to solve these problems the plugin NoNAT in the router Titan has been implemented, that allows to be intermediary between a modem and a control software. That is, the modem will be connected to the Titan router as well as the control software will connect to the Titan router, making it an intermediary.
Required Hardware
- MTX-Router-Titan-3G-mini or NRX-Router-TItan (only Ethernet) as required
MTX-Router-3G-Titan Configuration
The first step to carry out this practice is the configuration of the MTX-Router-3G-Titan. To do this, connect a network cable between your PC and the Titan router. Then open your Internet browser. The router has by default the static IP address 192.168.1.2, so you must configure your PC with a static IP within the range 192.168.1.X, for example configure on your PC the LAN address 192.168.1.10
Once you have done that, type in the address bar of your browser http://192.168.1.2 and go directly to the next router configuration start screen. The default username and password are: admin/admin, so enter that data and press the LOGIN button.
In this example we will assume that it will not use the 3G network, but the router will be used internally within an office, using as an ethernet output a router, fiber or ADSL router.
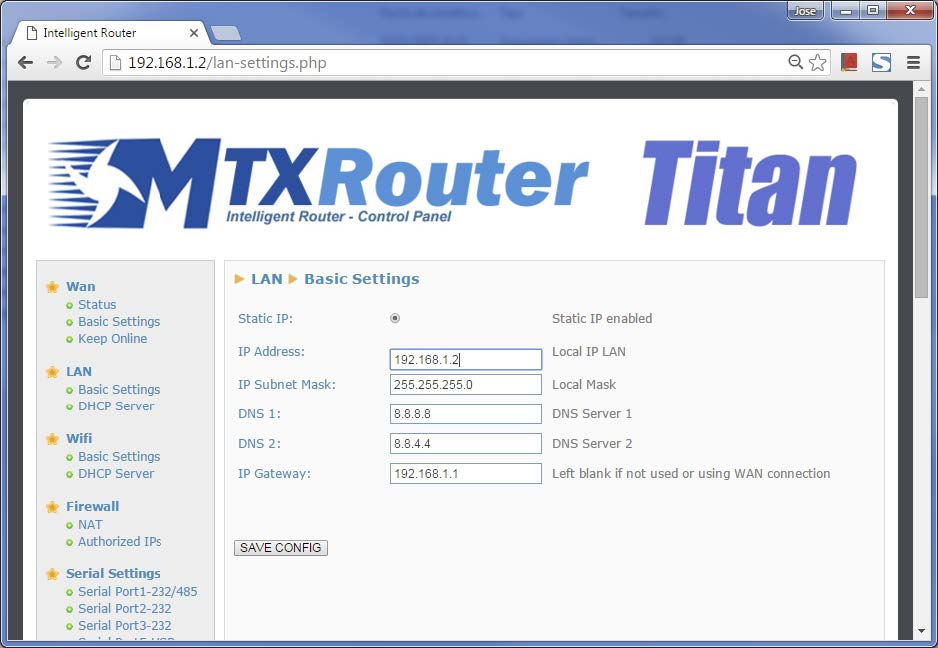
To do this, simply go to the LAN> Basic Settings section and configure the IP LAN of the router you want (default 192.168.1.2) and enter the IP address of the router\’s cable/ fiber/adsl router. Of course, this application assumes that your cable/fiber/adsl router has a fixed and public IP address.
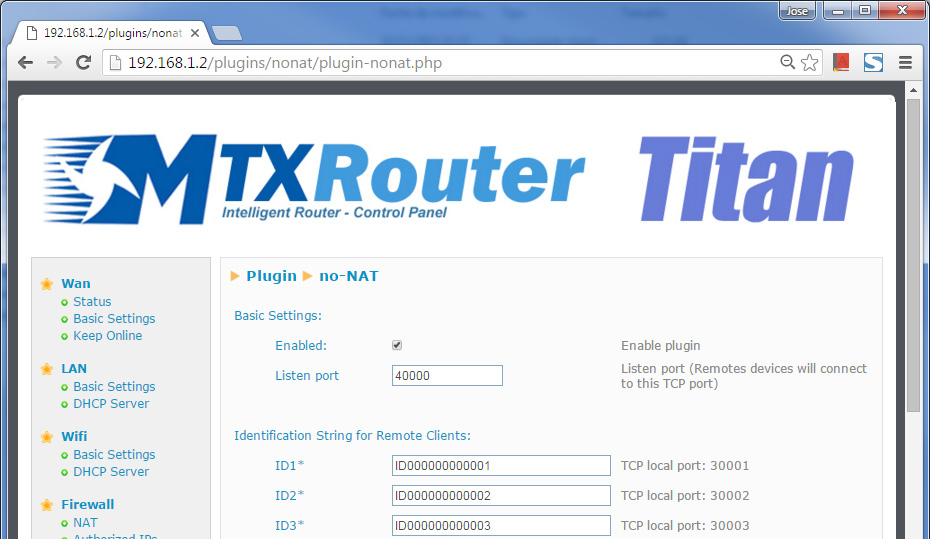
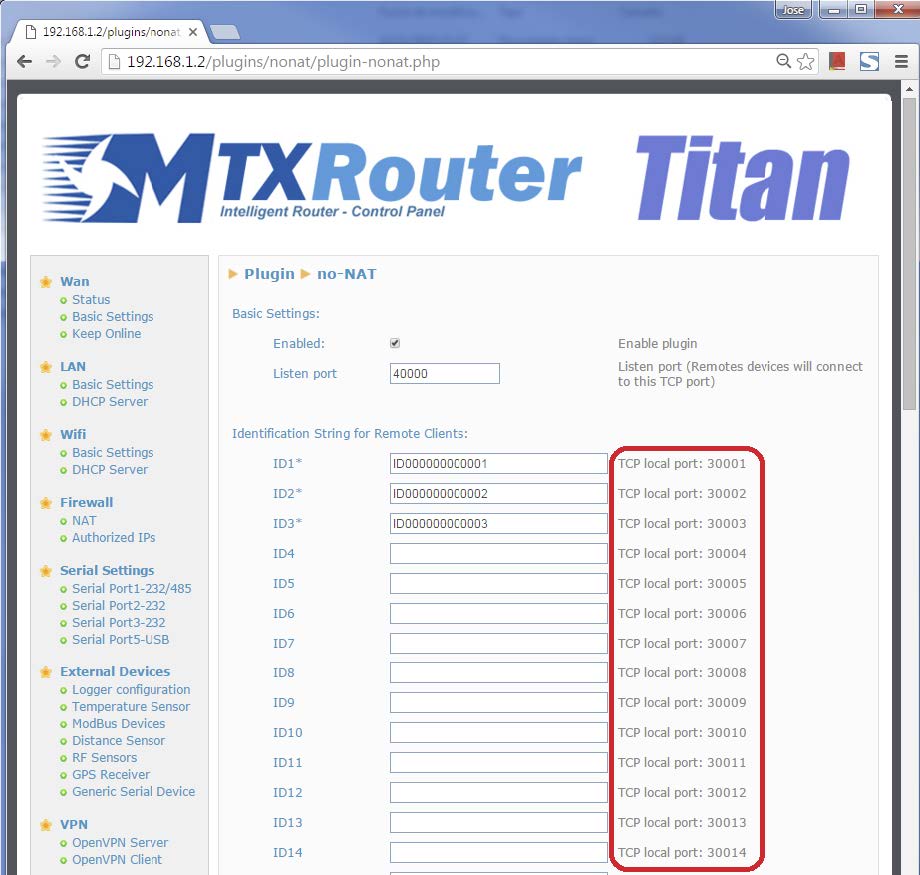
Now configure the Plugins > No-NAT section. To do this, choose a TCP port to which all MTX-Tunnel modems will need to be connected. For example, you can choose TCP port 40000. Remember that you need to make NAT on your company\’s cable/adsl/fiber router by mapping the TCP port 40000 to the LAN IP address of the titan router, in this example case to the IP address 192.168.1.2.
Then simply set up an ID for each MTX-Tunnel. That is, for example, a configuration file for the MTXTunnel ID1 would look something like:
GPRS_apn: movistar.es
GPRS_login: MOVISTAR
GPRS_password: MOVISTAR
GPRS_timeout: 0
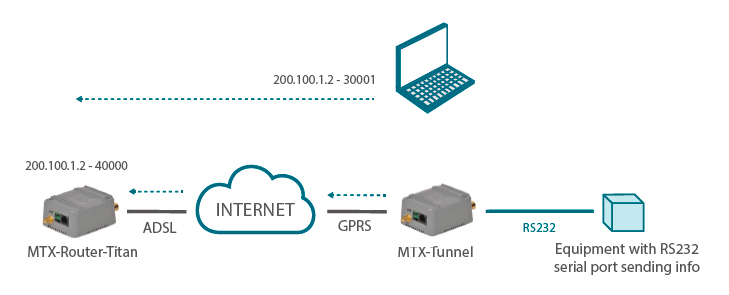
TCP_IP: 200.100.1.2
TCP_port: 40000
SMS_sendIP: on
SMS_allphones: on
SMS_ATEnabled: on
SMS_ATResponse: on
Where in MTX_IDClient you have to indicate the modem identifier as 1 (equivalent to a passsword), in TCP_IP the public IP address of the adsl/cable/fiber router of the company and in TCP_port the chosen port mentioned above.
All MTX-Tunnel modems should have the same configuration file, with the exception of the identifying parameter MTX_IDClient, which must be different for each modem.
Once all configured, restart the Titan router. Note that each modem has a TCP port assigned to it. In your company\’s adsl / fiber / cable router you will also need to make NAT from those ports to the Lan IP address of the Titan rotuer (in the case of example 192.168.1.2).
Testing the No-Nat Plugin
Trying the plugin is very simple. Once you have everything configured on the Titan router (and having rebooted this one), power the MTX-Tunnel you have connected to the device to read (eg an electric meter). Then, wait a few seconds for the MTX-Tunnel to connect to the GPRS / 3G network.
You can then use your control software. If your control PC is within the same LAN where the Titan router is connected, configure your software to perform telemetry of the device connected to address 192.168.1.2 and TCP port30001. If you are testing from a PC that is located In a network other than the TITAN router, connect to the public IP address of the adsl / cable / fiber router and port 30001. In the case of the example, IP 200.100.1.2 (the same as the MTX-Tunnel) and Port 30001.
Testing the MTX-Router-Titan from within the office:
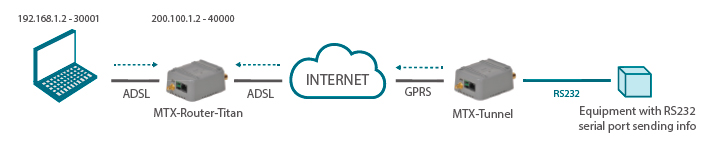
Testing the MTX-Router-Titan from outside the office:
It is interesting to see the lower part of the screen where a summary of the Modbus TCP registers mapping is included.
Once the router is configured, we must reset the device so that the new configuration becomes active.

 Enter the “ethernet” or “modem” connection type:
 For an ethernet configuration, make sure the IP parameters are compatible with server access according to the concentrator local network configuration. For an ethernet connection, the configuration must be compatible with the concentrator’s local network topology so that it can access the servers. This configuration is done from the “Networks” configuration page (see section 3.2.2.3: “Networks”).
For a modem connection, the modem configuration must be correct before a connection can be set up. This configuration is done from the “Modem” configuration page (see section 3.2.2.4: “Modem”).
The parameters for the servers to be configured are at least the following:
For an ethernet configuration, make sure the IP parameters are compatible with server access according to the concentrator local network configuration. For an ethernet connection, the configuration must be compatible with the concentrator’s local network topology so that it can access the servers. This configuration is done from the “Networks” configuration page (see section 3.2.2.3: “Networks”).
For a modem connection, the modem configuration must be correct before a connection can be set up. This configuration is done from the “Modem” configuration page (see section 3.2.2.4: “Modem”).
The parameters for the servers to be configured are at least the following:
 Therefore the following fields need to be configured: “Interface”, “Type”, “Server type”, “Address”, “Port”, “Login” and “Password”.
The other fields can be left at the default values subject to the directories having been properly created beforehand. See section 3.1.2: “Configuration files” for more details.
Therefore the following fields need to be configured: “Interface”, “Type”, “Server type”, “Address”, “Port”, “Login” and “Password”.
The other fields can be left at the default values subject to the directories having been properly created beforehand. See section 3.1.2: “Configuration files” for more details.


 Wait. The concentrator will reboot using its factory configuration.


