Suchen Sie etwas anderes?
Table of Contents
Management
Configure WEB server parameters.

Protocol: This feature allows you to manage the router using either HTTP protocol or the HTTPS protocol.
Local Web GUI port: Set the access port of the WEB server. For example, when the gateway address is 192.168.1.1 and set the server port 1010, you will enter the address bar in the http://192.168.1.1:1010 to access the WEB configuration page. The default port for the server is 80.

Telnet: Enable or disable Telnet server.
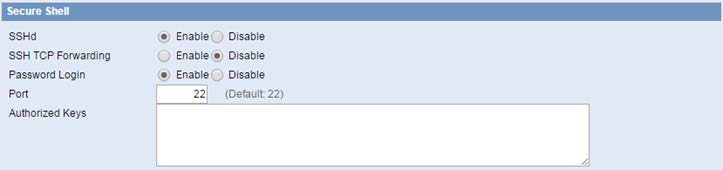
SSH TCP Forwarding: Enable or disable to support the TCP forwarding.
Password Login: Allows login with the router password (username is admin).
Port: port number for SSHd (default is 22).
Authorized Keys: Here users paste their public keys to enable key-based login (more secure than a simple password).

Remote Access: This feature allows you to manage the router from a remote location, via the Internet. To disable this feature, keep the default setting, Disable. To enable this feature, select Enable, and use the specified port (default is 8080) on your PC to remotely manage the router. You must also change the router’s default password, if you haven’t . To remotely manage the router, enter http://xxx.xxx.xxx.xxx:8080 (the x’s represent the router’s Internet IP address, and 8080 represents the specified port) in web browser’s address field. You will be asked for the router’s password.
If use https, need to specify the url as https://xxx.xxx.xxx.xxx:8080 (not all firmwares does support this without rebuilding with SSL support).
SSH Management: Enable SSH to remotely access the router by Secure Shell.
Telnet Management: Enable SSH to remotely access the router.
NOTE: If the Remote Router Access feature is enabled, anyone who knows the router’s Internet IP address and password will be able to alter the router’s settings.
Location: Equipment location.
Contact: Contact this equipment management.
Name: Device name.
RO Community: SNMP RO community name, the default is public, Only to read.
RW Community: SNMP RW community name, the default is private, Read-write permissions.