Skip to main content
Suchen Sie etwas anderes?
The MTX-Router-Titan and MTX-Router-Titan mini can act as an OpenVPN server. By using a VPN service, all devices connected to the router’s Ethernet bus or the IP-RS232/485/USB gateways can be securely accessed from the othe rend of the VPN network. A VPN service is also useful to avoid problems generated from the use of proxies, firewalls, etc. and especially when using SIM cards that use IP addresses in the range 10.x.x.x
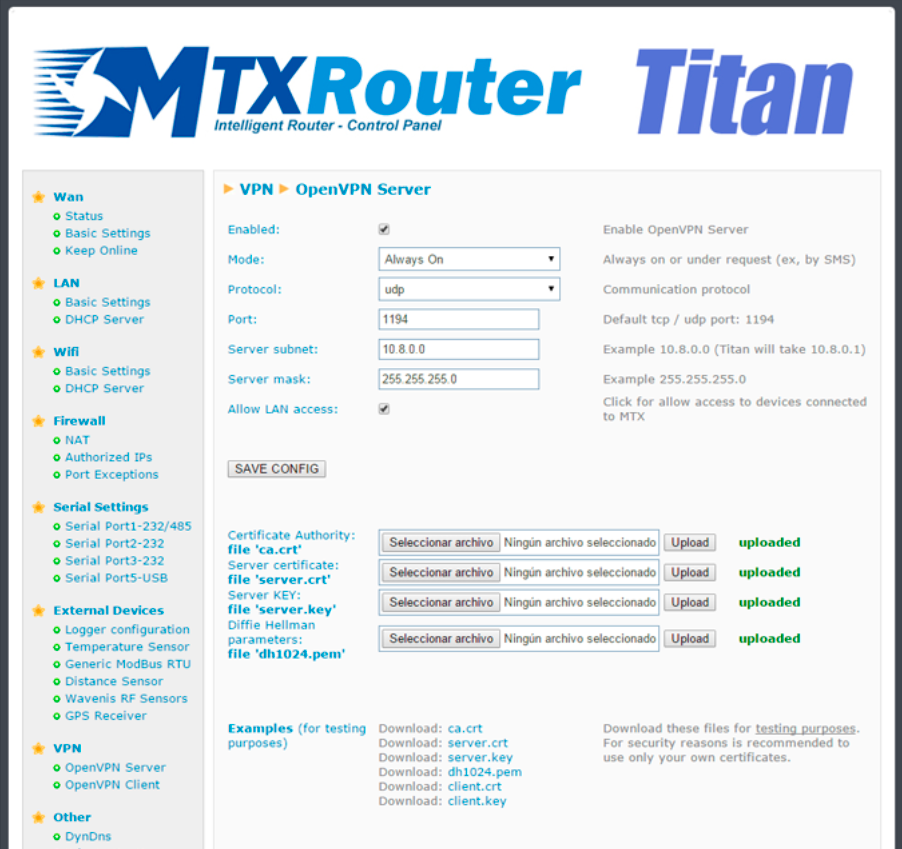
- Enabled: select this box if we wish to activate the OpenVN service in Server mode
- Mode: “Always On” will keep the VPN active. “Under Request” will activate the VPN for the time we require. This option could be used for maintenance. To activate the VPN service we will need to send an AT command via SMS, Telnet, Webserver, SNMP or Modbus TCP. Once the time configured has passed, the VPN will be disconnected
- Protocol: establish the protocol for the activation of the VPN service. Either UDP or TCP
- Port: the standard port is 1194 but we can change this in this field
- Server Subnet: indicates the subnet that will be created when the VPN is activated. If a value of 10.8.0.0 is used, the device will adopt the address 10.8.0.1 once the VPN is activated
- Server Mask: indicate the server mas to be applied to the VPN
- Allow LAN access: select this option if we wish to be able to access remotely the devices connected to the router’s Ethernet port. Do not activate this option if we only want to access the router and the IP/RS232/485/USB gateways controlled by the router
- Necessary files for OpenVPN
- In order to be able to use the MTX-Router-Titan devices as an OpenVPN server, we will need to create and update the following files: ca.crt (certificate of authenticity), server.crt (server certificate), server.key (server private key) and dh1024.pem (Diffie Hellman parameters)
Towards the bottom of the screen we will see that we can download example files. These must only be used in test mode. In real applications we should always generate our own certificates.
ADDITIONAL NOTES
- Once the configuration is complete, press the “SAVE CONFIG” button to save the changes. Remember that the router should be reset in order for the changes to take effect

 Enter the “ethernet” or “modem” connection type:
 For an ethernet configuration, make sure the IP parameters are compatible with server access according to the concentrator local network configuration. For an ethernet connection, the configuration must be compatible with the concentrator’s local network topology so that it can access the servers. This configuration is done from the “Networks” configuration page (see section 3.2.2.3: “Networks”).
For a modem connection, the modem configuration must be correct before a connection can be set up. This configuration is done from the “Modem” configuration page (see section 3.2.2.4: “Modem”).
The parameters for the servers to be configured are at least the following:
For an ethernet configuration, make sure the IP parameters are compatible with server access according to the concentrator local network configuration. For an ethernet connection, the configuration must be compatible with the concentrator’s local network topology so that it can access the servers. This configuration is done from the “Networks” configuration page (see section 3.2.2.3: “Networks”).
For a modem connection, the modem configuration must be correct before a connection can be set up. This configuration is done from the “Modem” configuration page (see section 3.2.2.4: “Modem”).
The parameters for the servers to be configured are at least the following:
 Therefore the following fields need to be configured: “Interface”, “Type”, “Server type”, “Address”, “Port”, “Login” and “Password”.
The other fields can be left at the default values subject to the directories having been properly created beforehand. See section 3.1.2: “Configuration files” for more details.
Therefore the following fields need to be configured: “Interface”, “Type”, “Server type”, “Address”, “Port”, “Login” and “Password”.
The other fields can be left at the default values subject to the directories having been properly created beforehand. See section 3.1.2: “Configuration files” for more details.


 Wait. The concentrator will reboot using its factory configuration.


