Photovoltaic self-consumption: why smart management is the key to profitability

Solar Self-Consumption: Why Smart Energy Management Is Key to Maximising PV Performance

As energy prices continue to fluctuate and energy independence becomes an increasingly important priority, photovoltaic (PV) self-consumption is gaining momentum. For businesses, industrial facilities and energy communities, using locally generated solar electricity is an effective way to reduce reliance on the grid, optimise energy costs and improve the overall profitability of a solar installation.

However, installing solar panels is only the first step. To unlock the full potential of self-consumption, energy production and consumption must be intelligently coordinated.

This is where smart energy management and solutions such as the WebdynSunPM make a difference.

1. Understanding photovoltaic self-consumption

Photovoltaic self-consumption refers to using the electricity generated by a solar installation directly, rather than exporting all the energy to the grid.

The objective is simple: maximise the share of locally produced electricity that is consumed on-site, reducing the need to purchase electricity from the grid.

There are several self-consumption models:

  • Individual self-consumption: electricity is generated and consumed within a single site, such as an industrial building, commercial facility or residential property.

  • Collective self-consumption: several consumers share electricity generated by one or more local PV installations. This model enables energy to be distributed among multiple buildings, businesses or users.

  • Partial self-consumption with grid injection: the electricity produced is used locally whenever possible, while any surplus is exported to the grid.

Each model offers different opportunities and requires an appropriate approach to energy monitoring, regulation and control.

2. The challenges of self-consumption without intelligent control

A photovoltaic installation does not automatically guarantee optimal self-consumption.

Without an effective energy management strategy, production and consumption may not be properly synchronised. Solar electricity is often generated during the middle of the day, while a site’s energy demand may follow a completely different pattern.

This mismatch can lead to several challenges:

  • Unmanaged energy surpluses: excess solar production is exported to the grid, sometimes at a lower value than the cost of purchasing electricity.

  • Peak grid consumption: electricity may still need to be purchased during periods when local production is insufficient.

  • Production and consumption mismatches: energy is generated when it is not needed and purchased when it could potentially have been produced or stored locally.

  • Limited visibility: without accurate monitoring, operators may struggle to identify inefficiencies and optimise the installation.

These limitations can significantly affect the financial performance of a PV project.

The challenge is therefore not simply to produce more solar energy, but to make better use of the energy already available.

3. Intelligent energy management: turning solar production into value

Intelligent energy management helps bridge the gap between photovoltaic production and actual consumption.

By collecting real-time data from inverters, energy meters and other connected equipment, an energy management system can monitor the installation, analyse energy flows and apply control strategies according to the site’s requirements.

Depending on the installation configuration and available equipment, intelligent control can help to:

  • Synchronise production and consumption: align energy generation with the site’s actual energy demand.

  • Prioritise energy usage: direct available solar energy towards selected equipment or applications.

  • Manage surplus production: activate flexible loads or energy storage systems when excess production is available.

  • Control grid injection: regulate the power exported to the grid to comply with contractual or regulatory requirements, including zero-injection configurations.

  • Optimise energy flows: adapt power distribution according to predefined operating strategies.

  • Improve energy visibility: provide detailed data to support operational decisions and identify opportunities for improvement.

The result is a smarter, more flexible photovoltaic installation, designed to make the most of every kilowatt-hour produced.

4. Individual vs. collective self-consumption: different models, different control requirements

Although individual and collective self-consumption share the same objective of maximising the value of locally generated renewable electricity, their technical requirements can differ considerably.

Individual self-consumption: simplicity and direct control

In an individual self-consumption model, a single site consumes the electricity generated by its own photovoltaic installation.
This configuration generally offers:

  • Simplified energy management.
  • Direct control over production and consumption.
  • Easier implementation of monitoring and regulation strategies.
  • Greater visibility over the site’s energy performance.


However, its effectiveness depends heavily on the site’s consumption profile. When production exceeds demand, surplus energy may be injected into the grid unless storage or flexible consumption solutions are available.

Intelligent control can help improve the balance between generation and demand, making the installation more efficient.

Collective self-consumption: sharing energy across multiple users

Collective self-consumption takes this concept further by bringing together several consumers who share electricity generated by a common photovoltaic installation.

This model can involve multiple buildings, businesses, public facilities or residential users. It creates opportunities to pool energy demand, improve local energy utilisation and develop new energy-sharing arrangements.

However, it also introduces additional technical and operational challenges:

  • Coordination between multiple consumers and production sites.

  • More complex energy-flow monitoring.

  • Allocation and traceability of shared electricity.

  • Dynamic management of production and consumption.

  • Compliance with applicable regulatory and contractual frameworks.

In this context, accurate data acquisition and reliable energy monitoring are essential to ensure that the system operates efficiently.

Whether individual or collective, self-consumption requires a robust monitoring and control infrastructure to deliver its full potential.

WebdynSunPM: an advanced energy control gateway
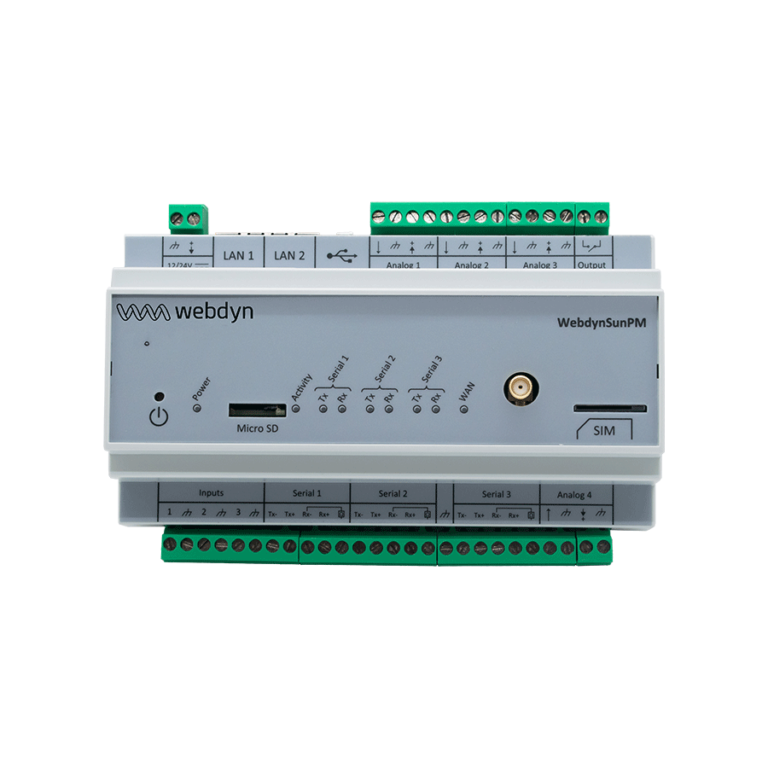
To optimise self-consumption, operators need reliable information and effective control over their photovoltaic installations.

WebdynSunPM is an intelligent PV plant controller designed to monitor, collect and manage data from photovoltaic installations. Acting as an on-site energy management solution, it connects the different components of a solar installation and enables advanced monitoring and control strategies.

Thanks to its multi-protocol communication capabilities and compatibility with a wide range of inverters, meters and other equipment, WebdynSunPM provides a central point for collecting and managing operational data.

Optimization of self-consumption

Self-consumption is now at the heart of corporate energy strategies. Generating energy is no longer enough: above all, it must be consumed intelligently.

WebdynSunPM enables:

  • production to be tailored to the site’s actual needs,
  • energy losses to be minimised,
  • and the value of the electricity generated to be maximised.

This approach directly improves the overall profitability of the installation.
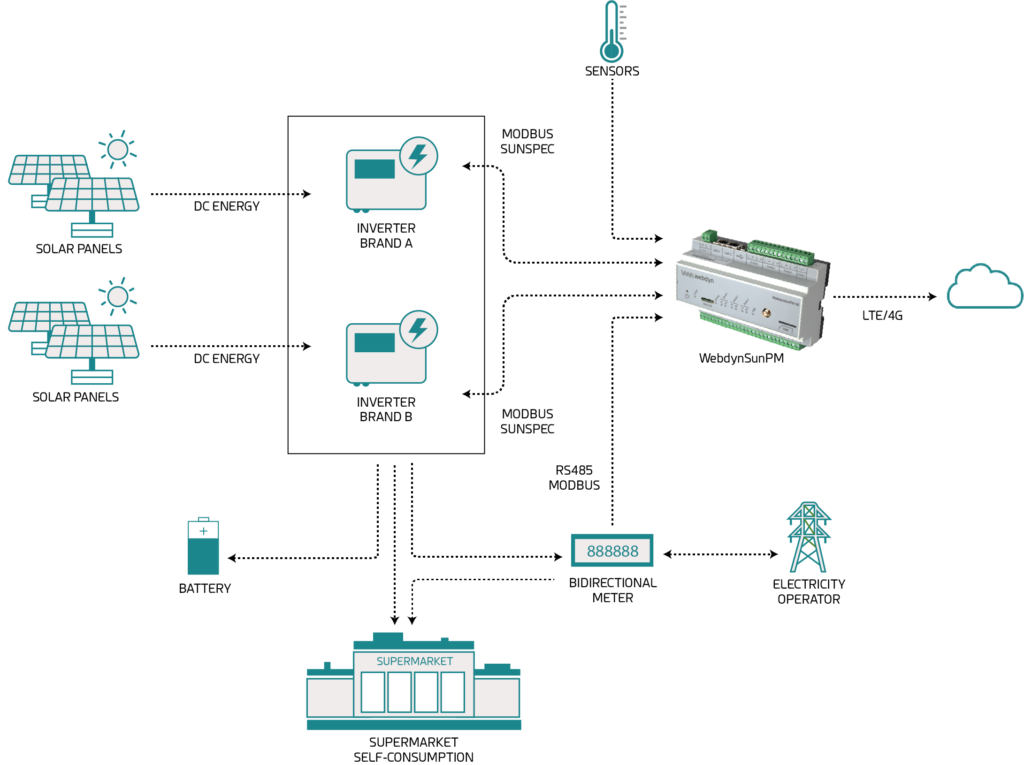
Autoconsummation-Supermarket-diagram English NEW

Its capabilities support several key aspects of self-consumption optimisation:

Real-time data acquisition and monitoring

WebdynSunPM collects data from connected equipment, providing detailed visibility into photovoltaic production, energy consumption and grid exchanges. This information helps operators understand how energy is generated and used across the installation.

Intelligent power regulation

Through configurable control strategies and dedicated scripts, WebdynSunPM can adapt the operation of a PV installation to specific energy management requirements, including power limitation and zero-injection applications.

Optimisation of energy flows

By monitoring production and consumption data, WebdynSunPM provides the information and control capabilities needed to implement strategies that improve the use of locally generated electricity.

Integration with energy storage systems

As photovoltaic installations increasingly incorporate battery storage, the ability to communicate with different devices and manage energy flows becomes even more important. WebdynSunPM supports the development of more flexible PV and storage architectures, depending on equipment compatibility and configuration.

Adaptability to different project requirements

From commercial and industrial rooftops to larger utility-scale installations, WebdynSunPM offers flexible integration possibilities to address different PV monitoring and control requirements.

By bringing together connectivity, data acquisition and on-site control, WebdynSunPM helps turn photovoltaic installations into smarter, more manageable energy systems.

Measuring the economic benefits of intelligent self-consumption

The financial value of self-consumption depends on several factors, including electricity prices, the site’s consumption profile, PV production, grid tariffs, export compensation and the availability of energy storage.

Intelligent energy management can contribute to improving the economic performance of an installation through several mechanisms:

  • Increasing the proportion of solar electricity consumed locally.

  • Reducing electricity purchases from the grid.

  • Limiting unnecessary energy injection.

  • Improving the utilisation of available photovoltaic production.

  • Supporting better-informed operational decisions.

Even relatively small improvements in the alignment between production and consumption can have a meaningful impact over the lifetime of a PV installation.

To assess these benefits accurately, operators should monitor key performance indicators such as:

  • Self-consumption rate: the proportion of PV electricity generated that is consumed locally.

  • Self-sufficiency rate: the proportion of total electricity demand covered by local PV production.

  • Grid import and export: the volume of electricity purchased from and injected into the grid.

  • Peak power: the maximum power drawn from or injected into the grid.

  • Energy yield: the amount of electricity generated by the PV installation.

These indicators provide a clear picture of the installation’s performance and help identify opportunities for continuous optimisation.

SMARTER CONTROL FOR MORE PROFITABLE SOLAR ENERGY

Photovoltaic self-consumption is much more than a way to use renewable electricity locally. It is a strategic approach to improving energy independence, controlling electricity costs and maximising the value of solar investments.

However, achieving these objectives requires more than photovoltaic panels alone. Reliable data acquisition, accurate monitoring and intelligent control are essential to ensure that production and consumption work together as efficiently as possible.

Whether for individual or collective self-consumption, WebdynSunPM provides the connectivity, monitoring and on-site control capabilities needed to support smarter photovoltaic energy management.

A question, need a quotation? Contact us.

  • This field is for validation purposes and should be left unchanged.

Appendices and other documents

Product End of Life cycle

FAQ

No, the concentrator is not able to decrypt data from WM-BUS equipment because it does not have a safe on board to guarantee the security of the encryption keys of your equipment. The recovered data is deposited without modification (without decryption) by the concentrator on your remote server.
Please check these items in this order:
  • the battery level: if the battery level is too low or empty, the product will not run properly or not run at all.
  • Modem reception level: a bad signal at the modem may also prevent the hub from uploading files. Look to move the product or install an external antenna to improve signal quality.
  • The last configuration file: a bad configuration file can block the product.

Remotely, by checking the regularly uploaded files if the product configuration is correct.

On site, by passing the magnet over the product, you will hear 3 short beeps.

Replace the product and inject the configuration from the old product into the new one. If a white list is used, remember to inject it into the new product as well.

Appendices and other documents

Annexes et autres documents

Appendices and other documents

Appendices and other documents

Appendices and other documents

Appendices and other documents

Appendices and other documents

Appendices and other documents

Appendices and other documents

Product End of Life Cycle

FAQ

CONFIGURATION OF THE WEBDYNSUN GATEWAY

  • Start by checking that your computer’s IP parameters are compatible with the WebdynSun’s “IP” address (the default is 192.168.1.12). 
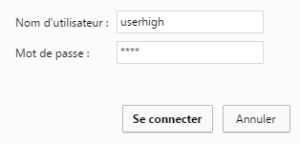
  • Next, launch a web browser (Firefox or IE) and enter the WebdynSun’s IP address in the address bar. An authentication page will appear: 

The default accesses are:
Username: userhigh
Password: high

  • Click on “log in”  

There are two types of configuration: via the web interface or via SMS.

Configuration of the web interface:

1/ Go to the configuration page with the gateway IP address (default 192.168.1.12)

2/ Go to the Configuration tab.

3/ Select either the Ethernet or modem connection mode:

If connecting via the local network (Ethernet):

  • Edit the WebdynSun’s IP parameters by assigning it a network-compatible address.

Please note, all fields must be completed in accordance with the configuration of your local network.

If connecting via the GPRS network (Modem):

  • Change the connection settings of the GPRS modem to the settings provided by your mobile operator.

4/ Edit the FTP server parameters.

5/ Confirm the changes.

6/ Restart the WebdynSun gateway using the new settings.

7/ In the menu, click on the “installation” tab, followed by the “connection” sub-tab and start the connection.

Configuration via SMS:

This configuration method requires the use of an active SIM card with a data option and a pin code that must be either “0000” or disabled.
The SIM card must be inserted into the unit before connection to the mains supply.
After connection to the mains supply, send the following SMS messages to the number of the previously inserted SIM card:

SMS for configuring the APN:
After replacing the generic fields with those of your operator, send the following SMS*:
apn=apn_name;usr=user_name;pwd=password;

Replace the above SMS fields with the following information:

  • apn_name: APN name supplied by your mobile operator
  • user_name: APN ID supplied by your mobile operator
  • password: APN password supplied by your mobile operator

SMS for FTP configuration:
After replacing the generic fields with those of your FTP server, send the following SMS*:
Ftp=server_name:user_name:password:port;

Replace the above SMS fields with the following information:

  • server_name: FTP server address
  • user_name: FTP account ID
  • Password: FTP account password
  • Port: FTP server port (the default port is 21)

Connection SMS:

Send the word “connect” by SMS* to launch a connection to the FTP server

*Please note: the formatting of the SMS must be exactly identical to that shown above (e.g.: no spaces between characters, etc.)

There are 2 ways of resetting the gateway.

  • If connecting by Ethernet:
    • Disconnect from the mains
    • Remove the cover
    • Disconnect the battery
    • Put the DIP Switch 2 on the WebdynSun card in “ON” position
    • Start the WebdynSun by connecting it only to the mains power supply
    • Wait until all the LEDs flash and then stop flashing (3 to 5 mins).
    • Disconnect from the mains
    • Reset the Dip Switch 2 to “OFF” 
    • Reconnect the battery
    • Reconnect to the mains supply and the WebdynSun starts normally.
  • If there is a SIM card inserted in the unit:
    • Send an SMS message containing the word “factory” to the number of the inserted SIM card.

NB : Resetting the gateway restores the configuration to its original state. Please note: data will be saved but the specific settings will not. Therefore, all the settings must be reconfigured.

Commands can be sent to connected devices with the exception of certain inverters and Modbus slaves that do not accept write requests.

If the device allows it, command files can be created on the FTP server.

The WebdynSun has a memory of about 100MB.

Therefore, if the remote server cannot be accessed, the WebdynSun gateway can backup data for several months.
The maximum data backup time varies depending on the amount of data to be collected.

The average backup time ranges from 3 to 4 months.

The average battery life is 5 years.

It may vary depending on the installation environment.

Yes, data may be sent to a PLC if the latter is equipped with a Modbus protocol.
The “Report” configuration file allows the WebdynSun gateway to automatically write the values read on a Modbus slave

All our products are guaranteed for 2 years.

For further information, please see our general conditions of sale.

Files uploaded by the WebdynSun gateway are compressed in Gz format.

The data contained in these files is structured in csv format.

The data volume depends on the files exchanged.

The average is about 5 MB per month but this varies from one installation to another.

INVERTER COMPATIBILITY WITH THE WEBDYNSUN GATEWAY

Different brands of inverter may be connected to the RS485(B) port or via the Ethernet port if the inverter protocol is based on the Modbus protocol (RTU or TCP).

However, different brands of inverters cannot be connected to the same RS485(A) port.

For a list of compatible inverters, please see the product page of the WebdynSun data gateway
  • Check if the correct inverter protocol is selected before starting detection:
  • Check the wiring and configuration of the inverters by referring to the inverter appendices.
  • Check that the inverters are not in OFF or stand-by mode.
  • Check that the line end plugs on the RS 485(A) Bus are turned on.

COMPATIBILITY WITH MODBUS DEVICES

Yes, any device you wish to connect must be configured and its Modbus definition file must be created.

The configuration is mainly based on the RS485 serial bus parameters and the IP parameters.

Yes, different Modbus devices can be connected to the same RS485 (B) port.

However, they must have the same communication parameters (bus parameters or compatible IP parameters), in order for them to communicate with each other.

Appendices and other documents

Appendices and other documents

Appendices and other documents

Appendices and other documents

Appendices and other documents

  • Warning – Firmware update V4.07.02 – For the old version with SIM CARD of the pin code is 0000 you can update in this version. For the second case : When you insert a SIM CARD with pin code is 0000 used in this version (4.07.02) Downgrading to a previous version is not permitted.


PRODUCT END OF LIFE CYCLE

Appendices and other documents

  • Warning – Firmware update V4.07.02 – For the old version with SIM CARD of the pin code is 0000 you can update in this version.

    For the second case : When you insert a SIM CARD with pin code is 0000 used in this version (4.07.02) Downgrading to a previous version is not permitted.

PRODUCT END OF LIFE CYCLE

Annexes and other documents

FAQ

Annexes and other documents

FAQ

Annexes and other documents

FAQ

Annexes and other documents

FAQ

CONFIGURATION OF THE WEBDYNRF GATEWAY

  • If the file is deleted from the directory after connecting the WebdynRF gateway, the problem is usually due to a file format error. The configuration and control files must follow the format described in the schema (XSD) files. To check schema consistency, open the XML file with the Notepad++ text editor and install the “XML Tool” add-on. Next, copy the corresponding XSD file to the XML file in the same directory, and select “Validate now” in XML Tool. Errors detected by the tool should be displayed.
  • If the file is not deleted from the server, the most common problem is that the file has not been located correctly. The file must be available on the server in the “INBOX” directory and in the sub-directory bearing the product UID name (e.g.: “/INBOX/0045CE/”).

GENERAL USE OF THE WEBDYNRF GATEWAY

The amount of data exchanged on the GPRS network varies depending on the configuration. However, the average consumption would be about 5MB / month.
The WebdynRF gateway consumes an average of about 250mA.

There are 2 firmware updating methods:
Local updating:
On the WebdynRF configuration interface, go to the “Actions” tab and select the updater in the “File upload” menu before clicking on the “Upload” button

Remote updating:
Upload the file containing the updater (file with extension “.bz2”) in the “BIN” directory to the FTP server . Next, place the update command in the INBOX directory corresponding to your gateway (“INBOX/”, with, the identifier of the gateway concerned)

The update command must follow the following format:

      updater.tar.bz2
      checksum_md5

updater.tar.bz2
checksum_md5

With:

  • updater.tar.bz2: Updater file name uploaded to the “BIN” directory
  • checksum_md5: Md5 code of the updater file

A lack of connection to the FTP server may be due to a network connection problem (Ethernet or GPRS), an FTP login problem or a failure to initiate the connection.

If you cannot connect to the network, check the following points:

  • Ethernet:
    • Modem set to “off” or “always off”
    • “Gateway” fields correctly entered
    • At least one DNS server must be configured
  • GPRS:
    • Modem set to “on”
    • APN, APN ID and APN password correctly entered
    • GPRS call number set to “*99***1#”

If you cannot log in, check the following points:

  • Incorrect FTP parameters
  • TCP port 21 closed at output
  • Domain name resolution problem: the DNS server is not specified

If the connection fails to initiate:

In this case, only the automatic connection does not work. The problem is probably caused by an incorrect schedule configuration. Please note, the schedule ID must be an integer.

 PARTICULAR APPLICATION OF THE WEBDYNRF WIRELESS M-BUS GATEWAY

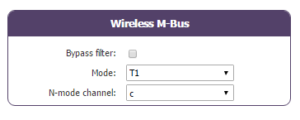
For the WM-bus module data to be transmitted, you must:

  • Choose the mode corresponding to the modules used (S, T or N)
  • Define the modules or groups of modules to be processed

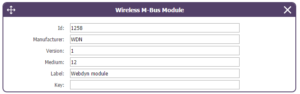
A module may be defined in a unique way by all the fields below:

  • Id
  • Manufacturer
  • Version
  • Medium

If a module’s data is encrypted, the encryption key for this module can be defined in the “Key” field.

To simplify the entry of the modules to be processed, a module group can be defined that conforms to the fields entered. The other fields will then be left empty (below is an example of a configuration for retrieving all Webdyn manufacturer (WDN) modules with the encryption key “00000000000000000000000000000000”.

  •   Id :
  •   Manufacturer : WDN
  •   Medium :
  •   Version :
  •   Label : Webdyn
  •   Key : 00000000000000000000000000000000

Note: In order for the modules (filters) entered to be taken into account, the “ByPass filter” mode must be deactivated.

Click here to read the media file 

Click here to read the units file 

 PARTICULAR APPLICATION OF THE WEBDYNRF WAVENIS

The tool is connected to the gateway via the installer access (install).

It is therefore necessary to use the installer password (default is “middle”), and not the administrator’s password (default is “high”)

The statuses transmitted by the WebdynRF gateway are the raw values contained in the Wavenis modules. They are transmitted without interpretation. For further details, please refer to the Coronis module manuals.

Appendix and other documents

FAQ

CONFIGURATION OF THE WEBDYNRF GATEWAY

  • If the file is deleted from the directory after connecting the WebdynRF gateway, the problem is usually due to a file format error. The configuration and control files must follow the format described in the schema (XSD) files. To check schema consistency, open the XML file with the Notepad++ text editor and install the “XML Tool” add-on. Next, copy the corresponding XSD file to the XML file in the same directory, and select “Validate now” in XML Tool. Errors detected by the tool should be displayed.
  • If the file is not deleted from the server, the most common problem is that the file has not been located correctly. The file must be available on the server in the “INBOX” directory and in the sub-directory bearing the product UID name (e.g.: “/INBOX/0045CE/”).

GENERAL USE OF THE WEBDYNRF GATEWAY

The amount of data exchanged on the GPRS network varies depending on the configuration. However, the average consumption would be about 5MB / month.
The WebdynRF gateway consumes an average of about 250mA.

There are 2 firmware updating methods:
Local updating:
On the WebdynRF configuration interface, go to the “Actions” tab and select the updater in the “File upload” menu before clicking on the “Upload” button

Remote updating:
Upload the file containing the updater (file with extension “.bz2”) in the “BIN” directory to the FTP server . Next, place the update command in the INBOX directory corresponding to your gateway (“INBOX/”, with, the identifier of the gateway concerned)

The update command must follow the following format:

      updater.tar.bz2
      checksum_md5

updater.tar.bz2
checksum_md5

With:

  • updater.tar.bz2: Updater file name uploaded to the “BIN” directory
  • checksum_md5: Md5 code of the updater file

A lack of connection to the FTP server may be due to a network connection problem (Ethernet or GPRS), an FTP login problem or a failure to initiate the connection.

If you cannot connect to the network, check the following points:

  • Ethernet:
    • Modem set to “off” or “always off”
    • “Gateway” fields correctly entered
    • At least one DNS server must be configured
  • GPRS:
    • Modem set to “on”
    • APN, APN ID and APN password correctly entered
    • GPRS call number set to “*99***1#”

If you cannot log in, check the following points:

  • Incorrect FTP parameters
  • TCP port 21 closed at output
  • Domain name resolution problem: the DNS server is not specified

If the connection fails to initiate:

In this case, only the automatic connection does not work. The problem is probably caused by an incorrect schedule configuration. Please note, the schedule ID must be an integer.

 PARTICULAR APPLICATION OF THE WEBDYNRF WIRELESS M-BUS GATEWAY

For the WM-bus module data to be transmitted, you must:

  • Choose the mode corresponding to the modules used (S, T or N)
  • Define the modules or groups of modules to be processed

A module may be defined in a unique way by all the fields below:

  • Id
  • Manufacturer
  • Version
  • Medium

If a module’s data is encrypted, the encryption key for this module can be defined in the “Key” field.

To simplify the entry of the modules to be processed, a module group can be defined that conforms to the fields entered. The other fields will then be left empty (below is an example of a configuration for retrieving all Webdyn manufacturer (WDN) modules with the encryption key “00000000000000000000000000000000”.

  •   Id :
  •   Manufacturer : WDN
  •   Medium :
  •   Version :
  •   Label : Webdyn
  •   Key : 00000000000000000000000000000000

Note: In order for the modules (filters) entered to be taken into account, the “ByPass filter” mode must be deactivated.

Click here to read the media file 

Click here to read the units file 

 PARTICULAR APPLICATION OF THE WEBDYNRF WAVENIS

The tool is connected to the gateway via the installer access (install).

It is therefore necessary to use the installer password (default is “middle”), and not the administrator’s password (default is “high”)

The statuses transmitted by the WebdynRF gateway are the raw values contained in the Wavenis modules. They are transmitted without interpretation. For further details, please refer to the Coronis module manuals.

Annexes et autres documents

  • WARNING :  Pour les anciens produits qui disposent d’une carte SIM avec un code PIN à 0000 , la mise à jour vers la version 4.07.02 sera fonctionelle.

    Second cas : Si la carte SIM avec un code PIN à 0000 est utilisée dans cette version (4.07.02), le passage vers une mise à jour antérieure est interdit. 

NOTICE DE FIN DE VIE DES PRODUITS