Suchen Sie etwas anderes?
Table of Contents
Scenario Details
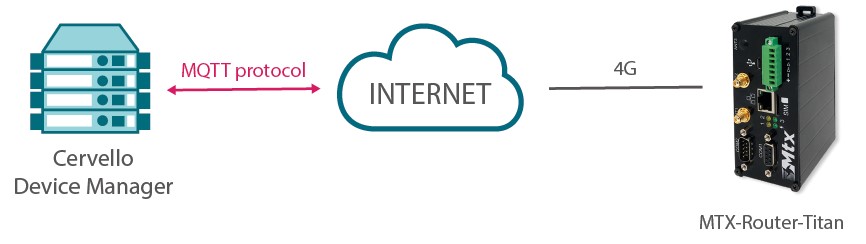
Titan routers can be managed remotely through the Device Manager of the Cervello Platform. It is very useful for router maintenance and monitoring tasks, configuration changes, etc.
This application note shows how to perform the autoprovisioning procedure, that is, the basic procedure for connecting to the Cervello platform.
Description of the Example
The process of linking with Cervello Device Manager is a very simple process and consists of only two steps. The first one is to configure the Titan router to access the Internet, which can be through 2G/3G/4G (the most common scenario) or through Ethernet or WiFi. The second step consists of pressing a button and, after 20 seconds, the Titan router will be linked to the Cervello Platform. After that, you can access the website https://release.cervello.io and, with your username and password and access your private device management area.
Internet Access Configuration
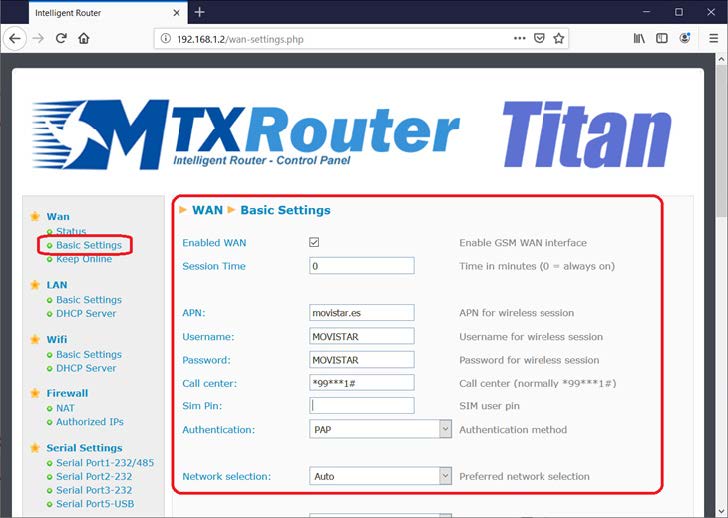
To configure the Internet access of the Titan router via SIM card, you must access the router\’s configuration menu “WAN > Basic Settings” (through the default IP address 192.168.1.1 and the default username/password admin/admin).
Once in this configuration screen, enter the parameters Sim PIN of the SIM card (if you have one), and the APN, Username and Password of the operator used. Once this is done press the SAVE CONFIG button. Finally, restart the router (Other > Reboot menu) so that the Titan router starts up with the new settings and proceeds to connect to the Internet.
NOTE: If instead of configuring Internet access via SIM card, you need to do it through the Ethernet port or via Wi-Fi, you must configure the “LAN > Basic Settings” or “WiFi > Basic Settings” menus and, after completing the configuration, restart the router using the “Other > Reboot” menu.
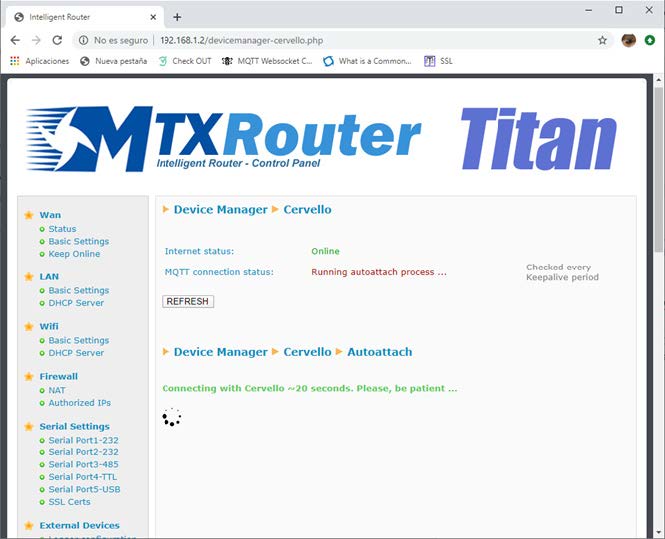
Connection with Cervello
Once the router has restarted, access the “Device Manager > Cervello” configuration menu and, once you verify that you have an Internet connection, press the “JOIN CERVELLO” button. A screen like the following will appear for 20 seconds:
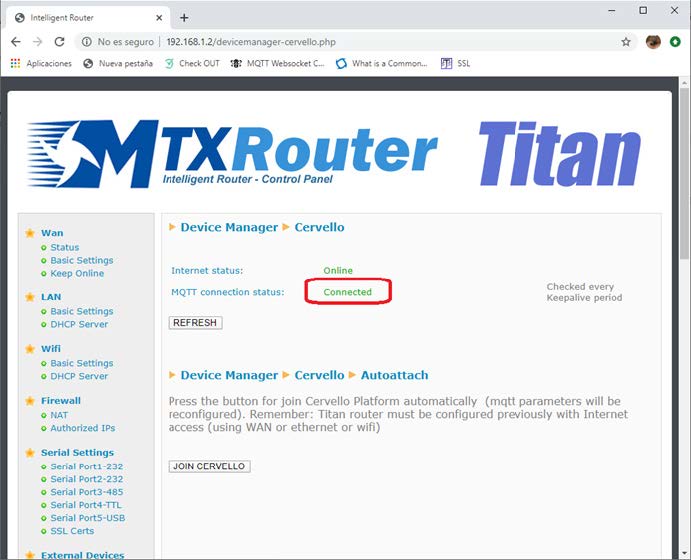
Once the process is finished, you will see if it has been correctly reflected in MQTT Connection Status, as shown in the following screen.

 Geben Sie den Verbindungsmodus „ethernet“ oder „modem“ ein:
 Stellen Sie bei einer Ethernet-Konfiguration sicher, dass die IP-Parameter mit dem Serverzugriff entsprechend der lokalen Netzwerkkonfiguration des Hubs kompatibel sind. Bei einer Ethernet-Verbindung muss die Konfiguration mit der lokalen Netztopologie des Hubs kompatibel sein, damit dieser auf die Server zugreifen kann. Diese Konfiguration erfolgt über die Konfigurationsseite „Networks“ (siehe Kapitel 3.2.2.3: „Netzwerke (Networks)“).
Bei einer Modemverbindung muss das Modem korrekt konfiguriert sein, bevor eine Verbindung hergestellt werden kann. Diese Konfiguration erfolgt auf der Konfigurationsseite „Modem“ (siehe Kapitel 3.2.2.4: „Modem“).
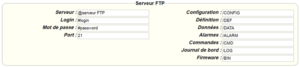
Die minimal zu konfigurierenden Serverparameter sind folgende:
Stellen Sie bei einer Ethernet-Konfiguration sicher, dass die IP-Parameter mit dem Serverzugriff entsprechend der lokalen Netzwerkkonfiguration des Hubs kompatibel sind. Bei einer Ethernet-Verbindung muss die Konfiguration mit der lokalen Netztopologie des Hubs kompatibel sein, damit dieser auf die Server zugreifen kann. Diese Konfiguration erfolgt über die Konfigurationsseite „Networks“ (siehe Kapitel 3.2.2.3: „Netzwerke (Networks)“).
Bei einer Modemverbindung muss das Modem korrekt konfiguriert sein, bevor eine Verbindung hergestellt werden kann. Diese Konfiguration erfolgt auf der Konfigurationsseite „Modem“ (siehe Kapitel 3.2.2.4: „Modem“).
Die minimal zu konfigurierenden Serverparameter sind folgende:
 Diese Felder müssen konfiguriert werden: „Interface“, „Type“, „Server type“, „Address“, „Port“, „Login“ und „Password“.
In den übrigen Feldern können die Standardwerte beibehalten werden, solange die Verzeichnisse zuvor korrekt angelegt wurden. Weitere Einzelheiten siehe Kapitel 3.1.2: „Konfigurationsdateien“.
Diese Felder müssen konfiguriert werden: „Interface“, „Type“, „Server type“, „Address“, „Port“, „Login“ und „Password“.
In den übrigen Feldern können die Standardwerte beibehalten werden, solange die Verzeichnisse zuvor korrekt angelegt wurden. Weitere Einzelheiten siehe Kapitel 3.1.2: „Konfigurationsdateien“.


 Warten Sie. Der Hub startet nach ein paar Augenblicken mit der Werkseinstellung neu.