Suchen Sie etwas anderes?
All general configuration parameter starts with “MTX_” prefix string.
Table of Contents
MTX_PIN, MTX_PIN2
Description: PIN secure number of SIM inserted. Possible values:
- 16 characters maximum
- Default value: 0000
Additional notes:
- In case of using a SIM card with no PIN number, MTX_PIN security code does not need any value
- The MTX_PIN2 parameter is for exclusive use for models that have the “DUAL SIM” feature and refers to the Username used by the secondary SIM. In the case of the MTX-IOT-S family modems, the secondary SIM is the one inside the modem, accessible by opening the case
MTX_mode
Description: This is a very important parameter. It is needed to write the connection mode for MTX-Tunnel. MTX-Tunnel can wait for an incoming connection if it is a TCP socket server. Value is server. If MTX-Tunnel connects to a remote server then it is a TCP socket client. Value is client. If MTX-Tunnel uses UDP protocol for socket communication, value is udp. If you do not need any GPRS-Serial tunnel Gateway use value “none.” Possible values:
- server, client, udp, none
- Default value: server
Additional notes:
- By using “none” as the value you can use MTX-Tunnel for SMS and other telemetry applications, but no 2G/3G/4G connection will be made. See annex 2 with many example scenarios to understand this parameter
MTX_urc
Description: MTX-Tunnel can output in COM1 (ASC0) the status of connections or working state of MTX-Tunnel as URC –Unsolicited Result Codes- messages. URC messages can be:
^MTXTunnel_9.x_running
First message after powering up MTXTunnel. It means it is in running mode.
^MTX_IP_XXX.XXX.XXX.XXX
Message when MTXTunnel has got a new IP address in a GPRS connection.
^MTX_DTR_END_APPLICATION
This message is outputted when the MTX-Tunnel application has been stopped by a user request (special AT command or DTR serial line change level).
^MTX_CONNECTION_CLIENT_ESTABLISHED
Output message when MTX-Tunnel configured as client has connected successfully with the remote server.
^MTX_CONNECTION_CLIENT_END
Output message when a client configured MTX-Tunnel has closed the connection with the remote server because it has disconnected itself or because the socket has been closed remotely.
^MTX_CONNECTION_ESTABLISHED
Output message when MTX-Tunnel is server mode configured and accepts a remote socket connection…
^MTX_CONNECTION_END
Output message when MTX-Tunnel configured as server has closed the connection with the remote equipment because it has disconnected itself or because the socket has been closed remotely.
^MTX_SOCKET_UDP_ESTABLISHED
Output message when MTX-Tunnel configured as “udp” is ready to send and receive UDP data.
^MTX_SOCKET_UDP_END
URC message will be shown when MTX-Tunnel configured as “udp” closes the UDP socket due to a normal request (for example, time for GPRS connection has been expired).
^MTX_BITCOIN_INCOME_
This message is to be shown when the MTX-Tunnel is configured to receive payments using bitcoin. See annex for more information. Possible values:
- on, off
- Default value: off
Additional notes:
- We recommend you to not activate URC messages unless necessary. In a normal GPRS-Serial RS232 tunnel Gateway these messages are in the same RS232 Serial port so there can be interference in the communication
- The first time when configuring and testing MTX-Tunnel it can be useful to see what MTX-Tunnel is doing or get information like the newly obtained IP address
MTX_reset
Description: Time parameter (in minutes) so that MTX-Tunnel can be reset automatically. A value of “0” indicates that the modem will never be automatically reset. Possible values:
- 0… 43200 (43200 minutes=30 days)
- Default value: 0
- “0” disable this feature and MTX-TUNNEL will not be reset periodically.
Additional notes:
- It is not recommended to use this parameter unless you think it is necessary. MTX-Tunnel features many automatic procedures to ensure GPRS connection will be stable and working 100% of the time.
MTX_resetHour
Description: This parameter can perform an automatic reset at a specific time X. Once reset, the MTX-Tunnel will restart automatically. A value of “99” will cause the modem to never reset itself at any time. Possible values:
- 0… 23-99
- Default value: 99
Additional notes:
- “99” value disables this feature; modem will be never automatically reset
- It is not recommended to use this feature unless you think it is necessary; MTX-Tunnel has internal procedures allowing GPRS connectivity to always be on…
- You need to use the MTX_TPServer parameter and use a timing server. The modem will synchronize internal time with server time TP protocol based
- Modem time format is HOUR UTC
- If you enable this parameter, please use also MTX_reset parameter at 25 hours. This way reset will be performed and all services are restored even if timing synchronization fails
MTX_ping
Description: This is a very important configuration parameter to ensure GPRS connectivity. MTX-Tunnel will perform a PING to a configured IP address at configured periodic second timing. If value is “0” PING will be never performed. Possible values:
- 0… 1440 (1 day)
- Default value: 30
Additional notes:
- We recommend using MTX_PING with a least 30 minutes value
- This parameter is more important if MTX-Tunnel is used in “server” mode. In this mode, MTXTunnel is waiting for incoming connections from remote equipments, and network operators can block the PPP connection without any notice. MTX-Tunnel cannot detect this block as there is no traffic so we use PING protocol to detect if the PPP connection is alive. PING traffic is almost insignificant and you could avoid the network operation PPP blocking when there is no traffic transmission
MTX_pingIP
Description: In the case of the above parameter MTX_ping > 0, i.e. when periodic ping is activated, this parameter value defines the PING IP address to be performed. If you do not use this parameter, MTX-Tunnel will perform PING to its own IP address. Be careful, some network operators do not allow performing PING to the newly obtained IP address, so we recommend you use a well known IP address. You can use your own server/office IP or the DNS Google one which is 8.8.8.8. Possible values:
- xxx.xxx.xxx.xxx or you can use a URL like google.com
- Default value: MTX-Tunnel obtained IP
Additional notes:
- We recommend that you use PING methods when using permanent connections
MTX_portAux
Description: Most part of the MTX modem family have two COM serial ports, COM1 y COM2. If you activate this parameter with the value “on”, external equipment connected to COM2 could send AT commands.
Possible values:
- on, off, modbusmaster, gateway, bypass, wmbus
- Default value: off
Additional notes:
- If you are not going to use this feature, disable this parameter with the value “off” as it will save internal CPU resources
- This parameter must be “off” when using MTX-Terminals that only have one COM1 port
- Read AT commands that can be used. Please read the MTX_ATLimited parameter
- From MTX-Tunnel version 5.6, “wavenis” can be used as the parameter to control RF Wavenis protocol based devices connected to COM2
- From MTX-Tunnel version 7 “modbusmaster” can be used as the parameter to read RTU modbus devices connected to COM2. Read LOGGER_, MODBUS_ parameter description for more information
- From MTX-Tunel version 7.10 “gateway” can be used as the parameter to act as a gateway between the serial ports of the modem when there is no GPRS or GSM connection established. All data that enters the COM1 part is redirected to the COM2 port and vice versa
- From MTX-Tunnel version 9-20 it has a “bypass” functionality. This option is very similar to the option “gateway” but with preference for the serial gateway regarding the serial 3G gateway
- As of version MTX-Tunnelv11.14 it has the option “wmabus”. This option configures the modem to be able to read wmbus devices, as long as the modem has an appropriate internal RF card
MTX_portAuxEcho
Description: Enable MTX_portAux parameter “on” value when you need echo AT commands in COM2 port. Possible values:
- on, off
- Default value: on
Additional notes:
- This parameter is only valid when MTX_portAux is enabled (“on”). If not, this will not used
MTX_IDClient
Description: If MTX-Tunnel is configured in client mode (MTX_mode value parameter “client”), MTX-Tunnel sends an identification string when the connection with the server is done. This string is the first to be sent after the connection with the remote server. This is intended to identify MTX-Tunnel with the server, and is useful when dynamic IP addressing is used. Possible values:
- Text string 255 characters max.
- Default value: (empty, nothing is sent)
Additional notes:
- If you leave the value empty MTX-Tunnel will not send an identification string
MTX_IDClientExtended
Description: By enabling this parameter with the value “on” and using identification string with MTX_IDClient parameter, it is possible to send more information to a remote server. When MTX_IDClientExtended is “on”, the extended string has the following format: MTX_IDClient#IMEI#gpio1#gpio2# … #gpio10#adc1#adc2# MTX_IDClient is configuration string, IMEI is modem identifier, and gpioX is digital input/output and is analog input. NOTE
- With new models MTX-3G-Java-IoT and MTX-3G-Java-IOT the string will have the value of the pulse counter 1 and pulse counter 2 MTX_IDClient#IMEI#gpio20#gpio21#gpio22#gpio23#adc1#adc2#counter1# counter2# If I/O are not needed and you set the parameter MTX_IDClientExtended “imei”: MTX_IDClient#IMEI# MTX_IDClient is configuration string, IMEI is modem identifier
Possible values:
- on, off, imei
- Default value: off
Additional notes:
- If you leave the value empty MTX-Tunnel will not send an identification string
MTX_IDClientPeriod
Description: MTX_IDClient information string is only sent after the client connection to the remote server once after every new connection. With this parameter IDClient can send the information periodically every X seconds; for this, just use a value >0. Possible values:
- 0 … 2592000 (30 days)
- Default value: 0 (only one string is sent at connection)
Additional notes:
- This can be useful if you need to remotely monitor the input/outputs and analog input because their statuses are sent periodically
MTX_dtr
Description: In some scenarios you may need to stop the MTX-Tunnel application. Then the modem would work with normal AT commands so you would be able to make a CSD call or voice call for example. There are two ways to stop MTX-Tunnel:
- Send a proprietary AT command (AT^MTXTUNNEL=EXIT)
- Use modem DTR line on COM1 serial port. This feature must be enabled with the parameter value at “on”
Possible values:
- on, off
- Default value: off
Additional notes:
- You can start MTX-Tunnel again using AT+CFUN=1, 1 command (recommended). Also you can use AT^SJRA=”A:/MTXTunnel.jar” command
MTX_TPProtocol
Description: Parameter available since MTX-Tunnel version v9.30. Previus versions can only use “tp” servers. It allows to choose the time sync protocol between “tp (Time Protocol)” and “ntp (Network Time Protocol).” Possible values:
- Tp, ntp
- Default value: tp (for compatibility reasons for previous versions)
Additional notes:
- Time servers give URG time, so when it is used by a modem it is also UTC time (please take into account what UTC time is your region on. For example, in Spain it’s UTC+1 or UTC+2 in the summer)
MTX_TPServer
Description: MTXTunnel can be timing synchronized using TP (Time protocol) or NTP (Network Time Protocol) since MTX-Tunnel v9.30. we can choose the protocol with the parameter MTX-TPProtocol. It connects to timing servers and fixes the RTC (Real Time Clock) deviation errors. Also it gets the time after power up. It can be used on private or own time servers, but they are many free time servers and they can be used on MTX-Tunnel like this. For example, if MTX_TPProtocol has “tp” value we can choose between these time servers:
| time-a.timefreq.bldrdoc.gov time-a.timefreq.bldrdoc.gov time-b.timefreq.bldrdoc.gov time-c.timefreq.bldrdoc.gov utcnist.colorado.edu time-nw.nist.gov nist1.nyc.certifiedtime.com nist1.dc.certifiedtime.com nist1.sjc.certifiedtime.com nist1.datum.com ntp2.cmc.ec.gc.ca ntps1-0.uni-erlangen.de ntps1-1.uni-erlangen.de ntps1-2.uni-erlangen.de ntps1-0.cs.tu-berlin.de time.ien.it ptbtime1.ptb.de ptbtime2.ptb.de > recommended as public free one tp1.mtxm2m.com |
If we select “ntp” in MTX_TPProtocol we can choose any NTP server. For example: 0.es.pool.ntp.org, 1.es.pool.ntp.org Possible values:
- Text string < 255 characters
- Default value: none
Additional notes:
- Please note time server’s returns UTC time and there are a few hours difference in your country. As an example, in Spain the time is UTC+1 or UTC+2 in summer. UTC 09.00 time in July is 11.00 local time in Spain
- From MTX-Tunnel v7.15, this parameter can be specified as “null”. By doing this, the modem takes its current time as valid, without consulting an external server.This can be useful in situations where the WAKEUP_ parameter is used, whereby an activity must be carried out at certain intervals and the actual time is not really important
MTX_TPServer2
Description: Backup timing server. If the previous main time server fails, MTX-Tunnel will take this second one as a security backup. If MTX_TPProtocol is “tp” we can choose from these time servers:
| time-b.timefreq.bldrdoc.gov time-a.timefreq.bldrdoc.gov time-b.timefreq.bldrdoc.gov time-c.timefreq.bldrdoc.gov utcnist.colorado.edu time-nw.nist.gov nist1.nyc.certifiedtime.com nist1.dc.certifiedtime.com nist1.sjc.certifiedtime.com nist1.datum.com ntp2.cmc.ec.gc.ca ntps1-0.uni-erlangen.de ntps1-1.uni-erlangen.de ntps1-2.uni-erlangen.de ntps1-0.cs.tu-berlin.de time.ien.it ptbtime1.ptb.de ptbtime2.ptb.de tp1.mtxm2m.com > recommended free public time server |
If we select “ntp” in MTX_TPProtocol we can choose any NTP server. For example: 0.es.pool.ntp.org, 1.es.pool.ntp.org Possible values:
- Text string < 255 characters
- Default value: None
Additional notes:
- You can use this backup timing server only if you have configured main in MTX_TPServer parameter
MTX_ATMux
Description: This parameter, when enabled, activates the multiplexer on the COM1 serial port of MTX-Tunnel. Multiplexer means it is possible to send AT commands to a modem when a GPRS-RS232 tunnel is active/connected. This way you can use AT commands to see network overage/information, change or read a digital output/input, stop MTX-Tunnel or change a configuration parameter. You need to write AT commands into special tags strings because MTX-Tunnel has to interpret it and not send it to the GPRS using following syntax: <MTXTUNNEL> </MTXTUNNEL> Example: <MTXTUNNEL>AT+CSQ</MTXTUNNEL> MTXTunnel will return: <MTXTUNNEL>AT+CSQ +CSQ: 22, 99 OK</MTXTUNNEL> Possible values:
- on, off
- Default value: off
Additional notes:
- Special AT command must be sent with a pause of 1 second after last data sent on serial port but there can be no pauses of more than 50ms between characters
- Read chapter 7 to know more information about which AT commands are allowed in this multiplexer mode
MTX_WatchdogOnExit
Description: MTXTunnel features watchdog. If enabled, MTX-Tunnel must internally refresh the watchdog every 300 seconds (5 minutes). In case this refresh fails, the internal software watchdog will reset the MTX-Tunnel application. If MTX-Tunnel is stopped (you can stop it using DTR or by AT commands), watchdog remains active, meaning that after 5 minutes, MTX-Tunnel will be reset and so, starts again. If you disable this feature with an “off” value, watchdog will never reset MTX-Tunnel, even if it is ended. Possible values:
- on, off
- Default value: on
Additional notes:
- This is useful when the user needs to stop MTX-Tunnel temporarily to do certain classic modem communications (voice or data call, SMS….) and then if “on” ensure that MTX-Tunnel is running after 5 minutes
MTX_model
Description: very important and mandatory parameter which specifies which MTX-Terminal modem model will run the MTX-Tunnel application. Its use is completely necessary. You can enter the name of the equipment or part number. Both can be found on the sticker at the bottom of any MTX modem.
| MTX-2G-T | MTX-2G-T |
| MTX-2G-Java-IoT-STD-N | MTX-2G-JAVA-IOT-STD-N |
| MTX-3G-Java-IoT-STD-N (EHS6) | MTX-3G-JAVA-IOT-STD-N |
| MTX-3G-Java-IoT-STD-G (EHS8) | MTX-3G-JAVA-IOT-STD-G |
| MTX-3G-Java-IoT-STD-A | MTX-3G-JAVA-IOT-STD-A |
| MTX-4G-Java-IoT-STD-N | MTX-4G-JAVA-IOT-STD-N |
| MTX-4G-Java-IoT (USA-AT&T) | MTX-4G-JAVA-IOT-STD-N |
| MTX-4G-Java-IoT-STD-N (AUS) | MTX-4G-JAVA-IOT-STD-N |
| MTX-3G-Java-T | MTX-3G-JAVA-T |
| MTX-3G-Java-T2 | MTX-3G-JAVA-T2 |
| MTX-3G-Java-T-G | MTX-3G-JAVA-T-G |
| MTX-3G-Java-T-S | MTX-3G-JAVA-T-S |
| MTX-4G-Java-T (4G/2G) | MTX-4G-JAVA-T |
| MTX-4G-Java-T (4G/3G/2G) | MTX-4G-JAVA-T |
| MTX-4G-Java-T2 | MTX-4G-JAVA-T2 |
| MTX-4G-Java-T (USA-AT&T) | MTX-4G-JAVA-T |
| MTX-4G-Java-T (AUS) | MTX-4G-JAVA-T |
| MTX-4G-Java-IoT-STD-N-WC868 | MTX-4G-JAVA-IOT-STD-N-WC868 |
| MTX-4G-Java-IoT-STD-N-RL | MTX-4G-JAVA-IOT-STD-N-RL |
| MTX-4G-Java-IoT-STD-N-GPS | MTX-4G-JAVA-IOT-STD-N-GPS |
| MTX-4G-Java-IoT-STD-N-ULP | MTX-4G-JAVA-IOT-STD-N-ULP |
Default value: none Additional notes:
- Example: you have an MTX called “MTX-4G-Java-IoT-STD-N (AUS).” The value you can enter is: MTX_model: MTX-4G-JAVA-IOT-STD-N or MTX_model: 199801446
- Please ensure to check this mandatory parameter due to each model’s specific I/O configuration. If you do not write the correct value, MTX-Tunnel may not work properly in any related with input/outputs features (like SMS alarm-control)
MTX_ATLimited
Description: This optional parameter can disable the limitation of AT command execution if the value is “off”. Remember you can use AT commands (multiplex on COM1, COM2, or via SMS or HTTP). Possible values:
- on, off
- Default value: on
Additional notes:
- We recommend that you set this parameter to “on”. Only use “off” when you need to use another command, but keep in mind that using AT commands without limitation could interfere with MTX-Tunnel behaviour. Please read AT command set of MTX-Terminals or ask iotsupport@mtxm2m.com for more information
MTX_clientSSL
Description: Allows SSL secure socket communication (only client mode MTX_mode: client). Remote server needs to support secure SSL socket connection. Possible values:
- on, off
- Default value: off
Additional notes:
- It is only possible to use an SSL security socket when MTX tunnel is used in client mode
- Do not use this if it is not necessary. Traffic data volume is increased and data communication speed will be slower
- The server must support any of following SSL standards
- TLP protocol version 1.0 (RFC 2246)
- SSL v3.0
- WAP TLS Profile and Tunneling Specification
MTX_temporalClient
Description: This parameter allows you to establish a temporal client socket when MTX-Tunnel is in server mode (MTX_mode: server) and there is no connection established. Example scenario: A series of MTX-Tunnel modems are available. Each MTX Tunnel has a weather station on its COM1 serial port. All MTX-Tunnel are configured in “server” mode, since they are meant to establish a periodic connection from a central PC to collect the historical of temperatures of each meteorological station. This allows critical alarm values to be sent without waiting for incoming server connections. After one minute (enough time to send the alarms), the socket is closed and MTX-Tunnel remains in normal server mode. Possible values:
- on, off
- Default value: off
Additional notes:
- This temporal tunnel connection takes just one minute, if there is no data traffic, the socket will be closed
- When the temporal socket is activated, the socket server services (server socket, WebServer….) are also activated. But if the temporary socket is closed after one minute, the associate services are closed after GPRS_timeout parameter
- The temporal client socket can be activated if the GPRS connection is always active (GPRS_timeout=0) or not (GPRS_timeout>0)
- If there is already a GPRS connection (socket connected to MTX-Tunnel) it is not possible to start the temporal client socket
- If the temporal client socket is running it is not possible to start server mode and any incoming connections will be not allowed
- It is MANDATORY that the MTX_ATMux parameter is disabled “off”, if not the temporal client socket connection will be not started
- From MTX-Tunnel v7 is it also possible to use a special AT remote commands to start the temporal client socket
MTX_msToSend
Description: A pause that indicates how many milliseconds must pass without receiving data through the serial port for the MTX-Tunnel to send data via GPRS. Possible values:
- 0 … 5000
- Default value: 50
Additional notes:
- This is useful if the equipment connected to serial COM and MTX-Tunnel do not send data in concatenated way. Communication will be slower but all data is compacted
MTX_gatewayModBus
Description: This parameter will configure MTX-Tunnel as ModBus TCP/Modbus RTU tunnel gateway. MTX-Tunnel must be configured in server mode. Possible values:
- on, off, comm, comm2
- Default value: off
Additional notes:
- Remember MTX-Tunnel must be in server mode, waiting for TCP connection. See Annex 2, example 2.14
- The comm, comm2 parameters are available from version 11.08 of the MTX-Tunnel and are useful when the modem has 2 IP-Serial gateways configured.
An “on” value means that if the modem has two IP-Serial gateways configured, both act as modbus TCP / RTU gateways.
A “comm” value makes only the main serial port (the one associated with COMM_ parameters) act as a modbus TCP / RTU gateway, with the secondary serial port (the one associated with COMM2_ parameters) acting as transparent gateway.
A “comm2” value makes only the secondary serial port (the one associated with the COMM2_ parameters) act as a modbus TCP / RTU gateway, with the main serial port (the one associated with the COMM_ parameters) acting as a transparent gateway.
MTX_alwaysConnectedClient
Description: If MTX-Tunnel is configured in client mode (MTX_mode:Client), this parameter establishes a TCP socket connection once (value “off”) or in case the socket is closed, the connection is retried every 30 seconds (value “on”). Possible values:
- on, off
- Default value: on
Additional notes:
- “off” value is intended for the server to collect all data and close the socket. MTX-Tunnel will not retry in 30 seconds to open the socket, which will save resources in the server
- Parameter only valid if MTX-Tunnel is in client mode
MTX_init1, MTX_init2, MTX_init3
Description: These 3 parameters can execute AT commands after MTX-Tunnel starts or powers up. As an example, one AT command could be sending an SMS when the modem is switched on. Possible values:
- AT command text string
- Default value: none
Additional notes:
- This can be used in many end applications and helps in a special start-up. Please check the AT commands manual or ask iotsupport@mtxm2m.com for further information
MTX_ATEmbedded
Description: this parameter allows the modem to interpret AT commands received by a client socket. That is, if this parameter is “on” from the server itself, AT commands can be sent to the MTX-Tunnel encapsulated between the tags: and . You can check the coverage, change settings… Very useful in the case of using socket type “client”. Possible values:
- on, off, temporalclient
- Default value: off
Additional notes:
- If you send an embedded AT command through a socket, you will also receive the response between the tags
- This mode of sending embedded AT commands allows you to bypass firewalls and proxies that many telephone operators use. If you cannot use Telnet to send remote AT commands to your MTX-Tunnel because your operator prevents it, use this route. Valid for both client, server and temporary client sockets
- The “temporaryclient” value option is only available from the MTX-Tunnel v10.18 version. If you set this value and the modem is set to (MTX_mode: server), only the AT ^ MTXTUNNEL = DEFAULTTEMPORALCLIENT command can be executed. Refer to the meterind example (meter reading) 7 of annex 6 for more information
MTX_radioBand
Description: This parameter can specify the preferred radio bands the modem will connect to. This is not really necessary in most cases, but in some countries in South America it is recommended to set this parameter. Possible values:
- none, europe, america
- Default value: none
Additional notes:
- If your modem is going to be used in Europe use “none” or “europe” value
- If your modem is going to be used in an American country, use “america” value
- Only available for MTX-65i modems family
MTX_invertedCom
Description: This parameter will invert COM values on MTX-Terminal modems with 2 serial COMS. As an example, MTX65i has two RS232 serial ports and MTX-65i-RS485 has one RS232 and another RS485. If MTX_invertedCOM is enabled (value “on”) the secondary COM2 port now will act as COM1 and vice versa. Possible values:
- on, off
- Default value: off
Additional notes:
- This could be useful if you principally need the COM2 port of MTX-65i-RS485
- Please note that RS485 serial COM of MTX-3G-Java-IOT-STD-N modem is the secondary com. If you need to use it as primary (eg to attend a GSM call) must use MTX_invertedCom to “on”
MTX_flushSerialBuffers
Description: This parameter allows you to clean the serial buffers of any data to be sent before connecting to the TCP/IP socket. This means that if you have some outstanding serial data, it is removed by the modem’s buffers before establishing the GPRS-serial gateway. Possible values:
- on, off
- Default value: off
MTX_ATEmbeddedPass
Description: With the MTX_ATEmbeddedPass parameter set to “on” it is possible to send configuration AT commands in its own GPRS-serial gateway. With MTX_ATEmbeddedPass it is possible to set a password for embedded AT commands for enhanced security. Possible values:
- String of up to 32 characters
- Default Value: none
Additional notes:
- If you set a password for the MTX_ATEmbeddedPass parameter, you will have to specify the password when you send an embedded AT command
- For example you need to send the command AT+CSQ. If you do not set a password you could send this
<MTXTUNNELR>AT+CSQ</MTXTUNNELR>, but if you have set your password as XXX you will need to send<MTXTUNNELR XXX>AT+CSQ</MTXTUNNELR>which means you need to send:<MTXTUNNELR[space][password]> ATcommand</MTXTUNNELR>
MTX_clientReconnection
Description: This parameter is useful for configuration scenarios in which client connections are present (MTX_mode: client). In these scenarios this parameter specifies when the MTX-Tunnel will retry the connection after a shutdown by the remote server. Possible values:
- 0 … 86400 (seconds)
- Default Value: 30
Additional notes:
- Note that if you set the value with a very low number (e.g. 0), MTX-Tunnel will retry the connection very quickly if there are constant problems or failures with the remote server and this will increase bandwidth
MTX_urcPort
Description: Parameter available from MTX-Tunnel v7.15. Sets the output port of URC messages. Possible values:
- asc0, asc1 y usb
- Default value: asc0
Additional notes:
- The “asc0” value refers to main serial port (COMM_)
- The “asc1” value refers to the secondary serial port (COMM2_ )
- The “usb” value refers to usb port
MTX_clientTimeout
Description: Parameter available from version MTX-Tunnel v7.15. It allows you to specify the time, in seconds, that must be taken to close a client socket in the case of no GPRS data exchange. Possible values:
- 30… 86400
- Default value: 1800 (30 minutes)
MTX_serverTimeout
Description: the parameter is available from MTX-Tunnel v9.18. It allows to specify the time in seconds. A server TCP Socket (for a 2G/3G/4G-serial gateway) will be closed in case there is no data transmission via 2G/3G/4G. Possible values:
- 0… 86400
- Default value: 0 (not activated)
Additional notes:
- This parameter is not necessary for the majority of scenarios. Its value can be 0 for most of them
- Where this parameter matters is in those scenarios where a serial port is used for two simultaneous tasks: autonomous reading of modbus registers + 2G/3G/4G-Serial gateway. That is to say, scenarios where the autonomous reading of modbus registers is suspended when a 2G/3G/4G-serial gateway is set up by the same serial port for a real-time action. The example 6.10 of this manual shows a typical case of the use of this parameter
MTX_rssiLow
Description: parameter valid from version MTX-Tunnel v10.00. This parameter will start working if the parameter MTX_redLed or MTX_greenLed have selected the option “rssi.” If so, a coverage value under this range (MTX_rssiLow) will make the coverage LED to blink every 3 seconds indicating low signal level. Possible values:
- 0… 31
- Default value: 10
Additional notes:
- The values of a modem coverage level are standardized between 0 and 31, with 0 as the worst value and 31 as the greatest coverage
- The modem updates the status of its coverage LED every 10 seconds
- In case coverage is between the values MTX_rssiLow and MTX_rssiHigh, the coverage LED will indicate it with 2 blinks every 3 seconds
MTX_rssiHigh
Description: parameter valid from version MTX-Tunnel v10.00. This parameter will start working if the parameter MTX_redLed or MTX_greenLed have selected the option “rssi.” If so, a coverage value over this range (MTX_rssiLow) will make the coverage LED to blink 3 times every 3 seconds indicating high signal level. Possible values:
- 0… 31
- Default value: 20
Additional notes:
- The values of a modem coverage level are standardized between 0 and 31, with 0 as the worst value and 31 as the greatest coverage
- The modem updates the status of its coverage LED every 10 seconds
- In case coverage is between the values MTX_rssiLow and MTX_rssiHigh, the coverage LED will indicate it with 2 blinks every 3 seconds
MTX_greenLed
Description: parameter valid from version MTX-Tunnel v10.00. This parameter determins the behavior of the equipment green LED. Configured as “std” the behavior of the green LED is the standard Gemalto chipset (slow blink when the modem isn’t registered on the network, quick blink when it is). Configured like “rssi” the LED will blink every 3 seconds when the coverage level is low (coverage<MTX_lowRssi), 2 blinks when the coverage level is normal (MTX_rssiLow<=coverage<MTX_rssiHigh) and 3 blinks when the coverage level is high (coverage>= MTX_rssiHigh). Possible values:
- std, rssi
- Default value: std
Additional notes:
- Changing this parameter implies the equipment autoreset. That is, if you change the “std” value to “rssi” or viceversa, next time the modem starts it will autoreset once
- The modem updates the status of its coverage LED every 10 seconds
- The most interesting configuration is MTX_greenLed: rssi, MTX_blueLed: io2, MTX_redLed: sim
MTX_blueLed
Description: parameter valid from version MTX-Tunnel v10.00. This parameter determins the behavior of the equipment blue LED. Configured as “off” the blue LED won’t light up. Configured as “ip” the blue LED will light continually while the modem has IP (connection to a 2G/3G/4G data network). Configured as “ip2” the blue LED will blink every 3 seconds while the modem has IP (connection to a 2G/3G/4G data network). Possible values:
- off, ip, ip2
- Default value: ip
Additional notes:
- If you use “ip2” you can also use MTX_greenLed ·rssi” since the blinking of the blue light happens moments after the coverage blinking, to ease the visualization
- The modem updates the status of its coverage LED every 10 seconds
- The most interesting configuration is MTX_greenLed: rssi, MTX_blueLed: io2, MTX_redLed: sim
MTX_redLed
Description: parameter valid from version MTX-Tunnel v10.00. This parameter determins the behavior of the equipment red LED. Configured as “off” the red LED won’t light up. Configured as “rssi” the red LED will behave like the MTX_greenLed when the value is “rssi.” Configured as “sim” the red LED will light up when: sim not inserted, incorrect sim pin, blocked sim (puk necessary). Possible values:
- off, rssi, sim
- Default value: off
Additional notes:
- Using the value “sim” is interesting because it allows to detect and resolve some connectivity problems quickly, detecting that the problem is in the sim
- The modem updates the status of its coverage LED every 10 seconds
- The most interesting configuration is MTX_greenLed: rssi, MTX_blueLed: io2, MTX_redLed: sim
MTX_fullDuplex
Description: Parameter valid from version MTX-Tunnel v7.19. It allows you to improve the full-duplex capacity of the GPRS-Serie gateways. It is especially designed for applications NOT based in question-answer comunications but with independent transmissions/receptions. Possible values:
- on, off
- Default value: off (disabled)
Additional notes:
- It is recommended to set it to “on” in the case of applications with independent asynchronous two-way communications. If you have a question/answer application (typical question from a server to whom the slave replies) do not activate this parameter
- Activating this parameter will slightly improve the asynchronous two-ways communications but will penalize with time other services (Telnet, …)
- If you are not sure about if activating or not this parameter, we advice you not to include it in the config.txt setting file
MTX_filter
Description: Parameter valid from version MTX-Tunnel v7.20 It allows you to use a filter in the 2G/3G/4G-Serie gateways (both in TCP server mode, as in TCP client and UDP modes). The use of a filter implies that, of the data frames received by the modem serial port, only those with a certain header will be sent via 2G/3G/4G. Possible values:
- x,x,x,x… (bytes in header separated by a comma “,”)
- Default value: none (no headers used)
Additional notes:
- The header must be especified with bytes (decimal, no hexadecimal) separated by “,”
- For example, if you only want to send the frames starting with “ABC”, the MTX_filter parameter in the setting file should be: MTX_filter: 65,66,67 as A corresponds to ASCII 65, B to 66, C to 67
- Another example: if the MTX-Tunnel is connected to a red modbus and you are only interested in transmitting via GPRS the data frames to the MODBUS device with address 1, the MTX_filter parameter in the configuration file should be: MTX_filter: 1
- If you do not need to use filters, simply do not include this parameter in the configuration file
- Be aware you must take into account the MTX_msToSend parameter to use this parameter
MTX_latitude
Description: Parameter valid from version MTX-Tunnel v7.27 Specifies the latitude (relative to the GPS position, in decimal format) where the MTX-Tunnel is installed. This parameter is necessary when using the MTX-Tunnel astronomical clock, for example to switch a relay or for a digital output automatically at sunset/sunrise time. Possible values:
- -90.00000 to 90.00000
- Default value: none
Additional notes:
- See this scenario for a better understanding of this parameter
MTX_longitude
Description: Parameter valid from version MTX-Tunnel v7.27. Specifies the longitude (relative to the GPS position, in decimal format) where the MTX-Tunnel is installed. This parameter is necessary when using the MTX-Tunnel astronomical clock, for example to switch a relay or for a digital output automatically at sunset/sunrise time. Possible values:
- -180.00000 to 180.00000
- Default value: none
Additional notes:
- See this scenario for a better understanding of this parameter
MTX_configMode
Description: Parameter valid from version MTX-Tunnel v7.27. It allows you to choose if the “config” or “running” mode of the MTX-Tunnel is with or without the SIM inserted. That is, in “normal” mode (default mode) the MTX-Tunnel enters setting mode when the MTX is fed without a SIM card inserted and enters into “running” mode when it is fed with a SIM card inserted. In “reverse” mode the MTX enters “config” mode with a SIM card inserted and goes into“running” mode when there is no SIM card. Possible values:
- -normal, reverse
- Default value: normal
Additional notes:
- Do not use the reverse mode if you are not sure what this parameter is for. It is only possible to use it in very specific scenarios
- Use reverse mode only if you need the MTX-Tunnel for Logger without data delivery via 2G/3G/4G. That is, for example, to store the modbus records of a device during certain time in the modem internal memory. After this time, the modem is picked up and the “data.txt” file with the records stored is manually extracted
- From MTX-Tunnel 9.39 on it is possible to use the value “modem” with the parameter MTX_configMode. That allows, also using MTX_ATMux in “modem” mode, to send AT commands also in configuration mode “when the modem doesn’t have a SIM card.” In other words, you will be able to configure via AT commands (AT^MTXTUNNEL=SETPARAM, etc.) without the need to load the file config.txt.
MTX_interface
Description: Parameter valid from version MTX-Tunnel v8.04 It allows you to choose the interface of communication between serial or USB. Possible values:
- serial, usb
- Default value: serial
Additional notes:
- Parameter only available for 3G models. It can’t be used with GPRS models
MTX_encryptedConfig
Description: This parameter allows to encrypt the configuration file “config.txt”. If this parameter is set to “1”, the file “config.txt” will be encrypter after modem is power up. The “config.txt” file is different for each modem, so you can’t use the same encrypted “config.txt” file for any modem. If you need to use this option, it is very convenient to save the “config.txt” previously. Possible values:
- 0, 1
- Default value: 0
Additional notes:
- This parameter is only supported from MTX-Tunnel v9.39
MTX_mes
Description: it allows to activate/deactivate the modem MES. That is, it allows to activate/deactivate the access to the internal memory of the modem. For example, it can prevent non authorized access to the configuration file “config.txt.” Remember you can also use the parameter MTX_encryptedConfig to encrypt the configuration. This MTX_mes parameter is a higher security level, that allows to block any access to the modem memory locally (USB, RS232). Possible values:
- on, off
- Default value: on (MES activated)
Additional notes:
- This parameter is only supported from MTX-Tunnel v10.04
- Be very careful with this command. If you set it off, after restarting the modem, the MES access will be blocked. The only way to unlock the access to the memory again will be sending the following commands:
AT^MTXTUNNEL=SETPARAM,MTX_mes,on
AT+CFUN=1,1
Then, have the precaution to test your access to the modem via Telnet, MQTT, SMS, etc. to the modem before blocking the memory.
MTX_resetCond
Description: this parameter allows that, in the case the modem is configured like a serial IP gateway (TCP server mode), and it gets the daily autoreset condition in the MTX_reset or MTX_resetHour parameter, the reset won’t happen when there’s a socket established against the modem and MTX_resetCond is in “socket” mode. Possible values:
- off, socket
- Default value: off
Additional notes:
- This parameter can be very useful if the modem is configured to autoreset daily and is being used to make a serial IP gateway in server mode. Configuring this parameter like “socket” will avoid the modem resets while it’s being used as a gateway. The reset will perform when the socket finishes
MTX_status
Description: this parameter allows, in the case of being activated (on), to extract certain status information via one of the USB ports created by the MTX modem in Windows (the port COM USB associated with the modem). Possible values:
- on, off
- Default value: off
Additional notes:
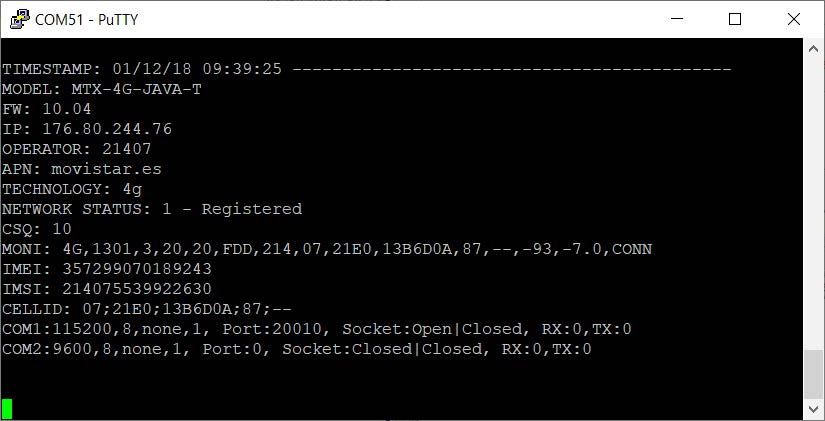
- This parameter can be useful to see the general status of the modem. It allows to see general aspects like the IP address obtained, the functioning network, the APN, the coverage, aspects of the BTS used, etc
MTX_numGSMErrors
Description: this parameter allows, when there are multiple registry problems in the network, to autoreset the modem after X periods of registry tries. Possible values:
- 0 … 10000 (10 second blocks)
- Default value: 0 (deactivated)
Additional notes:
- MTX-Tunnel tries to register in the network and checks that registry every 10 seconds. If the established value for that parameter is > 0, after re-trying, the modem will autoreset. For example, if you specify a value of 90, if the MTX modem can’t register in the network in 90×10=900 seconds (15 minutes) the modem will autoreset. Although generally this parameter isn’t necessary, it can be in some conflictive areas, where there are BTS problems normally. A value of 180 is recommended for security reasons.
MTX_defaultPrefix
Description: this parameter allows to assign a prefix to an entering call without a prefix. Possible values:
- Up to 8 characters
- Default value: none (deactivated)
Additional notes:
- For instance, if you call a modem located in Spain from a Spanish phone number located in Spain, the telephone number received by the modem won’t have the +34 prefix. If you configure the entering phone number as an authorized number (SMS_validPhone1), you will need to configure the parameter MTX_defaultPrefix to “+34” so that prefix can be added to the incoming number
MTX_temporalClientTimeout
Description: if a temporary TCP client socket is established, this parameter indicates how many seconds must pass without traffic on the socket (transmission or reception) for the temporary socket to close.
- Possible values: 0… 3600 (seconds)
- Default value: 60
Additional notes:
- Parameter available since version 10.18. In previous versions the value is always 60 seconds
MTX_api232Resp
Description: This parameter is useful with the AT^MTXTUNNEL = RS232,… command. It allows you to specify whether the response collected by said AT command should be returned in ASCII or HEX format.
For example, if the command AT^MTXTUNNEL = RS232, … were used to send a command by SMS to the MTX modem which would be forwarded through the serial port to a device, and this would generate a response, said response would be forwarded literally when this parameter is in “ascii” mode or in hexadecimal when in “hex” mode. This is very useful when devices are outputting unrepresentable binary data in “ascii” format.
Possible values:
- ascii, hex
- Default value: ascii

 Geben Sie den Verbindungsmodus „ethernet“ oder „modem“ ein:
 Stellen Sie bei einer Ethernet-Konfiguration sicher, dass die IP-Parameter mit dem Serverzugriff entsprechend der lokalen Netzwerkkonfiguration des Hubs kompatibel sind. Bei einer Ethernet-Verbindung muss die Konfiguration mit der lokalen Netztopologie des Hubs kompatibel sein, damit dieser auf die Server zugreifen kann. Diese Konfiguration erfolgt über die Konfigurationsseite „Networks“ (siehe Kapitel 3.2.2.3: „Netzwerke (Networks)“).
Bei einer Modemverbindung muss das Modem korrekt konfiguriert sein, bevor eine Verbindung hergestellt werden kann. Diese Konfiguration erfolgt auf der Konfigurationsseite „Modem“ (siehe Kapitel 3.2.2.4: „Modem“).
Die minimal zu konfigurierenden Serverparameter sind folgende:
Stellen Sie bei einer Ethernet-Konfiguration sicher, dass die IP-Parameter mit dem Serverzugriff entsprechend der lokalen Netzwerkkonfiguration des Hubs kompatibel sind. Bei einer Ethernet-Verbindung muss die Konfiguration mit der lokalen Netztopologie des Hubs kompatibel sein, damit dieser auf die Server zugreifen kann. Diese Konfiguration erfolgt über die Konfigurationsseite „Networks“ (siehe Kapitel 3.2.2.3: „Netzwerke (Networks)“).
Bei einer Modemverbindung muss das Modem korrekt konfiguriert sein, bevor eine Verbindung hergestellt werden kann. Diese Konfiguration erfolgt auf der Konfigurationsseite „Modem“ (siehe Kapitel 3.2.2.4: „Modem“).
Die minimal zu konfigurierenden Serverparameter sind folgende:
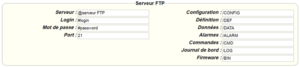
 Diese Felder müssen konfiguriert werden: „Interface“, „Type“, „Server type“, „Address“, „Port“, „Login“ und „Password“.
In den übrigen Feldern können die Standardwerte beibehalten werden, solange die Verzeichnisse zuvor korrekt angelegt wurden. Weitere Einzelheiten siehe Kapitel 3.1.2: „Konfigurationsdateien“.
Diese Felder müssen konfiguriert werden: „Interface“, „Type“, „Server type“, „Address“, „Port“, „Login“ und „Password“.
In den übrigen Feldern können die Standardwerte beibehalten werden, solange die Verzeichnisse zuvor korrekt angelegt wurden. Weitere Einzelheiten siehe Kapitel 3.1.2: „Konfigurationsdateien“.


 Warten Sie. Der Hub startet nach ein paar Augenblicken mit der Werkseinstellung neu.