Suchen Sie etwas anderes?
Titan – AN44: IPSEC – Client-Server IKEv2 – Authentication with certificate
Inhaltsverzeichnis
Scenario Details
We need to implement a secure network between 3 PLCs, so that they can communicate with each other. For this, an IPSec tunnel will be created, where a Titan router connected to the PLC3 will act as the IPSec Master. This Titan router will have a SIM card with a fixed IP address 88.28.221.24. Titan routers connected to PLC1 and PLC2 will play the role of the IPSec Client. The following diagram shows the connection diagram with the relevant IP address scheme of all devices.
Description of the Example
In this example we will use digital certificate authentication.
Configuration and Previous Requirements
The basic requirement to be able to carry out the application is that the SIM card inserted in the Titan router that will act as IPSec Server must have a public and static IP address. This is necessary to be able to access remotely from the other Titan routers connected to the public Internet. Also make sure that all the Titans have the correct time, since the generation and validity management of the certificates needs it.
Router Titan IPSEC (SERVER) Configuration
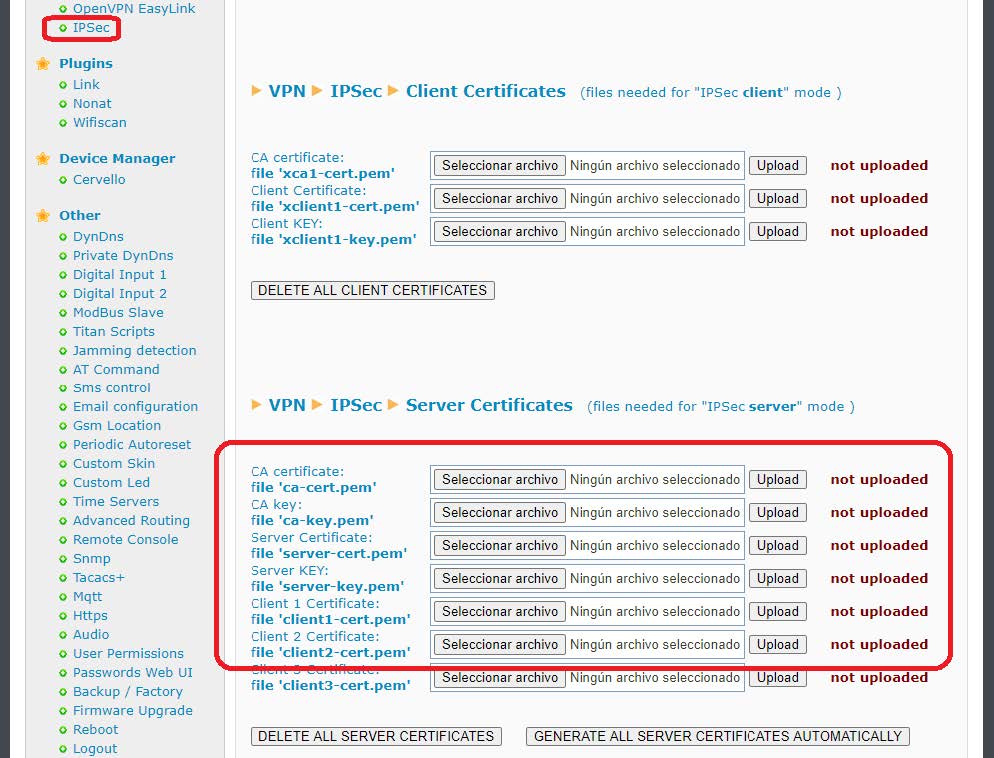
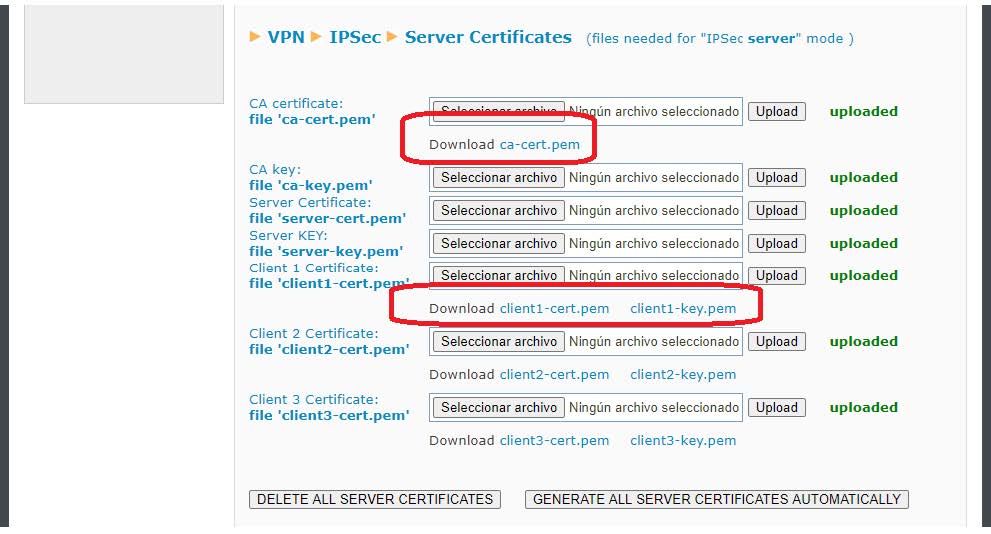
The first thing to do is go to the VPN>IPSEC menu. For the planned configuration we will need the certificates ca-cert.pem, and server-cert.pem. Obviously also your private keys ca-key.pem and server-key.pem. You will also need a pair of client certificates and their private keys “client1-cert.pem”, “client1-key.pem”, “client2-cert.pem”, “client2-key.pem”,
At this point there are two possibilities. 1. If these certificates are available, they can be uploaded manually from the section indicated in red:
2. If the certificates are not available, the Titan router has a button to generate them. When you press the button, all certificates will be generated automatically. The process can take up to 5 minutes to finish. Press the REFRESH button to check the status of the process.
In this example, we use the second option to automatically generate all certificates. To do this, you must, as indicated, press the button GENERATE ALL SERVER CERTIFICATES AUTOMATICALLY.
Very important note: Make sure the router is on time before generating the certificates
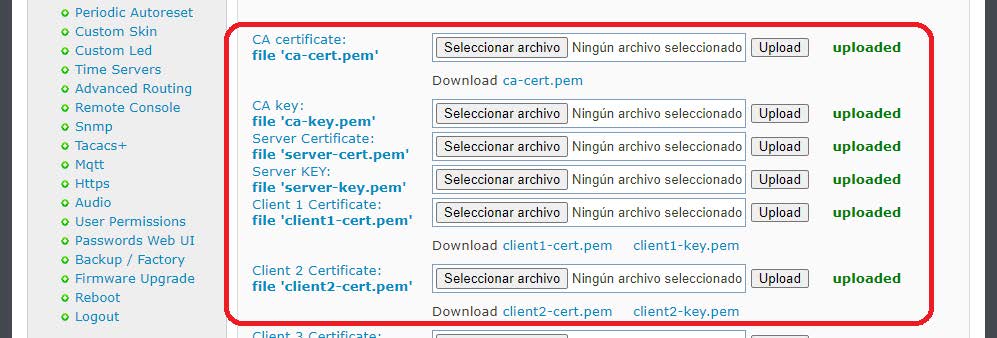
After completing the process correctly this will be the result:
Once you have the necessary certificates, you must proceed to the configuration of the VPN itself. To do this, check the “Enabled” box at the beginning of this configuration page and press the “SAVE CONFIG” button.
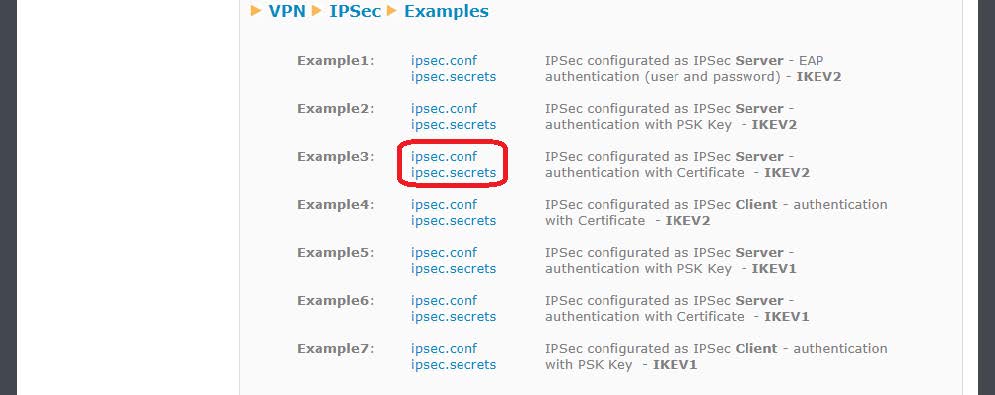
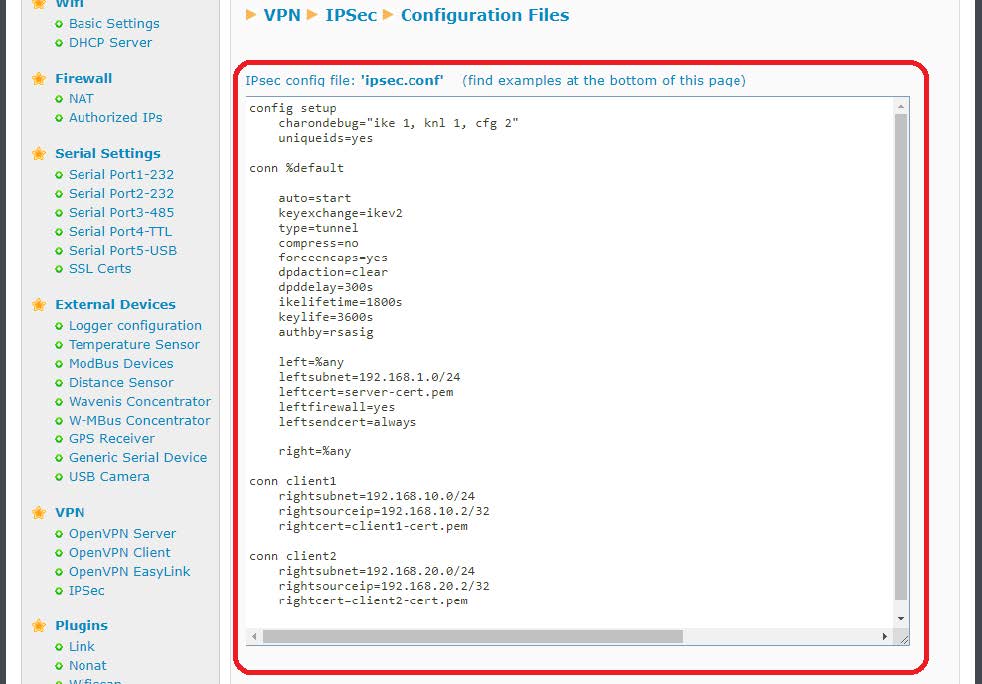
Finally, since the IPSec service of the Titan router is based on strongswan, the files “ipsec.conf” and “ipsec.secrets” must be configured. The easiest thing is to go to the examples at the bottom of the page and get the example that is closest to what you want to configure. In the case of this application note, Example 3 is chosen (since we are configuring the Server), by clicking (downloading) the corresponding files ipsec.conf and ipsec.secrets, which we will open with a notepad to get your content.
This content should be adapted to the example and inserted in the appropriate box. For ipsec.conf:
And for ipsec.secrets (previously you must click on the Show/Hide legend to show the box):
And then the SAVE CONFIG button will be pressed, which will save the content of both files in the internal memory of the Titan router. Finally, if the IPSec service was not started when the router was started (that is, the “Enabled” box was not active), the router must be completely rebooted (“Other>Reboot” menu). If the IPSec service was already started (“Enabled” box active), you can only press the “RESTART IPSEC” button to restart the IPSec service with the new configuration without having to restart the router completely, a much faster option.
After restarting the router or pressing the “RESTART IPSEC” button (if the service was already active), the status of the IPSEC connection will appear as follows. If the Status box is blank, the service may not have started yet. Wait a few seconds and press the REFRESH button.
Router Titan IPSEC (CLIENT) Configuration
In this section the Titan router will be configured with the IPSec client role that is connected to PLC1. The configuration of the second Titan acting with the same role, connected to PLC2, is completely analogous.
The first thing to do is go to the VPN> IPSEC menu. For the planned configuration we will need the certificates related to the “Client Certificates” section.
These certificates can be downloaded from the certificates section of the Titan router that acts as IPSec Master and that were previously generated. For the Titan connected to the PLC1 we download the files ca-cert, client1-cert.pem and client1-key.pem.
For the Titan connected to the PLC2 it would also be the file ca-cert but the client2 file would be client2-cert.pem, client2-key.pem.
Once the certificates have been uploaded to the Titan router, this would be what the configuration screen would look like:
Once you have the necessary certificates, you must proceed to the configuration of the VPN itself. To do this, check the “Enabled” box at the beginning of this configuration page and press the “SAVE CONFIG” button.
Finally, since the IPSec service of the Titan router is based on strongswan, the files “ipsec.conf” and “ipsec.secrets” must be configured. The easiest thing is to go to the examples at the bottom of the page and get the example that is closest to what you want to configure. In the case of this application note, Example 4 is chosen (since we are configuring the Client), by clicking (downloading) the corresponding files ipsec.conf and ipsec.secrets, which we will open with a notepad to get your content.
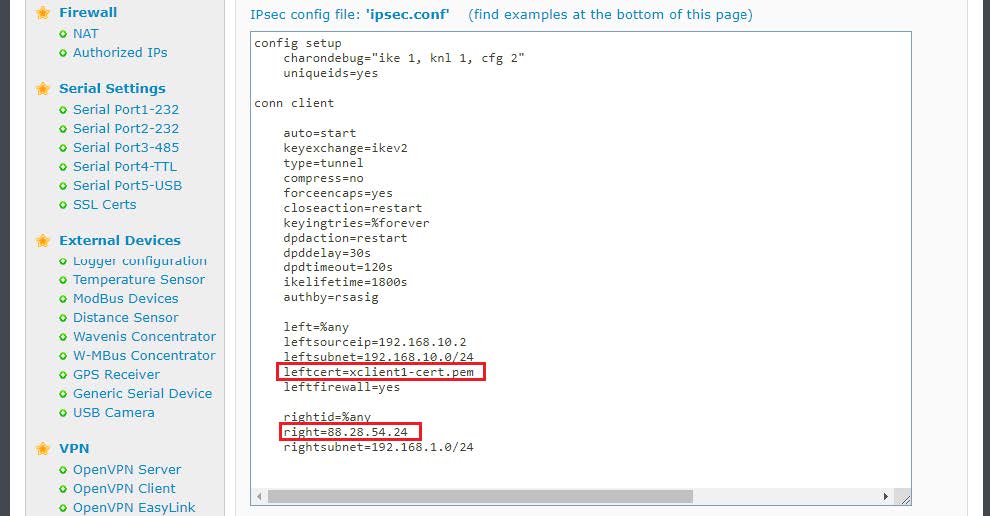
Said content must be adapted to the scenario and inserted in the appropriate box. For ipsec.conf:
Remember that in right you must indicate the public IP of the Titan that acts as IPSec Master, in the case of this example 88.28.54.84. Note also that in leftcert, the value must be xclient1-cert.pem in the 2 titans that act as IPSec client, since it is the name with which the Titan router stores this certificate internally as seen above and as shown in the following image.
And for ipsec.secrets (previously you must click on the Show/Hide legend to show the box):
And then the SAVE CONFIG button will be pressed, which will save the content of both files in the internal memory of the Titan router. Finally, if the IPSec service was not started when the router was started (that is, the “Enabled” box was not active), the router must be completely rebooted (“Other> Reboot” menu). If the IPSec service was already started (“Enabled” box active), you can only press the “RESTART IPSEC” button to restart the IPSec service with the new configuration without having to restart the router completely, a much faster option.
After restarting the router or pressing the “RESTART IPSEC” button (if the service was already active), the status of the IPSEC connection will appear as follows. If the Status box is blank, the service may not have started yet. Wait a few seconds and press the REFRESH button. If everything works fine, you should see a screen like the following:
At this point the PLC1 (client) and PLC3 (server) could already interact with each other through a secure IPSec tunnel. Repeat the same procedure for the titan router connected to PLC2.










 Geben Sie den Verbindungsmodus „ethernet“ oder „modem“ ein:
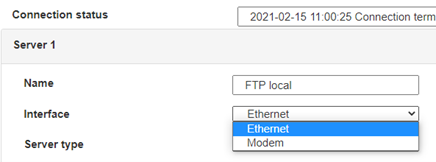 Stellen Sie bei einer Ethernet-Konfiguration sicher, dass die IP-Parameter mit dem Serverzugriff entsprechend der lokalen Netzwerkkonfiguration des Hubs kompatibel sind. Bei einer Ethernet-Verbindung muss die Konfiguration mit der lokalen Netztopologie des Hubs kompatibel sein, damit dieser auf die Server zugreifen kann. Diese Konfiguration erfolgt über die Konfigurationsseite „Networks“ (siehe Kapitel 3.2.2.3: „Netzwerke (Networks)“).
Bei einer Modemverbindung muss das Modem korrekt konfiguriert sein, bevor eine Verbindung hergestellt werden kann. Diese Konfiguration erfolgt auf der Konfigurationsseite „Modem“ (siehe Kapitel 3.2.2.4: „Modem“).
Die minimal zu konfigurierenden Serverparameter sind folgende:
 Diese Felder müssen konfiguriert werden: „Interface“, „Type“, „Server type“, „Address“, „Port“, „Login“ und „Password“.
In den übrigen Feldern können die Standardwerte beibehalten werden, solange die Verzeichnisse zuvor korrekt angelegt wurden. Weitere Einzelheiten siehe Kapitel 3.1.2: „Konfigurationsdateien“.


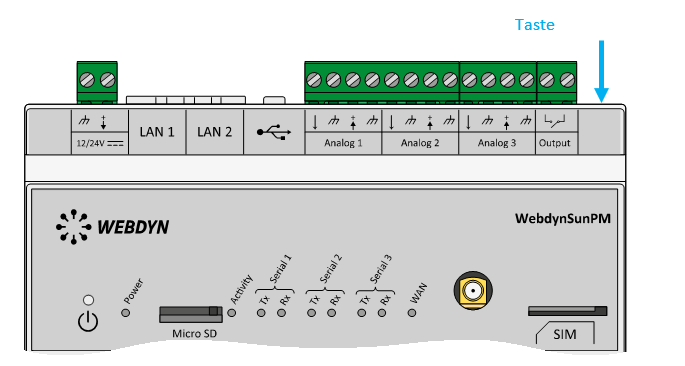 Warten Sie. Der Hub startet nach ein paar Augenblicken mit der Werkseinstellung neu.


