Vai al contenuto principale
Suchen Sie etwas anderes?
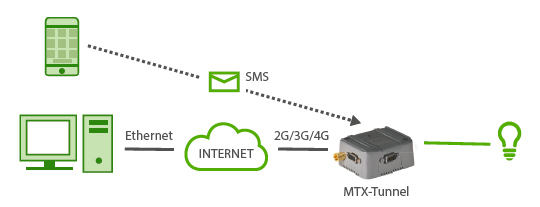
Scenario details:
- We need to be able to activate a relays for some seconds by sending an SMS message
- By sending an SMS with the text “ON”, the relay will be activated for X seconds. Then, the relay (when an SMS with “ON” is received) will be activated for 10 seconds
- Only the authorized telephone numbers (666123456 and 666123457) will be capable of activating the relay
- The relay needs to be activated remotely, via Telnet, as well as being able to change the MTX configuration remotely
Solution: MTX-Tunnel firmware + MTX-Java-IoT
EXAMPLE of settings (file config.txt) for such scenario:
| Configuration | Observations |
| GPRS_apn: movistar.es GPRS_login: MOVISTAR GPRS_password: MOVISTAR GPRS_timeout: 10 MTX_PIN: 0000 MTX_model: 199802407 MTX_mode: none MTX_urc: off TELNET_enabled: on TELNET_login: user TELNET_password: 1234 TELNET_port: 20023 FIREWALL_enabled: off SMS_allPhones: off SMS_validPhone1: +34666123456 SMS_validPhone2: +34666123457 SMS_ATEnabled: on SMS_ATResponse: on SMS_alias1: ON1>AT^MTXTUNNEL=SETIO,5,1 SMS_alias2: OFF1>AT^MTXTUNNEL=SETIO,5,0 SMS_aliasOk: CommandOk SMS_aliasError: CommandError |
APN GPRS provided by the GSM operator GPRS Login GPRS Password 10 minute sessions If SIM card doesn’t have PIN, leave as 0000 The MTX model chosen is MTX-DIN We do not want GPRS gateways We do not need URC information messages Telnet is activated Login for Telnet Password for Telnet Telnet port Connections from any IP can be made Not all phones will be used Authorized number 1 Authorized number 2 AT commands can be received SMS responses sent to AT commands Relay1 activated when receives SMS with ON1 Relay2 deactivated when receives SMS with OFF1 If command correctly executed, sent by SMS If command incorrectly executed, sent by SMS |
Details:
- Remember that the relay of the MTX-4G-Java-IoT-STD-N-RL is associated to GPIO6, as you can see on the tables of Annex at the end of this guide

 Enter the “ethernet” or “modem” connection type:
 For an ethernet configuration, make sure the IP parameters are compatible with server access according to the concentrator local network configuration. For an ethernet connection, the configuration must be compatible with the concentrator’s local network topology so that it can access the servers. This configuration is done from the “Networks” configuration page (see section 3.2.2.3: “Networks”).
For a modem connection, the modem configuration must be correct before a connection can be set up. This configuration is done from the “Modem” configuration page (see section 3.2.2.4: “Modem”).
The parameters for the servers to be configured are at least the following:
For an ethernet configuration, make sure the IP parameters are compatible with server access according to the concentrator local network configuration. For an ethernet connection, the configuration must be compatible with the concentrator’s local network topology so that it can access the servers. This configuration is done from the “Networks” configuration page (see section 3.2.2.3: “Networks”).
For a modem connection, the modem configuration must be correct before a connection can be set up. This configuration is done from the “Modem” configuration page (see section 3.2.2.4: “Modem”).
The parameters for the servers to be configured are at least the following:
 Therefore the following fields need to be configured: “Interface”, “Type”, “Server type”, “Address”, “Port”, “Login” and “Password”.
The other fields can be left at the default values subject to the directories having been properly created beforehand. See section 3.1.2: “Configuration files” for more details.
Therefore the following fields need to be configured: “Interface”, “Type”, “Server type”, “Address”, “Port”, “Login” and “Password”.
The other fields can be left at the default values subject to the directories having been properly created beforehand. See section 3.1.2: “Configuration files” for more details.


 Wait. The concentrator will reboot using its factory configuration.


