Caratteristiche tecniche

4G

Ethernet

Guida DIN

Ingressi digitali

0-10V / 4-20mA

Relè

RS485/
RS422
USB

Allarmi

Configurazione da remoto

Gestione dell’energia

MQTT, MQTT(s)

FTP
SFTP
WebDAV HTTP/s

Configuraz. SMS

Conforme a SunSpec
4G
Ethernet
Guida DIN
Ingressi digitali
0-10V / 4-20mA
Relè
RS485/
RS422
USB
Allarmi
Configurazione da remoto
Gestione dell’energia
MQTT, MQTT(s)
FTP
SFTP
WebDAV HTTP/s
Configuraz. SMS
Conforme a SunSpec

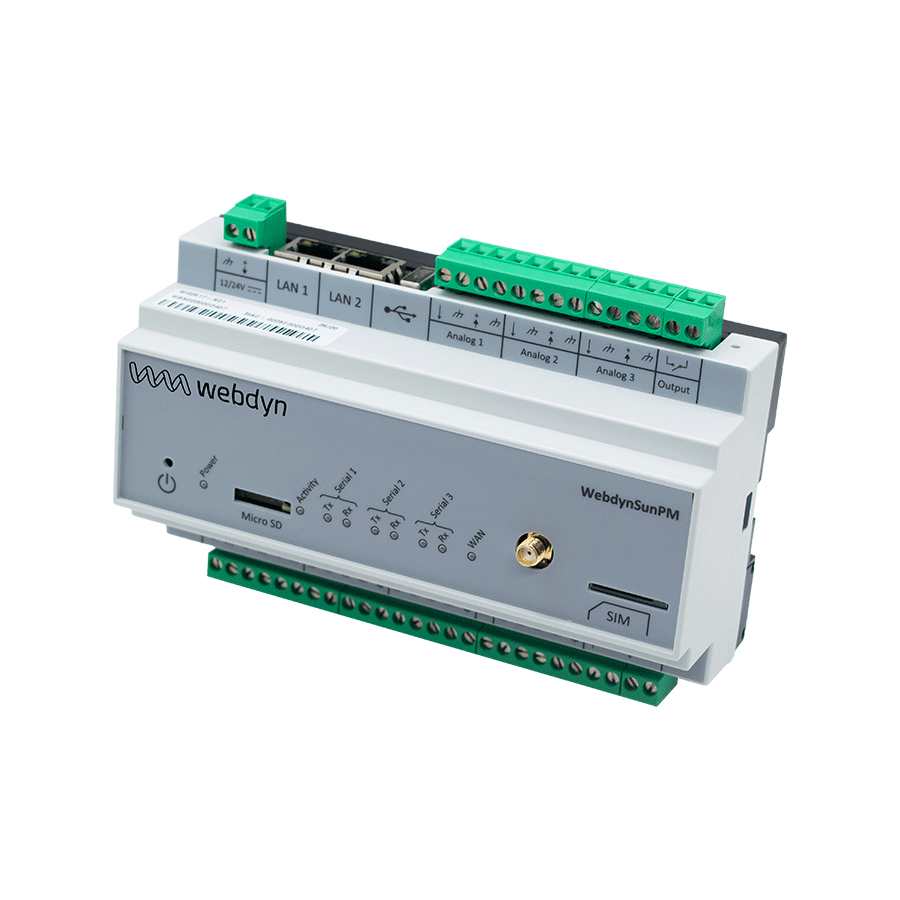
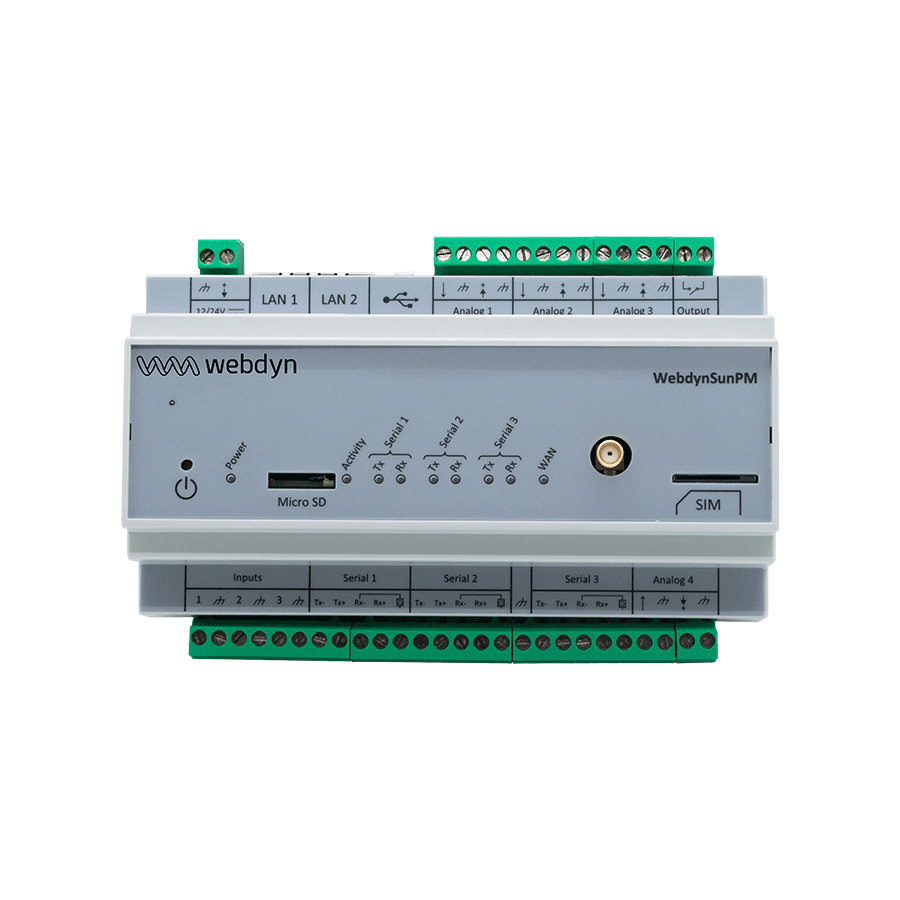
Il gateway WebdynSunPM è utilizzato per monitorare e controllare gli impianti fotovoltaici, raccogliendo, analizzando e modificando i parametri dell’apparecchiatura. Definire i propri scenari per modulare l’energia immessa in rete, ottimizzare lo stoccaggio di energia e gestire i consumi. L’installazione e la programmazione è semplice e di facile uso grazie al server web incorporato e da remoto. È compatibile con qualsiasi piattaforma, essendo in grado di inviare i dati a uno o due server FTP o eseguirne il backup, localmente, su una scheda micro SD. La funzionalità di gestione della produzione è valida per l’autoconsumo, lo stoccaggio, ecc.


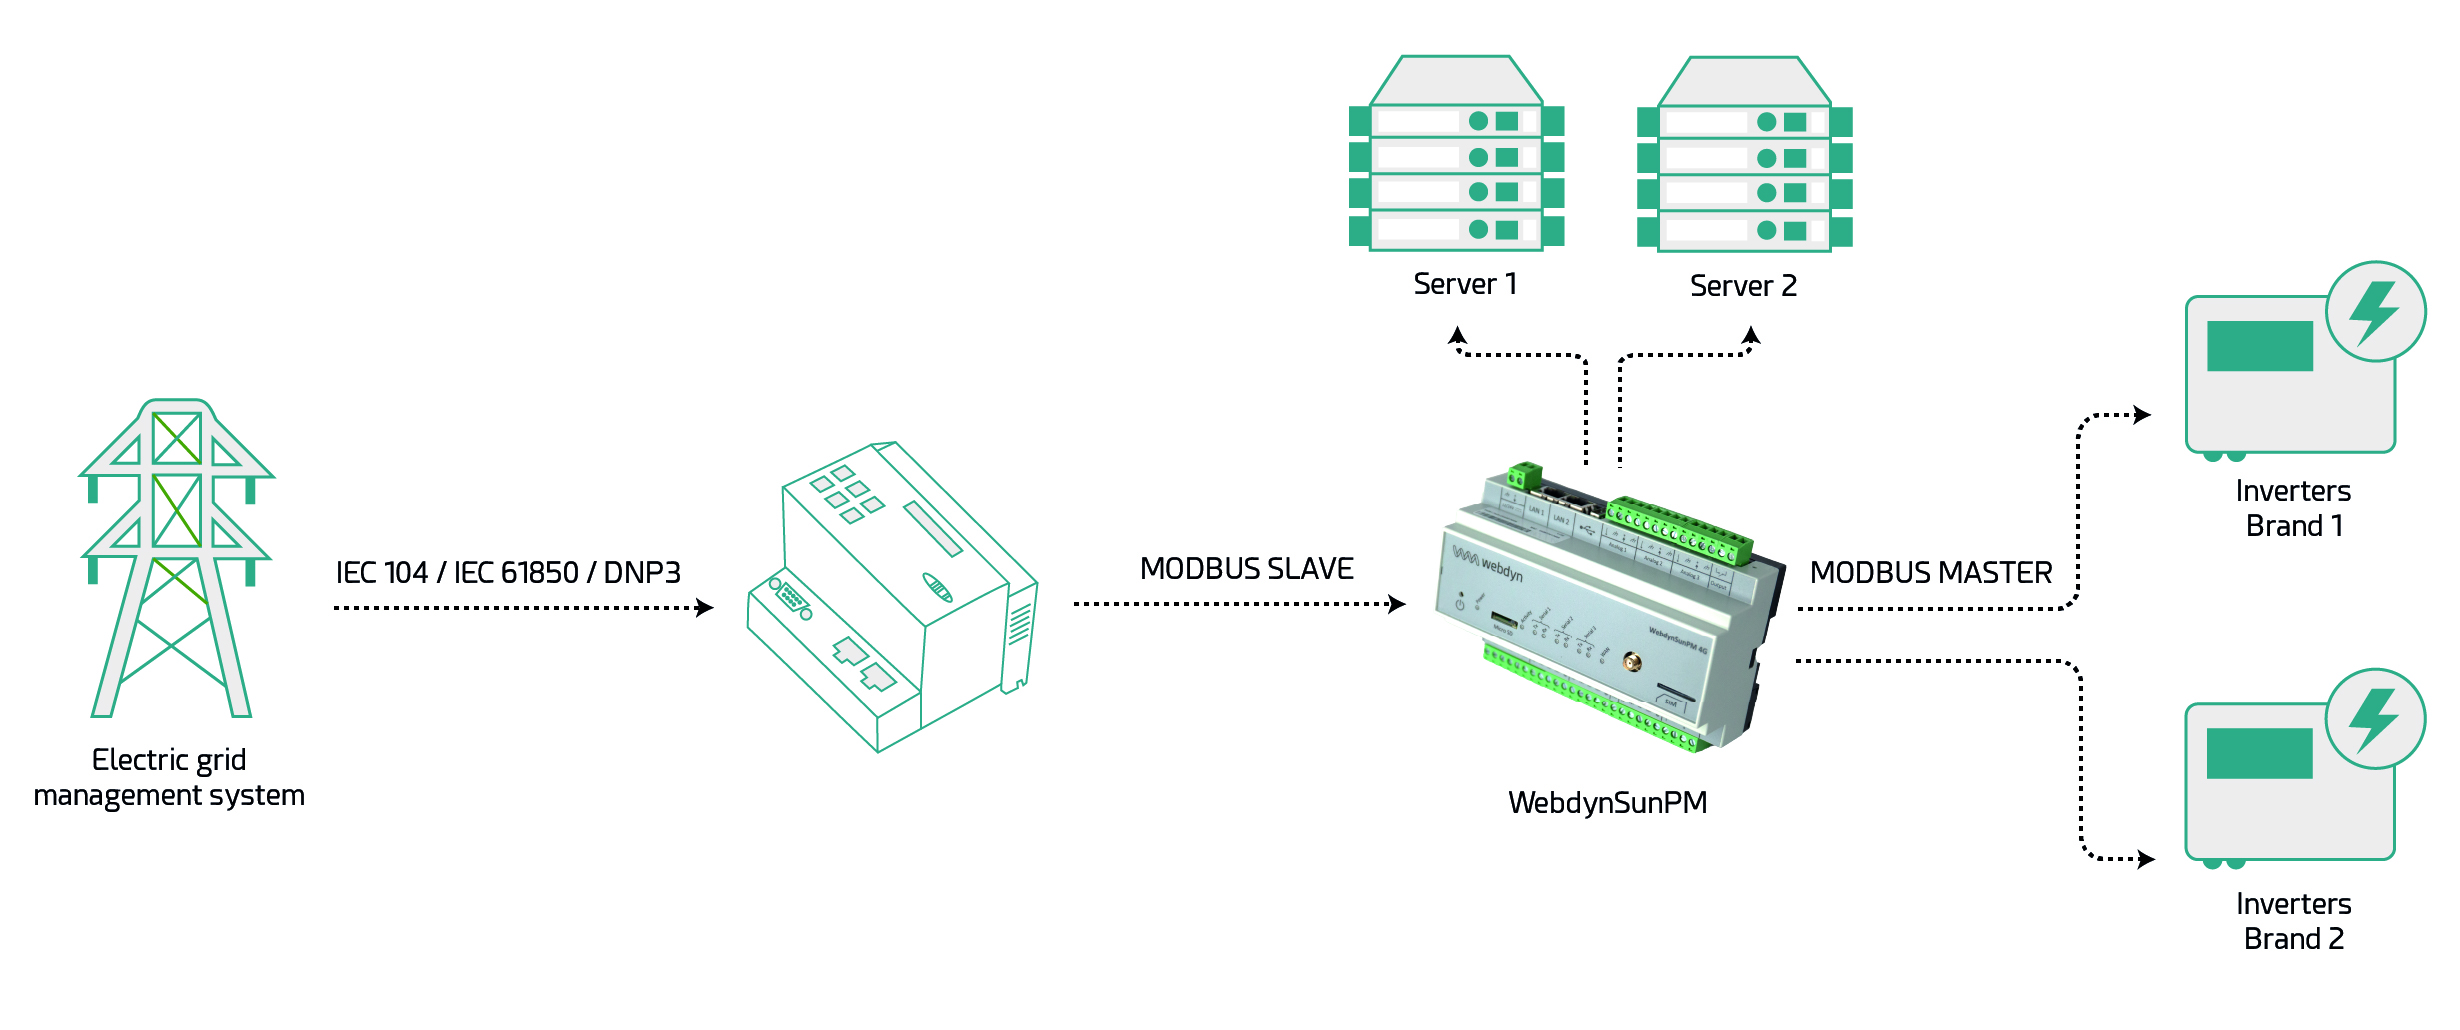
Gateway agnostico:- Conforme a Sunspec, Modbus RTU/TCP, protocolli proprietari (KACO, SMA, Delta, Solarmax...).- Compatibile con oltre 2000 referenze di marchi di inverter/contatori/sensori.
Nessuna restrizione sulla capacità dell'impianto fotovoltaico.
Rilevamento automatico dell'inverter.
Consumo di dati molto basso sulle reti mobili.
Due possibili server di destinazione
Server web intuitivo integrato per una facile configurazione
Funzionalità aggiuntive disponibili come opzione:- Iniezione zero- Disaccoppiamento- Regolazione della potenza- Gestione BESS
Monitoraggio in tempo reale della produzione di energia elettrica
Flessibilità di scambio
Gestione della potenza: iniezione zero nella rete
Gestione dei prezzi negativi
Gestione BESS
Gestione caricatori EV
Automazione delle azioni locali
Manutenzione locale o remota (allarmi, risoluzione dei problemi, correzioni...)
4G
Ethernet
Guida DIN
Ingressi digitali
0-10V / 4-20mA
Relè
RS485/
RS422
USB
Allarmi
Configurazione da remoto
Gestione dell’energia
MQTT, MQTT(s)
FTP
SFTP
WebDAV HTTP/s
Configuraz. SMS
Conforme a SunSpec
Connettività 4G
3x RS485/RS422
4x ingressi analogici
3x ingressi digitali
1x relè
1x USB
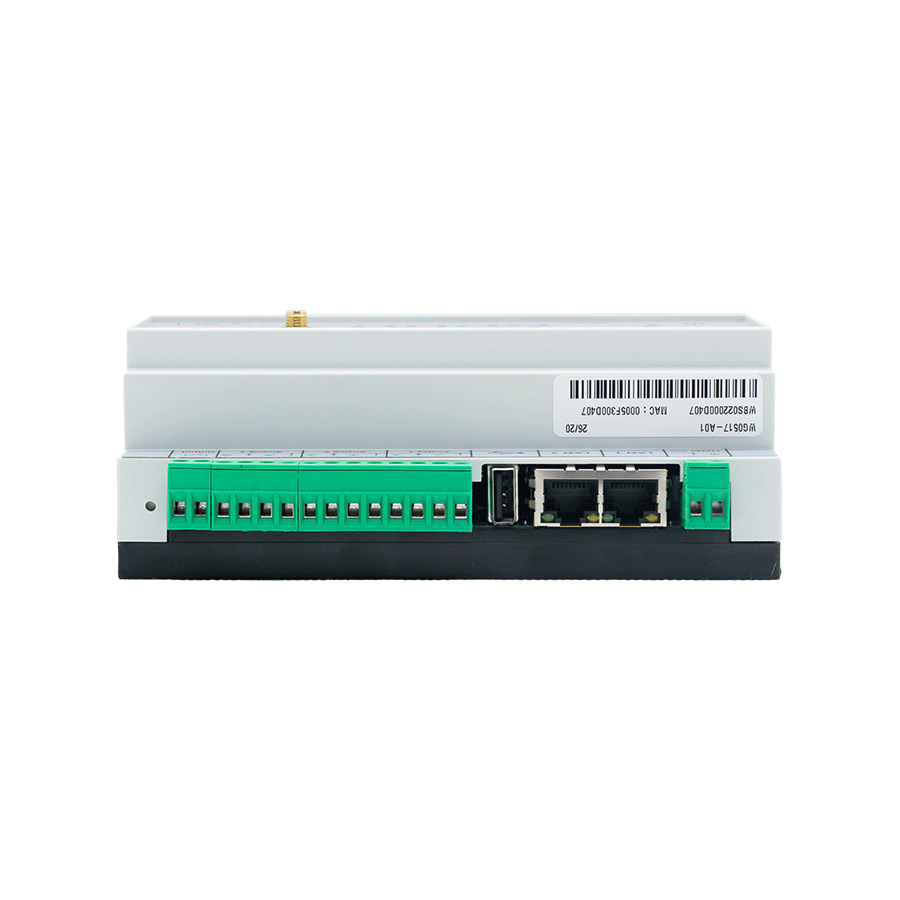
2x RJ45: Ethernet
1x Scheda SD di ingresso
1x supporto per scheda SIM
2x Ethernet (interfaccia web, connessione server)
1x connettore SMA F
2x morsettiere: alimentazione, RS485/422, ingressi a impulsi, ingressi analogici, relè
Status dei LED
Guida DIN
Ingresso CC: Da +12 a +24 Vdc
Consumo: 4 W max.
Intervallo di temperatura: -5ºC - +50ºC
Temperatura di stoccaggio: -20ºC - +85ºC
Dimensioni: 157X108x59 mm
Peso: 340 g
Certificazioni: RED, RoHS, REACH
| WebdynSunPM 4G |
|---|
| 4G: LTE-FDD B1/ B3/ B5/ B7/ B8/ B20/ B28 |
| LTE-FDD Data Rate (Mbps): 10 (DL)/ 5 (UL) |
| GPRS Data Rate (kbps): 85.6 (DL)/ 85.6 (UL) |
| EDGE Data Rate (kbps): 236.8 (DL)/ 236.8 (UL) |
| References | Descriptions |
|---|---|
| GATEWAY | |
| WG0517-A04 | WebdynSunPM 4G |
| LICENZE SOFTWARE | |
| PR08-01 | Licenza Iniezione Zero |
| PR08-02 | Licenza Funzione di Regolazione di Potenza Semplificata |
| PR08-05 | Licenza Controllo Ondulazione IO |
| PR08-06 | Licenza di Disaccoppiamento |
| PR08-07 | Licenza Regolazione Attiva della Potenza con Limitazione della Produzione |
| STAZIONI METEOROLOGICHE | |
| AC2201-01 | Pacchetto Stazione Meteorologica: Irraggiamento, Temperatura Ambiente + Modulo, Velocità del Vento |
| AC2201-02 | Pacchetto Stazione Meteorologica Light: Irraggiamento, Temperatura Ambiente + Modulo |
| ALTRI ACCESSORI | |
| AC0103-00-DR15 | Alimentatore 24 V DC / 15 W |
| AC020-1x (x to be replaced with the m requested) | Antenna GSM 5 + LTE 700/2600 SMA M - IP67 - RG58. “x” indica: 1 (5 m), 2 (20 m), 3 (10 m) |
| AC1201-01 | IO Expander 8 ingressi digitali / 6 uscite relè – Modbus Slave |
| AC1201-02 | IO Expander 16 ingressi digitali – Modbus Slave |
| AC1202-01 | IO Expander 8 ingressi analogici – Modbus Slave |
| AC1601-01 | Convertitore TIC - USB |
| AC1303-01 | Contatore Elettrico – Lettel MCX4- 34 – Modbus RTU/TCP |
| AC1304-01 | Sensore di Corrente Rogowski 1000 A |
Start by checking that the computer’s IP parameters are compatible with the WebdynSunPM IP address (by default 192.168.1.12)
Launch a web browser (Chrome, Firefox, Edge, Safari, etc.) and enter the WebdynSunPM concentrator IP address in the address bar. An authentication page is displayed:

The default accesses are:
| Identifiant | Mot de passe |
| userhigh | high |
Click “Login”
 Enter the “ethernet” or “modem” connection type:
 For an ethernet configuration, make sure the IP parameters are compatible with server access according to the concentrator local network configuration. For an ethernet connection, the configuration must be compatible with the concentrator’s local network topology so that it can access the servers. This configuration is done from the “Networks” configuration page (see section 3.2.2.3: “Networks”).
For a modem connection, the modem configuration must be correct before a connection can be set up. This configuration is done from the “Modem” configuration page (see section 3.2.2.4: “Modem”).
The parameters for the servers to be configured are at least the following:
For an ethernet configuration, make sure the IP parameters are compatible with server access according to the concentrator local network configuration. For an ethernet connection, the configuration must be compatible with the concentrator’s local network topology so that it can access the servers. This configuration is done from the “Networks” configuration page (see section 3.2.2.3: “Networks”).
For a modem connection, the modem configuration must be correct before a connection can be set up. This configuration is done from the “Modem” configuration page (see section 3.2.2.4: “Modem”).
The parameters for the servers to be configured are at least the following:
 Therefore the following fields need to be configured: “Interface”, “Type”, “Server type”, “Address”, “Port”, “Login” and “Password”.
The other fields can be left at the default values subject to the directories having been properly created beforehand. See section 3.1.2: “Configuration files” for more details.
Therefore the following fields need to be configured: “Interface”, “Type”, “Server type”, “Address”, “Port”, “Login” and “Password”.
The other fields can be left at the default values subject to the directories having been properly created beforehand. See section 3.1.2: “Configuration files” for more details.


Access to the FTP server depends on the selected solution.
If you have chosen a portal, it will give you the FTP server access identifiers.
If you want to use your own FTP server, contact your network administrator.
For all other configurations, and to determine the best solution, contact the Webdyn sales department which will advise you and direct you to the relevant contacts: contact@webdyn.com
 Wait. The concentrator will reboot using its factory configuration.

It is possible to send commands to connected devices if they accept them.
The WebdynSunPM can store up to 50Mb of uncompressed data per declared device.
If there is no access to the remote server, the WebdynSunPM concentrator can store the data for several months.
The maximum data storage time varies depending on the amount of data to be collected and the configured collection frequency.
The average storage time varies from 3 to 4 months.
The average service life of the battery is 5 years.
It may vary depending on the installation environment.
All our products are guaranteed for 2 years.
For more information, read the general terms and conditions of sale.
The data volume depends on the exchanged files.
The average is about 5 MB per month but this varies from one installation to another.

The default accesses are:
Username: userhigh
Password: high
There are two types of configuration: via the web interface or via SMS.
Configuration of the web interface:
1/ Go to the configuration page with the gateway IP address (default 192.168.1.12)
2/ Go to the Configuration tab.
3/ Select either the Ethernet or modem connection mode:
If connecting via the local network (Ethernet):
Please note, all fields must be completed in accordance with the configuration of your local network.

If connecting via the GPRS network (Modem):

4/ Edit the FTP server parameters.

5/ Confirm the changes.
6/ Restart the WebdynSun gateway using the new settings.
7/ In the menu, click on the “installation” tab, followed by the “connection” sub-tab and start the connection.
Configuration via SMS:
This configuration method requires the use of an active SIM card with a data option and a pin code that must be either “0000” or disabled.
The SIM card must be inserted into the unit before connection to the mains supply.
After connection to the mains supply, send the following SMS messages to the number of the previously inserted SIM card:
SMS for configuring the APN:
After replacing the generic fields with those of your operator, send the following SMS*:
apn=apn_name;usr=user_name;pwd=password;
Replace the above SMS fields with the following information:
SMS for FTP configuration:
After replacing the generic fields with those of your FTP server, send the following SMS*:
Ftp=server_name:user_name:password:port;
Replace the above SMS fields with the following information:
Connection SMS:
Send the word “connect” by SMS* to launch a connection to the FTP server
*Please note: the formatting of the SMS must be exactly identical to that shown above (e.g.: no spaces between characters, etc.)
There are 2 ways of resetting the gateway.
NB : Resetting the gateway restores the configuration to its original state. Please note: data will be saved but the specific settings will not. Therefore, all the settings must be reconfigured.
Commands can be sent to connected devices with the exception of certain inverters and Modbus slaves that do not accept write requests.
If the device allows it, command files can be created on the FTP server.
The WebdynSun has a memory of about 100MB.
Therefore, if the remote server cannot be accessed, the WebdynSun gateway can backup data for several months.
The maximum data backup time varies depending on the amount of data to be collected.
The average backup time ranges from 3 to 4 months.
The average battery life is 5 years.
It may vary depending on the installation environment.
Yes, data may be sent to a PLC if the latter is equipped with a Modbus protocol.
The “Report” configuration file allows the WebdynSun gateway to automatically write the values read on a Modbus slave
All our products are guaranteed for 2 years.
For further information, please see our general conditions of sale.
Files uploaded by the WebdynSun gateway are compressed in Gz format.
The data contained in these files is structured in csv format.
The data volume depends on the files exchanged.
The average is about 5 MB per month but this varies from one installation to another.
Different brands of inverter may be connected to the RS485(B) port or via the Ethernet port if the inverter protocol is based on the Modbus protocol (RTU or TCP).
However, different brands of inverters cannot be connected to the same RS485(A) port.

Para que se carguen los datos de los módulos WM-bus, es necesario


Un módulo puede definirse de forma única por todos los campos siguientes:
Si los datos de un módulo estuviesen encriptados, es posible definir la clave de encriptado de este módulo en el campo “Key”.
Para simplificar la introducción de los módulos a tratar, es posible definir un grupo de módulos respetando los campos introducidos. Los otros campos se dejarán vacíos (a continuación se muestra un ejemplo de configuración que permite recuperar todos los módulos del manufacturer Webdyn (WDN) con la clave de encriptado “00000000000000000000000000000000”.
Nota: Para que se tengan en cuenta los módulos (filtros) introducidos, el modo “ByPass filter” debe estar desactivado.
Haga clic aquí para leer el archivo de medios
Haga clic aquí para leer el archivo de unidades
Für die Eskalation der Daten der WM-Bus-Module gehen Sie wie folgt vor:
Ein Modul kann durch alle folgenden Felder eindeutig definiert werden:
Falls die Daten eines Moduls verschlüsselt werden, kann der Verschlüsselungsschlüssel für dieses Modul im Feld „Schlüssel“ festgelegt werden.
Um die Eingabe der zu verarbeitenden Module zu vereinfachen, kann eine Modulgruppe definiert werden, die die eingegebenen Felder erfüllt. Die anderen Felder bleiben dann leer (nachfolgend ein Beispiel für eine Konfiguration, mit der alle Module des Herstellers Webdyn (WDN) mit Verschlüsselungsschlüssel „00000000000000000000000000000000“ abgerufen werden können.)
Hinweis: Damit die eingegebenen Module (Filter) berücksichtigt werden können, muss der Modus „Bypass filter“ (Bypass-Filter) deaktiviert werden.
Klicken Sie hier, um die Mediendatei zu lesen
Klicken Sie hier, um die Einheitendatei zu lesen
For the WM-bus module data to be transmitted, you must:
A module may be defined in a unique way by all the fields below:
If a module’s data is encrypted, the encryption key for this module can be defined in the “Key” field.
To simplify the entry of the modules to be processed, a module group can be defined that conforms to the fields entered. The other fields will then be left empty (below is an example of a configuration for retrieving all Webdyn manufacturer (WDN) modules with the encryption key “00000000000000000000000000000000”.
Note: In order for the modules (filters) entered to be taken into account, the “ByPass filter” mode must be deactivated.
Click here to read the media file
Click here to read the units file
Para que se carguen los datos de los módulos WM-bus, es necesario
Un módulo puede definirse de forma única por todos los campos siguientes:
Si los datos de un módulo estuviesen encriptados, es posible definir la clave de encriptado de este módulo en el campo “Key”.
Para simplificar la introducción de los módulos a tratar, es posible definir un grupo de módulos respetando los campos introducidos. Los otros campos se dejarán vacíos (a continuación se muestra un ejemplo de configuración que permite recuperar todos los módulos del manufacturer Webdyn (WDN) con la clave de encriptado “00000000000000000000000000000000”.
Nota: Para que se tengan en cuenta los módulos (filtros) introducidos, el modo “ByPass filter” debe estar desactivado.
Haga clic aquí para leer el archivo de medios
Haga clic aquí para leer el archivo de unidades
Für die Eskalation der Daten der WM-Bus-Module gehen Sie wie folgt vor:
Ein Modul kann durch alle folgenden Felder eindeutig definiert werden:
Falls die Daten eines Moduls verschlüsselt werden, kann der Verschlüsselungsschlüssel für dieses Modul im Feld „Schlüssel“ festgelegt werden.
Um die Eingabe der zu verarbeitenden Module zu vereinfachen, kann eine Modulgruppe definiert werden, die die eingegebenen Felder erfüllt. Die anderen Felder bleiben dann leer (nachfolgend ein Beispiel für eine Konfiguration, mit der alle Module des Herstellers Webdyn (WDN) mit Verschlüsselungsschlüssel „00000000000000000000000000000000“ abgerufen werden können.)
Hinweis: Damit die eingegebenen Module (Filter) berücksichtigt werden können, muss der Modus „Bypass filter“ (Bypass-Filter) deaktiviert werden.
Klicken Sie hier, um die Mediendatei zu lesen
Klicken Sie hier, um die Einheitendatei zu lesen
For the WM-bus module data to be transmitted, you must:
A module may be defined in a unique way by all the fields below:
If a module’s data is encrypted, the encryption key for this module can be defined in the “Key” field.
To simplify the entry of the modules to be processed, a module group can be defined that conforms to the fields entered. The other fields will then be left empty (below is an example of a configuration for retrieving all Webdyn manufacturer (WDN) modules with the encryption key “00000000000000000000000000000000”.
Note: In order for the modules (filters) entered to be taken into account, the “ByPass filter” mode must be deactivated.
Click here to read the media file
Click here to read the units file
Pour que les données des modules WM-bus soient remontées, il faut :
Un module peut être défini de manière unique par l’ensemble des champs ci-dessous :
Dans le cas où les données d’un module seraient cryptées, il est possible de définir la clé de cryptage de ce module dans le champ « Key ».
Afin de simplifier la saisie des modules à traiter, il possible de définir un groupe de module respectant les champs saisis. Les autres champs seront alors laissés vides (ci-dessous un exemple de configuration permettant de récupérer l’ensemble des modules du manufacturer Webdyn (WDN) avec pour clé de cryptage « 00000000000000000000000000000000 ».
Remarque : Pour que les modules (filtres) saisis soient pris en compte, le mode « ByPass filter » doit être désactivé.