Tunnel – Basic Concepts

Vai al contenuto principale

If still you have doubts about the new MTX-Tunnel please read the following FAQ section:

What is the MTX-Tunnel?

The MTX-Tunnel is an embedded software application that you can order from your distributor which is already installed into the MTX modems family.

What is the MTX-Tunnel for?

The MTX-Tunnel can be mainly used to create a transparent serial Gateway (or tunnel) 2G/3G/4G/GSM (RS232/485). If you already have a machine or device with a serial port and want to control them remotely as if it were physically connected to your computer, MTX-Tunnel is the solution you need.

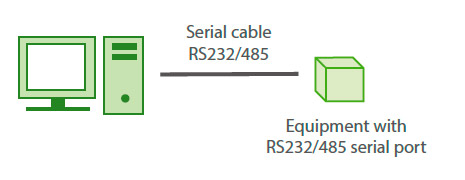
This is the scenario: serial equipment connected to a PC to read/write data…

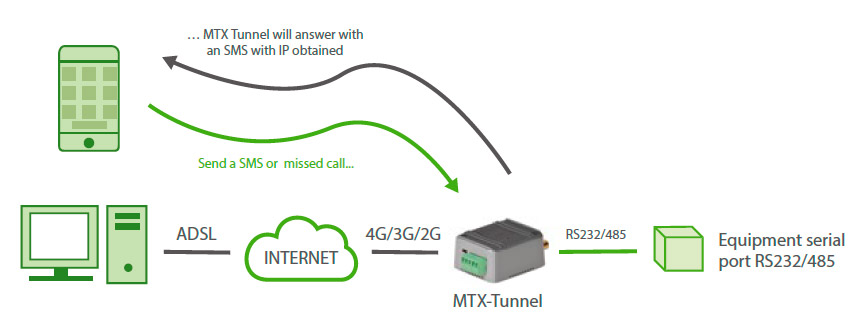
With GPRS-Serial MTX-Tunnel gateway, the above scenario is shown in the following example. Now your PC has to establish a TCP/IP connection using MTX-Tunnel. Then, EVERYTHING you send to this TCP/IP connection will be sent to the equipment’s serial port by MTX-Tunnel. On the contrary, all of the information in the equipment’s serial port is sent to your server using the GPRS network.

This feature (serial gateway 2G/3G/4G) is one of the many features that the MTX-Tunnel allows. Check the examples listed in this guide to grasp all the posibilities.

Is MTX-Tunnel needed at the PC server’s side?

It depends, but in general, it is not needed at the PC server’s side 99% of the time.

Not needed: If you already have your PC control software and have the option to connect via TCP/IP or UDP, a modem with MTX-Tunnel is not needed. Just configure the IP and the TCP port of the remote MTX-Tunnel and your PC will use the existing Internet connection to send and receive data remotely.

Not needed: If your PC control software does not have the option to connect using TCP/IP or UDP and the only option you have is to choose a COM port, the MTX-Tunnel modem is not needed. There are some freeware drivers for your operating system as Windows can emulate a COM port. Once this free driver is installed, a virtual COM (like COM100) will be installed in your PC and you must point to the IP and TCP port of the MTX-Tunnel remote. You must choose this virtual COM in your PC software.

Needed: If you need a “serial cable replacer” because you have to communicate two RS232 serial devices remotely and neither is a PC, i.e. you cannot install a virtual COM port because there is no operating system, you will need two MTX-Tunnels, one in each end. This is the scenario:

Who starts the connection?

MTX-Tunnel has the following modes TCP Server, TCP Client and UDP.

  • TCP Server mode. MTX-Tunnel is waiting to receive incoming connections. This means that the remote device (PC server) will start and establish the 2G/3G/4G – Serial Gateway. (In newer versions of MTX-Tunnel, a temporary client socket can be created when there is no connection available and MTX-Tunnel receives data via the series port
  • TCP Client mode. The MTX-Tunnel will start the Gateway. It will connect to the configured IP port of the server PC AND establish the GRPS-Serial Gateway automatically
  • UDP mode. UDP is not oriented to connection protocol. MTX-Tunnel just waits for the UDP packet and sends them to the serial port and vice versa. The data present at the serial port is sent to a PC via UDP

It is mandatory to be permanently connected to GPRS?

No, it’s not.

If your application requires it (99% of the cases), MTX-Tunnel can always be connected to GPRS/3G. Remember that network operators will bill the data volume, not time.

If you do not need MTX-Tunnel to be connected 100% of the time and you want the connection to be sporadic, MTX-Tunnel can be activated in these ways:

  1. Missed call from authorized phone number
  2. Incoming SMS with the text “mtxtunnel on” from an authorized phone number
  3. By a change on the level of an input
  4. If the analog input is higher than the configured limits
  5. With any date/hour scheduled timing
  6. Just when data is present on RS232 port (only in TCP Server mode)

So… how long is MTX-Tunnel active for (4G/3G/GPRS connected)?

It is configurable by the GPRS_timeout parameter. You can specify the time in minutes after which, if no GPRS connection is detected, MTX-Tunnel will close the session.

I want to use MTX-Tunnel as a TCP Server so I can connect to it periodically from my PC. Will I need a SIM card with a fixed IP?

It is not mandatory. There are various ways of finding out the remote IP if using SIMs with normal dynamic IP addresses. You can either make a missed call or send an SMS with the word “mtxtunnel on” to the remote MTX-Tunnel equipments. MTX-Tunnel will reply with an SMS including the IP obtained at this moment in time.

The new MTX-Tunnel is DynDNS featured. DynDNS is a service allowing you to associate a DNS name (like modem1.dyndns.org) to the IP obtained by MTX-Tunnel. For now, you can use this service for free: www.dyndns.org. It is also fully compatible with the free service offered by No-IP (www.no-ip.com).

Keep in mind that these services are NOT offered by MTX-Tunnel; we do not offer support and we are not responsible for these third party services.

I found that in my case I’m going to use thousands of MTX-Tunnel devices. I cannot use missed calls or SMSs to work out IP addresses. I do not want to use DynDNS as it can be difficult to handle and even costly. What can I do?

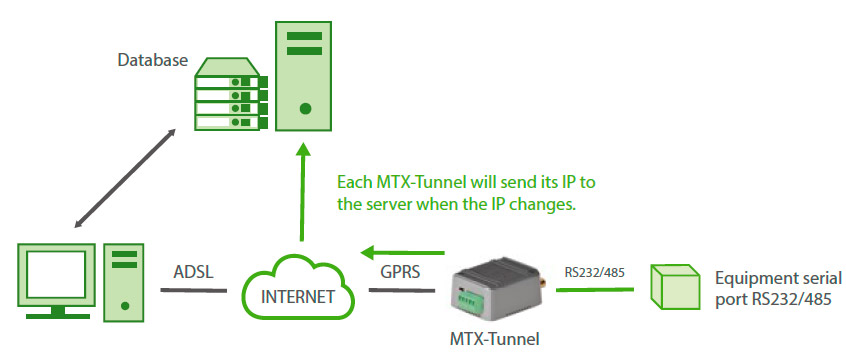
The MTX-Tunnel can inform the server PC every time an IP address changes.

You just need to enable a configuration parameter so that each time MTX-Tunnel changes the IP it will send frame data to a server PC with the following information: IMEI, the newly obtained IP and an optional user-configurable text.

Is it possible to send the new IP to a Web server? I’m more familiar with Web programming – ASP, PHP – rather than TCP-IP sockets. I’m thinking about using a database. Is this possible?

Yes, it does support this protocol conversion.

And via MQTT/MQTTS?

Yes, it can configure a TOPIC in the MTX-Tunnel to inform about the IP change (it can include other data like the digital inputs status, counters, analog inputs, etc.).

You are talking about relays, analog inputs… Is MTX-Tunnel not a Serial-GPRS Gateway?

MTX-Tunnel is a serial-GPRS Gateway but can also simultaneouslycontrol digital inputs/outputs, analog inputs, relays, GPS receivers, and devices connected to SPI/I2C, as well as read modbus series devices and 868MHz radio devices.

For example,the MTX-Tunnel can remotely read a digital input or commute remotely with a relay. It can also send automatically, at a pre-configured time of every X seconds.

Also, it can send automatically, at a pre-configured time of every X seconds, the status of all inputs/outputs or the GPS position to a server PC or WebServer. SMS messages can also be used. It can also remotely read a sensor connected to SPI or I2C. See the example annex for more information.

I’ve read about sending AT commands using a TCP/IP connection. Can I use an AT command to change the value of a digital output?

Yes, you can send AT commands via TCP/IP; you can also send them from a normal modem, via serial ports or you can send them via SMS. You can also activate relays or read or write digital input/outputs on your Web page (see API section 7 and example scenarios)

So, using MTX-IND, I can activate a relay using a SMS, but… it is impractical because the AT commands are not intuitive nor easy to remember.

Yes. It is possible to send AT commands via SMS and therefore activate a relay; however, it is not necessary to send the exact AT command. MTX-Tunnel supports ALIAS which means you can configure the modem to understand the SMS with the text “RELE1ON” as the command “AT^SSIO=0,0”, which activates Relay #1. Up to 10 ALIAS strings can be created.

Could I control two RS232 external devices with one terminal?

Yes, you can. MTX-Tunnel can control two RS232 external devices with just one SIM card. MTX-Tunnel will create two serial-GPRS tunnels running in parallel.

Just remember that the MTX-65i, and MTX-65i-ULP modems only have the TX and RX lines and therefore the secondary port cannot use flow control because the do not have the CTS and RTS lines; they only have the TX and RX lines.

See a configuration example: An advanced example for reading 2 serial devices using a single modem/SIM and simultaneously using GPRS connection and GSM calls. There is additional serial tunnelling when there are no GSM/ GPRS connections

What about using the MTX-Tunnel in a modem with GPS receiver inside? Can I use it for fleet management?

It is not intended for professional fleet management. The possibility of installing the MTXTunnel on modem witg GPS receiver inside exists so that the GPS position can be read in any given moment, i.e. the location of the modem can always be known, be it through requesting it via IP, WebServer, Telnet or SMS.

MTX-Tunnel can be configured to automatically send the GPS position every X seconds. However, MTX-Tunnel does not internally store the position in the Flash memory. This means that if there is no GPRS network and the GPS position cannot be sent in the given moment, the positions will not be stored for sending when the network coverage is restored. This is a typical application if GPRS coverage is lost. Because of this, it can only be used for basic fleet management as professional systems usually store the GPS position points like a data logger for future sending.

What is WebServer used for?

MTX-Tunnel WebServer which is included can be used to read the digital input/outputs or analog inputs and to change digital outputs easily on a PC (connected to the Internet) using a standard Internet browser.

Not only this, you can remotely see and modify the MTX-Tunnel’s configuration parameters. Also you can execute AT remote commands, like network coverage (using the command AT+CSQ), check incoming SMS, etc.

What is Telnet used for?

You can basically do the same with the Telnet service in MTX-Tunnel as you can with WebServer but it is more commonly used for third party application integration. Please read the TELNET and API section.

If you are unsure about whether to use WebServer or Telnet, we recommend Telnet since the remote access is much quicker.

I’m worried about unauthorized access using WebServer or Telnet.

MTX-Tunnel has an internal firewall which can be activated. Then MTX-Tunnel will only accept connections from previously configured IP addresses. Any other IP addresses will be blocked. Check the parameters FIREWALL_ in this guide.

For maintenance purposes, I would like access to MTX-Tunnel at any time and in any location, from any IP address.

In this case Firewall WebServer can be disabled, but we recommend protecting the WebServer with a user Login and Password. MTX-Tunnel can work with or without a Login/Password (public WebServer). The same applies for Telnet.

Could I or somebody else receive an SMS when an input changes, like alarm detection?

You can configure MTX-Tunnel to send special and configured SMS text strings to up to 10 configured different phone numbers. The SMS text can be configured in different text strings related to digital or analog input.

MTX-Tunnel is a GRPS-Serial tunnel Gateway. What is a GRPS-I2C, GPRS-SPI, HTTP-Serial or SMS-Serial tunnel? Do you have some examples?

EXAMPLES:

GPRS-I2C Tunnel: You can read an I2C sensor remotely like a temperature sensor.

GPRS-SPI Tunnel: You can write data on SPI bus and if a display is connected to it, the data will be on display.

HTTP-Serial Tunnel: You have a Web page with a form. All filled form data can be sent to the serial port of the device connected to the MTX-Tunnel. Then MTX-Tunnel will collect the machine response and send the data as a web response to your Web page.

SMS-Serial Tunnel: Example. You can define special text like “MTX” at the beginning of the SMS string. The text after this special string will be redirected to the serial port of the machine. MTX-Tunnel can extract the response from the machine and send another SMS to the user. For example: for the SMS “MTX 12345”, MTX-Tunnel will send the string “12345” to the serial port and will get a response from the machine like “67890”, which will be sent as SMS.

I need a low power application terminal modem. What can MTX-Tunnel do?

It allows the modem to be switched off completely until an event happens. This way the power consumption is about 2 uA. The modem is off and cannot do anything. It cannot receive calls, SMSs or communicate at all. Therefore an event needs to happen.

This event can be a digital input level change or a periodic alarm. As an example, MTX-Tunnel can be configured to wake up every 24 hours, send the telemetry (all the inputs values, RS232…) and after five minutes of being awake in case it needed to communicate with a serial equipment connected to the MTX-Tunnel, the terminal will be automatically switched off for another 24 hours.

Is it also possible to define scheduled wake up tasks. For example, the modem can wake up for X minutes every day at 10.00 AM or only on the 1st and 15th days of the current month at 08.00am and 08.00pm, or as needed.

If MTX-Tunnel can be woken up in a configured time, does this mean that there is clock inside? But you can also say that it’s powered off. Please explain.

ULP modems have their own Real Time Clock that allows to them to wake up at a configured/scheduled time/date.

Does the clock lose time? How can I assure that it always keeps time? that there is clock inside? But you can also say that it’s powered off. Please explain.

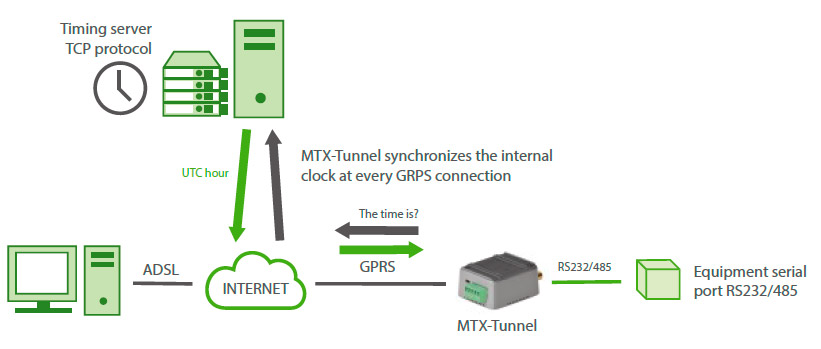
MTX-Tunnel includes time synchronization via 2G/3G/4G; in fact, it is mandatory to use it if the RTC is to be used. This way, each time a connection to the 2G/3G/4G is made, another is also made to a time server to synchronize the time and ensure it is always accurate (to UTC time). It is also mandatory to use the time server when using the Datalogger function that is included in MTX-Tunnel.

MTX-Tunnel used on the MTX-65-ULP wakes up at configured day/hour for some time (x minutes). Will the GPRS-Serial Gateway be active at this time?

During wake-up time, the modem will start and will run all configured services (WebServer, Telnet, Input/output telemetries…). In case the 2G/3G/4G serial tunnel is configured, it will activate it, but in case the WebServer is, it will activate, same with Telnet, if it has to send the digital I/Os, or if it needs to read an RTU Modbus device, it will also do it during that time.

What about SSL security? How does it work?

Some applications need some encryption data transmission. SSL is used. This way the data is transmitted and received SSL encrypted, avoiding data recovering sniffer. SSK is only available in TCP client mode. Be sure that your server can support SSL sockets in the following specifications:

  • TLS Protocol Version 1.0 as RFC 2246.
  • SSL V3 as The SSL Protocol Version 3.0
  • WAP(TM) TLS Profile and Tunneling Specification as WAP-219-TLS-20010411-a

It is also possible to send data via HTTPS for sending telemetries over secure web servers. Same to send data via MQTTS.

From the MTX-Tunnel v10 on it is also possible to include in the modem up to 10 SSL Root CA certificates, as well as an SSL client certificate if needed.

What does “API” feature mean?

API is mainly a way to integrate MTX-Tunnel in end user application. Basically it is like a special AT command end user. It can be easily integrated in a web page and can also switch a relay (change an Output) for example.

API could also be used to remotely access the MTX configuration and send AT commands at the same time without knowing all of the configuration parameter syntax.

What does “API” feature mean?

API is mainly a way to integrate MTX-Tunnel in end user application. Basically it is like a special AT command end user. It can be easily integrated in a web page and can also switch a relay (change an Output) for example.

API could also be used to remotely access the MTX configuration and send AT commands at the same time without knowing all of the configuration parameter syntax.

Please explain what MTX-Tunnel is able to do with a ModBus device connected to serial port on MTX-Terminal.

MTX-Tunnel will periodically and independently request data to the ModBus device connected to serial port. It will store the data in the internal memory and it will send the data to an http web server encapsulated in a JSON object. In any case the internal buffer is 1500 long which allows it to store data in case of network or coverage loss. The readings will be re-sent when the modem connectivity problems are resolved.

Is it possible to access the advice via GPRS and GSM at the same time?

Indeed, since MTX-Tunnelv7.11 it has been possible to establish gateways with both at the same time, but GSM calls have priority. A typical is example is that of an energy operator (Endesa, Iberdrola…). They could want daily access to a meter to take a reading via GSM but you also want to be able to access the meter but via GPRS, MTX-Tunnel allows you to do this. Remember MTX-2G-IoT does not support GSM calls made from analog modems. If you configure a 3G device to receive analog calls it must be set to work in 2G mode with the parameter GPRS_mode: 2g

How to configure a specific scenario

The new MTX-Tunnel has a lot of configuration parameters, more than explained in the FAQ section. Take a look in the configuration section.

Next you can find step-by-step MTX-Tunnel examples of first configuration scenarios; they are very useful for you for first hands-on usage.

In the Annex there are lots of examples of scenarios with the appropriate configuration to get MTX-Tunnel working. Try to find the closest scenario to you and review the copy & paste selected configuration, it’s nothing more special than that.

If you have specific questions contact the support line iotsupport@matrix.es.

Avete una domanda? Avete bisogno di un preventivo? Contattateci.

  • Questo campo serve per la convalida e dovrebbe essere lasciato inalterato.

Appendices and other documents

Important information

  • SMS encryption tool (new WebdynSunPM devices will only accept encrypted SMS commands)
  • If you have a firmware version 4.XXXX, download first in the product the V5.0.13 (download HERE) and then the last version.

Other manuals

Application Notes

Product End of Life Cycle

FAQ

Gateway configuration:

Start by checking that the computer’s IP parameters are compatible with the WebdynSunPM IP address (by default 192.168.1.12)

Launch a web browser (Chrome, Firefox, Edge, Safari, etc.) and enter the WebdynSunPM concentrator IP address in the address bar. An authentication page is displayed:

The default accesses are:

IdentifiantMot de passe
userhighhigh

Click “Login”

There are two configuration solutions, using the web interface and using text messages:
  • Configuration using the web interface:
Start by establishing a connection to the concentrator by connecting to it to access the server configuration: Enter the “ethernet” or “modem” connection type: For an ethernet configuration, make sure the IP parameters are compatible with server access according to the concentrator local network configuration. For an ethernet connection, the configuration must be compatible with the concentrator’s local network topology so that it can access the servers. This configuration is done from the “Networks” configuration page (see section 3.2.2.3: “Networks). For a modem connection, the modem configuration must be correct before a connection can be set up. This configuration is done from the “Modem” configuration page (see section 3.2.2.4: “Modem). The parameters for the servers to be configured are at least the following: Therefore the following fields need to be configured: “Interface”, “Type”, “Server type”, “Address”, “Port”, “Login” and “Password”. The other fields can be left at the default values subject to the directories having been properly created beforehand. See section 3.1.2: “Configuration files for more details.
  • Text message configuration:
Text message configuration requires sending the following commands:
      • Apn: to configure the SIM card APN. (see section 3.2:“apn” modem configuration command)
      • Ftp: to configure the FTP server that will contain the concentration configuration (see section 3.3: “ftp” FTP configuration command”).
      • Connect: to launch the connection to the FTP server and load the configuration (see section 3.1: ““connect” connection command

Access to the FTP server depends on the selected solution.

If you have chosen a portal, it will give you the FTP server access identifiers.

If you want to use your own FTP server, contact your network administrator.

For all other configurations, and to determine the best solution, contact the Webdyn sales department which will advise you and direct you to the relevant contacts: contact@webdyn.com

General gateway use

There are 2 methods to force a concentrator factory reset:
  • Press the Factory Reset button on the concentrator for 20 seconds:
Wait. The concentrator will reboot using its factory configuration.
  • If a SIM card is installed and configured, a “factory” text message can also be used for factory reset. Just send the “factory” text message to the SIM card phone number (see section 3.7: “factory” reset command”)

It is possible to send commands to connected devices if they accept them.

The WebdynSunPM can store up to 50Mb of uncompressed data per declared device.

If there is no access to the remote server, the WebdynSunPM concentrator can store the data for several months.

The maximum data storage time varies depending on the amount of data to be collected and the configured collection frequency.

The average storage time varies from 3 to 4 months.

The average service life of the battery is 5 years.

It may vary depending on the installation environment.

All our products are guaranteed for 2 years.

For more information, read the general terms and conditions of sale.

The data volume depends on the exchanged files.

The average is about 5 MB per month but this varies from one installation to another.

Inverter compatibility

See section 1.4: “Supported devices”.

Modbus device compatibility:

Yes, different Modbus devices can be connected to the same serial port.

Device compatibility:

    • Same type of RS485 or 4 wire connection.
    • All devices should be able to be configured using identical bus specifications. Same speed, same parity, same number of stop bits and data bits on all devices and on the WebdynSunPM.
    • Each device must be assigned a unique Modbus address (between 1 and 247) on the bus. (UnitID)

Appendices and other documents

Product End of Life cycle

FAQ

No, the concentrator is not able to decrypt data from WM-BUS equipment because it does not have a safe on board to guarantee the security of the encryption keys of your equipment. The recovered data is deposited without modification (without decryption) by the concentrator on your remote server.
Please check these items in this order:
  • the battery level: if the battery level is too low or empty, the product will not run properly or not run at all.
  • Modem reception level: a bad signal at the modem may also prevent the hub from uploading files. Look to move the product or install an external antenna to improve signal quality.
  • The last configuration file: a bad configuration file can block the product.

Remotely, by checking the regularly uploaded files if the product configuration is correct.

On site, by passing the magnet over the product, you will hear 3 short beeps.

Replace the product and inject the configuration from the old product into the new one. If a white list is used, remember to inject it into the new product as well.

Annexes et autres documents

Anexos y otros documentos

Annexes et autres documents

Anhänge und andere Dokumente

附錄及其他文件

附錄及其他文件

附錄及其他文件

附錄及其他文件

附錄及其他文件

Appendices and other documents

Product End of Life Cycle

FAQ

CONFIGURATION OF THE WEBDYNSUN GATEWAY

  • Start by checking that your computer’s IP parameters are compatible with the WebdynSun’s “IP” address (the default is 192.168.1.12). 
  • Next, launch a web browser (Firefox or IE) and enter the WebdynSun’s IP address in the address bar. An authentication page will appear: 

The default accesses are:
Username: userhigh
Password: high

  • Click on “log in”  

There are two types of configuration: via the web interface or via SMS.

Configuration of the web interface:

1/ Go to the configuration page with the gateway IP address (default 192.168.1.12)

2/ Go to the Configuration tab.

3/ Select either the Ethernet or modem connection mode:

If connecting via the local network (Ethernet):

  • Edit the WebdynSun’s IP parameters by assigning it a network-compatible address.

Please note, all fields must be completed in accordance with the configuration of your local network.

If connecting via the GPRS network (Modem):

  • Change the connection settings of the GPRS modem to the settings provided by your mobile operator.

4/ Edit the FTP server parameters.

5/ Confirm the changes.

6/ Restart the WebdynSun gateway using the new settings.

7/ In the menu, click on the “installation” tab, followed by the “connection” sub-tab and start the connection.

Configuration via SMS:

This configuration method requires the use of an active SIM card with a data option and a pin code that must be either “0000” or disabled.
The SIM card must be inserted into the unit before connection to the mains supply.
After connection to the mains supply, send the following SMS messages to the number of the previously inserted SIM card:

SMS for configuring the APN:
After replacing the generic fields with those of your operator, send the following SMS*:
apn=apn_name;usr=user_name;pwd=password;

Replace the above SMS fields with the following information:

  • apn_name: APN name supplied by your mobile operator
  • user_name: APN ID supplied by your mobile operator
  • password: APN password supplied by your mobile operator

SMS for FTP configuration:
After replacing the generic fields with those of your FTP server, send the following SMS*:
Ftp=server_name:user_name:password:port;

Replace the above SMS fields with the following information:

  • server_name: FTP server address
  • user_name: FTP account ID
  • Password: FTP account password
  • Port: FTP server port (the default port is 21)

Connection SMS:

Send the word “connect” by SMS* to launch a connection to the FTP server

*Please note: the formatting of the SMS must be exactly identical to that shown above (e.g.: no spaces between characters, etc.)

There are 2 ways of resetting the gateway.

  • If connecting by Ethernet:
    • Disconnect from the mains
    • Remove the cover
    • Disconnect the battery
    • Put the DIP Switch 2 on the WebdynSun card in “ON” position
    • Start the WebdynSun by connecting it only to the mains power supply
    • Wait until all the LEDs flash and then stop flashing (3 to 5 mins).
    • Disconnect from the mains
    • Reset the Dip Switch 2 to “OFF” 
    • Reconnect the battery
    • Reconnect to the mains supply and the WebdynSun starts normally.
  • If there is a SIM card inserted in the unit:
    • Send an SMS message containing the word “factory” to the number of the inserted SIM card.

NB : Resetting the gateway restores the configuration to its original state. Please note: data will be saved but the specific settings will not. Therefore, all the settings must be reconfigured.

Commands can be sent to connected devices with the exception of certain inverters and Modbus slaves that do not accept write requests.

If the device allows it, command files can be created on the FTP server.

The WebdynSun has a memory of about 100MB.

Therefore, if the remote server cannot be accessed, the WebdynSun gateway can backup data for several months.
The maximum data backup time varies depending on the amount of data to be collected.

The average backup time ranges from 3 to 4 months.

The average battery life is 5 years.

It may vary depending on the installation environment.

Yes, data may be sent to a PLC if the latter is equipped with a Modbus protocol.
The “Report” configuration file allows the WebdynSun gateway to automatically write the values read on a Modbus slave

All our products are guaranteed for 2 years.

For further information, please see our general conditions of sale.

Files uploaded by the WebdynSun gateway are compressed in Gz format.

The data contained in these files is structured in csv format.

The data volume depends on the files exchanged.

The average is about 5 MB per month but this varies from one installation to another.

INVERTER COMPATIBILITY WITH THE WEBDYNSUN GATEWAY

Different brands of inverter may be connected to the RS485(B) port or via the Ethernet port if the inverter protocol is based on the Modbus protocol (RTU or TCP).

However, different brands of inverters cannot be connected to the same RS485(A) port.

For a list of compatible inverters, please see the product page of the WebdynSun data gateway
  • Check if the correct inverter protocol is selected before starting detection:
  • Check the wiring and configuration of the inverters by referring to the inverter appendices.
  • Check that the inverters are not in OFF or stand-by mode.
  • Check that the line end plugs on the RS 485(A) Bus are turned on.

COMPATIBILITY WITH MODBUS DEVICES

Yes, any device you wish to connect must be configured and its Modbus definition file must be created.

The configuration is mainly based on the RS485 serial bus parameters and the IP parameters.

Yes, different Modbus devices can be connected to the same RS485 (B) port.

However, they must have the same communication parameters (bus parameters or compatible IP parameters), in order for them to communicate with each other.

Appendices and other documents

Appendices and other documents

Anexos y otros documentos

Anhänge und andere Dokumente

Annexes et autres documents

Anexos y otros documentos

Anhänge und andere Dokumente

Annexes et autres documents

Anexos y otros documentos

Anhänge und andere Dokumente

Annexes et autres documents

Anexos y otros documentos

Anhänge und andere Dokumente

Annexes et autres documents

Appendices and other documents

Appendices and other documents

Appendices and other documents

Appendices and other documents

Appendices and other documents

Appendices and other documents

Appendices and other documents

Appendices and other documents

Appendices and other documents

Appendices and other documents

  • Warning – Firmware update V4.07.02 For the old version with SIM CARD of the pin code is 0000 you can update in this version. For the second case : When you insert a SIM CARD with pin code is 0000 used in this version (4.07.02) Downgrading to a previous version is not permitted.


PRODUCT END OF LIFE CYCLE

Appendices and other documents

  • Warning – Firmware update V4.07.02 – For the old version with SIM CARD of the pin code is 0000 you can update in this version.

    For the second case : When you insert a SIM CARD with pin code is 0000 used in this version (4.07.02) Downgrading to a previous version is not permitted.

PRODUCT END OF LIFE CYCLE

Anexos y otros documentos

Preguntas frecuentes

Anexos y otros documentos

Preguntas frecuentes

Anexos y otros documentos

Preguntas frecuentes

Anhänge und andere Dokumente

FAQ

Anhänge und andere Dokumente

FAQ

Anhänge und andere Dokumente

FAQ

Annexes and other documents

FAQ

Annexes and other documents

FAQ

Annexes and other documents

FAQ

Anexos y otros documentos

Preguntas frecuentes

CONFIGURACIÓN DE LA PASARELA WEBDYNRF

  • En caso de que el archivo se elimine de la carpeta después de conectar el concentrador WebdynRF, el problema suele deberse a un error de formato de archivo. Los archivos de configuración y comando deben respetar el formato descrito en los archivos de esquema (XSD). Para comprobar la coherencia de un esquema, abra el archivo XML con el editor de texto Notepad++ e instale el complemento «XML Tool». Luego copie el archivo XSD correspondiente al archivo XML en la misma carpeta y seleccione en XML Tool «Validate now». Deben mostrarse los errores detectados por la herramienta.
  • En caso de que el archivo no se elimine del servidor, el problema más común es que el archivo no se ha guardado en la ubicación correcta. El archivo debe estar disponible en el servidor en la carpeta «INBOX», y en la subcarpeta que lleva el nombre del identificador único (UID) del producto (ejemplo «/INBOX/0045CE/»).

USO GENERAL DE LA PASARELA WEBDYNRF

La cantidad de datos intercambiados en la red GPRS varía según la configuración. No obstante, puede estimarse un consumo de unos 5 MB / mes.
El concentrador WebdynRF consume en promedio alrededor de 250mA.
Hay 2 modos de actualización de firmware: Actualización local: En la interfaz de configuración de la WebdynRF, acceda a la pestaña «Actions» y seleccione el actualizador en el menú «File upload» antes de hacer clic en el botón «Upload». Actualización remota: Descargue del servidor FTP el archivo que contiene el actualizador (archivo con la extensión «.bz2») en la carpeta «BIN». Luego inserte el comando de actualización en la carpeta INBOX correspondiente a su concentrador («INBOX/», con el identificador del concentrador respectivo) El comando de actualización debe respetar el siguiente formato: updater.tar.bz2 checksum_md5 updater.tar.bz2 checksum_md5 Con :
  • updater.tar.bz2: Nombre del archivo de actualización descargado en la carpeta «BIN»
  • checksum_md5: Código md5 del archivo de actualización

La falta de conexión con el servidor FTP puede explicarse por un problema de conexión a la red (Ethernet o GPRS), por un problema de inicio de sesión FTP o por una no activación de la conexión.

En caso de problema de conexión a la red, verifique los puntos siguientes:

  • Ethernet:
    • Modo del módem en «off» o «alwaysoff»
    • Campos «Gateway» introducidos correctamente
    • Debe configurarse al menos un servidor DNS
  • GPRS:
    • Modo del módem en «on»
    • APN, identificador APN y contraseña APN introducidos correctamente
    • Número de llamada GPRS a «* 99***1#»


En caso de problema de inicio de sesión, verifique los puntos siguientes:

  • Parámetros FTP incorrectos
  • Puerto TCP 21 cerrado en salida
  • Problema de resolución del nombre de dominio: no se ha indicado el servidor DNS


En caso de que no se active la conexión:

En este caso, solo la conexión automática no funciona. El problema suele deberse a una configuración incorrecta de los «schedules». Atención: el ID de los schedules debe ser un número entero.

USO PARTICULAR DE LA PASARELA WEBDYNRF WIRELESS M-BUS

Para que se carguen los datos de los módulos WM-bus, es necesario

  • Elegir el modo correspondiente a los módulos utilizados (S, T o N)
  • Definir los módulos o grupos de módulos a tratar

Un módulo puede definirse de forma única por todos los campos siguientes:

  • Id
  • Manufacturer
  • Version
  • Medium

Si los datos de un módulo estuviesen encriptados, es posible definir la clave de encriptado de este módulo en el campo «Key».

Para simplificar la introducción de los módulos a tratar, es posible definir un grupo de módulos respetando los campos introducidos. Los otros campos se dejarán vacíos (a continuación se muestra un ejemplo de configuración que permite recuperar todos los módulos del manufacturer Webdyn (WDN) con la clave de encriptado «00000000000000000000000000000000».

  •   Id :
  •   Manufacturer : WDN
  •   Medium :
  •   Version :
  •   Label : Webdyn
  •   Key : 00000000000000000000000000000000

Nota: Para que se tengan en cuenta los módulos (filtros) introducidos, el modo «ByPass filter» debe estar desactivado.

 USO PARTICULAR DE LA WEBDYNRF WAVENIS

La herramienta se conecta al concentrador accediendo al instalador (install).

Por lo tanto, debe utilizarse la contraseña del instalador (por defecto «middle»), y no la del administrador (por defecto «high»)

Los estados cargados por el concentrador WebdynRF son los valores brutos contenidos en los módulos Wavenis. Se cargan sin interpretación. Para obtener más detalles, consulte los manuales de los módulos Coronis.

Anhänge und andere Dokumente

FAQ

 KONFIGURATION DES WEBDYNRF-GATEWAYS

  • Wenn die Datei nach dem Verbinden des WebdynRF-Hubs aus dem Verzeichnis entfernt wird, liegt das Problem in der Regel an einem Fehler im Dateiformat. Die Konfigurations- und Befehlsdateien müssen das in den Schemadateien (XSD) beschriebene Format erfüllen. Um die Konsistenz eines Schemas zu überprüfen, öffnen Sie die XML-Datei mit dem Editor Notepad++ und installieren Sie das Add-in „XML Tool“. Kopieren Sie dann die XSD-Datei, die der XML-Datei entspricht, in dasselbe Verzeichnis, und wählen Sie im XML-Tool „Validate now“ (Jetzt bestätigen) aus. Die vom Tool erkannten Fehler müssen angezeigt werden.
  • Wenn die Datei nicht vom Server gelöscht wird, besteht das Problem meist darin, dass die Datei nicht an der richtigen Stelle abgelegt wurde. Die Datei muss auf dem Server im Verzeichnis „INBOX“ und im Unterverzeichnis mit dem Namen der Produkt-UID verfügbar sein (Beispiel: „/INBOX/0045CE/“).

ALLGEMEINE NUTZUNG DES WEBDYNRF-GATEWAYS

Die Menge der über das GPRS-Netzwerk ausgetauschten Daten hängt von der Konfiguration ab. Der Verbrauch kann auf etwa 5 MB/Monat geschätzt werden.
Der WebdynRF-Hub verbraucht durchschnittlich ca. 250 mA.

Es gibt 2 Modi für die Aktualisierung der Firmware:

Die lokale Aktualisierung:
Wechseln Sie auf der WebdynRF-Konfigurationsschnittstelle zur Registerkarte „Actions“ (Aktionen) und wählen Sie im Menü „File upload“ (Datei-Upload) den Updater aus, bevor Sie auf die Schaltfläche „Upload“ (Aktualisieren) klicken

Die Remote-Aktualisierung:
Laden Sie die Datei, die den Updater enthält (Datei mit der Erweiterung „.bz2“), auf den FTP-Server in das Verzeichnis „BIN“ hoch. Geben Sie dann den Aktualisierungsbefehl in das INBOX-Verzeichnis für Ihren Hub („INBOX/“ mit dem Benutzernamen des betreffenden Hubs).


Der Aktualisierungsbefehl muss folgendem Format entsprechen:

updater.tar.bz2
checksum_md5

updater.tar.bz2
checksum_md5

Mit :

  • updater.tar.bz2: Name der Updater-Datei, die in das Verzeichnis „BIN“ geladen wurde
  • checksum_md5: md5-Code der Updater-Datei

Eine fehlende Verbindung zum FTP-Server kann durch ein Problem mit der Netzwerkverbindung (Ethernet oder GPRS), ein Problem mit der FTP-Anmeldung oder durch die Nichtauslösung der Verbindung verursacht werden.

Falls Probleme mit der Netzwerkverbindung auftreten, überprüfen Sie Folgendes:

  • Ethernet:
    • Modem-Modus auf „off“ oder „alwaysoff“
    • „Gateway“-Feld korrekt eingegeben
    • Es muss mindestens ein DNS-Server konfiguriert sein
  • GPRS:
    • Modem-Modus auf „on“
    • APN, APN-Benutzername und APN-Passwort korrekt eingegeben
    • GPRS-Rufnummer auf „*99“ *1#“


Falls Probleme bei der Anmeldung auftreten, überprüfen Sie Folgendes:

  • Falsche FTP-Einstellungen
  • TCP-Port 21 geschlossen bei Ausgang
  • Problem bei der Auflösung des Domain-Namens: Der DNS-Server ist nicht näher spezifiziert


Bei Nichtauslösung der Verbindung:

In diesem Fall funktioniert nur die automatische Anmeldung nicht. Das Problem ist in der Regel auf eine schlechte Konfiguration der Zeitpläne zurückzuführen. Achtung, die ID der Zeitpläne muss eine Ganzzahl sein.

BESONDERE VERWENDUNG DES WEBDYNRF WIRELESS M-BUS-GATEWAYS

Für die Eskalation der Daten der WM-Bus-Module gehen Sie wie folgt vor:

  • Wählen Sie den Modus aus, der den verwendeten Modulen entspricht (S, T oder N)
  • Definieren Sie die Module oder Modulgruppen, die verarbeitet werden sollen

Ein Modul kann durch alle folgenden Felder eindeutig definiert werden:

  • Id
  • Manufacturer (Hersteller)
  • Version
  • Medium

Falls die Daten eines Moduls verschlüsselt werden, kann der Verschlüsselungsschlüssel für dieses Modul im Feld „Schlüssel“ festgelegt werden.

Um die Eingabe der zu verarbeitenden Module zu vereinfachen, kann eine Modulgruppe definiert werden, die die eingegebenen Felder erfüllt. Die anderen Felder bleiben dann leer (nachfolgend ein Beispiel für eine Konfiguration, mit der alle Module des Herstellers Webdyn (WDN) mit Verschlüsselungsschlüssel „00000000000000000000000000000000“ abgerufen werden können.)

  •   Id :
  •   Manufacturer (Hersteller): WDN
  •   Medium :
  •   Version :
  •   Label : Webdyn
  •   Key : 00000000000000000000000000000000

Hinweis: Damit die eingegebenen Module (Filter) berücksichtigt werden können, muss der Modus „Bypass filter“ (Bypass-Filter) deaktiviert werden.

 BESONDERE VERWENDUNG DES WAVENIS WEBDYNRF-GATEWAYS

Der Anschluss des Tools an den Hub erfolgt über den Installateurzugang (Install).

Es muss also das Passwort des Installateurs (standardmäßig „middle“) und nicht das des Administrators (standardmäßig „high“) verwendet werden.

Die Status, die vom WebdynRF-Hub eskaliert werden, sind die Rohwerte, die in den Wavenis-Modulen enthalten sind. Sie werden ohne Interpretation eskaliert. Weitere Informationen finden Sie in den Handbüchern der Coronis-Module.

Annexes and other documents

FAQ

CONFIGURATION OF THE WEBDYNRF GATEWAY

  • If the file is deleted from the directory after connecting the WebdynRF gateway, the problem is usually due to a file format error. The configuration and control files must follow the format described in the schema (XSD) files. To check schema consistency, open the XML file with the Notepad++ text editor and install the “XML Tool” add-on. Next, copy the corresponding XSD file to the XML file in the same directory, and select “Validate now” in XML Tool. Errors detected by the tool should be displayed.
  • If the file is not deleted from the server, the most common problem is that the file has not been located correctly. The file must be available on the server in the “INBOX” directory and in the sub-directory bearing the product UID name (e.g.: “/INBOX/0045CE/”).

GENERAL USE OF THE WEBDYNRF GATEWAY

The amount of data exchanged on the GPRS network varies depending on the configuration. However, the average consumption would be about 5MB / month.
The WebdynRF gateway consumes an average of about 250mA.

There are 2 firmware updating methods:
Local updating:
On the WebdynRF configuration interface, go to the “Actions” tab and select the updater in the “File upload” menu before clicking on the “Upload” button

Remote updating:
Upload the file containing the updater (file with extension “.bz2”) in the “BIN” directory to the FTP server . Next, place the update command in the INBOX directory corresponding to your gateway (“INBOX/”, with, the identifier of the gateway concerned)

The update command must follow the following format:

      updater.tar.bz2
      checksum_md5

updater.tar.bz2
checksum_md5

With:

  • updater.tar.bz2: Updater file name uploaded to the “BIN” directory
  • checksum_md5: Md5 code of the updater file

A lack of connection to the FTP server may be due to a network connection problem (Ethernet or GPRS), an FTP login problem or a failure to initiate the connection.

If you cannot connect to the network, check the following points:

  • Ethernet:
    • Modem set to “off” or “always off”
    • “Gateway” fields correctly entered
    • At least one DNS server must be configured
  • GPRS:
    • Modem set to “on”
    • APN, APN ID and APN password correctly entered
    • GPRS call number set to “*99***1#”

If you cannot log in, check the following points:

  • Incorrect FTP parameters
  • TCP port 21 closed at output
  • Domain name resolution problem: the DNS server is not specified

If the connection fails to initiate:

In this case, only the automatic connection does not work. The problem is probably caused by an incorrect schedule configuration. Please note, the schedule ID must be an integer.

 PARTICULAR APPLICATION OF THE WEBDYNRF WIRELESS M-BUS GATEWAY

For the WM-bus module data to be transmitted, you must:

  • Choose the mode corresponding to the modules used (S, T or N)
  • Define the modules or groups of modules to be processed

A module may be defined in a unique way by all the fields below:

  • Id
  • Manufacturer
  • Version
  • Medium

If a module’s data is encrypted, the encryption key for this module can be defined in the “Key” field.

To simplify the entry of the modules to be processed, a module group can be defined that conforms to the fields entered. The other fields will then be left empty (below is an example of a configuration for retrieving all Webdyn manufacturer (WDN) modules with the encryption key “00000000000000000000000000000000”.

  •   Id :
  •   Manufacturer : WDN
  •   Medium :
  •   Version :
  •   Label : Webdyn
  •   Key : 00000000000000000000000000000000

Note: In order for the modules (filters) entered to be taken into account, the “ByPass filter” mode must be deactivated.

Click here to read the media file 

Click here to read the units file 

 PARTICULAR APPLICATION OF THE WEBDYNRF WAVENIS

The tool is connected to the gateway via the installer access (install).

It is therefore necessary to use the installer password (default is “middle”), and not the administrator’s password (default is “high”)

The statuses transmitted by the WebdynRF gateway are the raw values contained in the Wavenis modules. They are transmitted without interpretation. For further details, please refer to the Coronis module manuals.

Anexos y otros documentos

Preguntas frecuentes

CONFIGURACIÓN DE LA PASARELA WEBDYNRF

  • En caso de que el archivo se elimine de la carpeta después de conectar el concentrador WebdynRF, el problema suele deberse a un error de formato de archivo. Los archivos de configuración y comando deben respetar el formato descrito en los archivos de esquema (XSD). Para comprobar la coherencia de un esquema, abra el archivo XML con el editor de texto Notepad++ e instale el complemento «XML Tool». Luego copie el archivo XSD correspondiente al archivo XML en la misma carpeta y seleccione en XML Tool «Validate now». Deben mostrarse los errores detectados por la herramienta.
  • En caso de que el archivo no se elimine del servidor, el problema más común es que el archivo no se ha guardado en la ubicación correcta. El archivo debe estar disponible en el servidor en la carpeta «INBOX», y en la subcarpeta que lleva el nombre del identificador único (UID) del producto (ejemplo «/INBOX/0045CE/»).

USO GENERAL DE LA PASARELA WEBDYNRF

La cantidad de datos intercambiados en la red GPRS varía según la configuración. No obstante, puede estimarse un consumo de unos 5 MB / mes.
El concentrador WebdynRF consume en promedio alrededor de 250mA.
Hay 2 modos de actualización de firmware: Actualización local: En la interfaz de configuración de la WebdynRF, acceda a la pestaña «Actions» y seleccione el actualizador en el menú «File upload» antes de hacer clic en el botón «Upload». Actualización remota: Descargue del servidor FTP el archivo que contiene el actualizador (archivo con la extensión «.bz2») en la carpeta «BIN». Luego inserte el comando de actualización en la carpeta INBOX correspondiente a su concentrador («INBOX/», con el identificador del concentrador respectivo) El comando de actualización debe respetar el siguiente formato: updater.tar.bz2 checksum_md5 updater.tar.bz2 checksum_md5 Con :
  • updater.tar.bz2: Nombre del archivo de actualización descargado en la carpeta «BIN»
  • checksum_md5: Código md5 del archivo de actualización

La falta de conexión con el servidor FTP puede explicarse por un problema de conexión a la red (Ethernet o GPRS), por un problema de inicio de sesión FTP o por una no activación de la conexión.

En caso de problema de conexión a la red, verifique los puntos siguientes:

  • Ethernet:
    • Modo del módem en «off» o «alwaysoff»
    • Campos «Gateway» introducidos correctamente
    • Debe configurarse al menos un servidor DNS
  • GPRS:
    • Modo del módem en «on»
    • APN, identificador APN y contraseña APN introducidos correctamente
    • Número de llamada GPRS a «* 99***1#»


En caso de problema de inicio de sesión, verifique los puntos siguientes:

  • Parámetros FTP incorrectos
  • Puerto TCP 21 cerrado en salida
  • Problema de resolución del nombre de dominio: no se ha indicado el servidor DNS


En caso de que no se active la conexión:

En este caso, solo la conexión automática no funciona. El problema suele deberse a una configuración incorrecta de los «schedules». Atención: el ID de los schedules debe ser un número entero.

USO PARTICULAR DE LA PASARELA WEBDYNRF WIRELESS M-BUS

Para que se carguen los datos de los módulos WM-bus, es necesario

  • Elegir el modo correspondiente a los módulos utilizados (S, T o N)
  • Definir los módulos o grupos de módulos a tratar

Un módulo puede definirse de forma única por todos los campos siguientes:

  • Id
  • Manufacturer
  • Version
  • Medium

Si los datos de un módulo estuviesen encriptados, es posible definir la clave de encriptado de este módulo en el campo «Key».

Para simplificar la introducción de los módulos a tratar, es posible definir un grupo de módulos respetando los campos introducidos. Los otros campos se dejarán vacíos (a continuación se muestra un ejemplo de configuración que permite recuperar todos los módulos del manufacturer Webdyn (WDN) con la clave de encriptado «00000000000000000000000000000000».

  •   Id :
  •   Manufacturer : WDN
  •   Medium :
  •   Version :
  •   Label : Webdyn
  •   Key : 00000000000000000000000000000000

Nota: Para que se tengan en cuenta los módulos (filtros) introducidos, el modo «ByPass filter» debe estar desactivado.

 USO PARTICULAR DE LA WEBDYNRF WAVENIS

La herramienta se conecta al concentrador accediendo al instalador (install).

Por lo tanto, debe utilizarse la contraseña del instalador (por defecto «middle»), y no la del administrador (por defecto «high»)

Los estados cargados por el concentrador WebdynRF son los valores brutos contenidos en los módulos Wavenis. Se cargan sin interpretación. Para obtener más detalles, consulte los manuales de los módulos Coronis.

Anhänge und andere Dokumente

FAQ

 KONFIGURATION DES WEBDYNRF-GATEWAYS

  • Wenn die Datei nach dem Verbinden des WebdynRF-Hubs aus dem Verzeichnis entfernt wird, liegt das Problem in der Regel an einem Fehler im Dateiformat. Die Konfigurations- und Befehlsdateien müssen das in den Schemadateien (XSD) beschriebene Format erfüllen. Um die Konsistenz eines Schemas zu überprüfen, öffnen Sie die XML-Datei mit dem Editor Notepad++ und installieren Sie das Add-in „XML Tool“. Kopieren Sie dann die XSD-Datei, die der XML-Datei entspricht, in dasselbe Verzeichnis, und wählen Sie im XML-Tool „Validate now“ (Jetzt bestätigen) aus. Die vom Tool erkannten Fehler müssen angezeigt werden.
  • Wenn die Datei nicht vom Server gelöscht wird, besteht das Problem meist darin, dass die Datei nicht an der richtigen Stelle abgelegt wurde. Die Datei muss auf dem Server im Verzeichnis „INBOX“ und im Unterverzeichnis mit dem Namen der Produkt-UID verfügbar sein (Beispiel: „/INBOX/0045CE/“).

ALLGEMEINE NUTZUNG DES WEBDYNRF-GATEWAYS

Die Menge der über das GPRS-Netzwerk ausgetauschten Daten hängt von der Konfiguration ab. Der Verbrauch kann auf etwa 5 MB/Monat geschätzt werden.
Der WebdynRF-Hub verbraucht durchschnittlich ca. 250 mA.

Es gibt 2 Modi für die Aktualisierung der Firmware:

Die lokale Aktualisierung:
Wechseln Sie auf der WebdynRF-Konfigurationsschnittstelle zur Registerkarte „Actions“ (Aktionen) und wählen Sie im Menü „File upload“ (Datei-Upload) den Updater aus, bevor Sie auf die Schaltfläche „Upload“ (Aktualisieren) klicken

Die Remote-Aktualisierung:
Laden Sie die Datei, die den Updater enthält (Datei mit der Erweiterung „.bz2“), auf den FTP-Server in das Verzeichnis „BIN“ hoch. Geben Sie dann den Aktualisierungsbefehl in das INBOX-Verzeichnis für Ihren Hub („INBOX/“ mit dem Benutzernamen des betreffenden Hubs).


Der Aktualisierungsbefehl muss folgendem Format entsprechen:

updater.tar.bz2
checksum_md5

updater.tar.bz2
checksum_md5

Mit :

  • updater.tar.bz2: Name der Updater-Datei, die in das Verzeichnis „BIN“ geladen wurde
  • checksum_md5: md5-Code der Updater-Datei

Eine fehlende Verbindung zum FTP-Server kann durch ein Problem mit der Netzwerkverbindung (Ethernet oder GPRS), ein Problem mit der FTP-Anmeldung oder durch die Nichtauslösung der Verbindung verursacht werden.

Falls Probleme mit der Netzwerkverbindung auftreten, überprüfen Sie Folgendes:

  • Ethernet:
    • Modem-Modus auf „off“ oder „alwaysoff“
    • „Gateway“-Feld korrekt eingegeben
    • Es muss mindestens ein DNS-Server konfiguriert sein
  • GPRS:
    • Modem-Modus auf „on“
    • APN, APN-Benutzername und APN-Passwort korrekt eingegeben
    • GPRS-Rufnummer auf „*99“ *1#“


Falls Probleme bei der Anmeldung auftreten, überprüfen Sie Folgendes:

  • Falsche FTP-Einstellungen
  • TCP-Port 21 geschlossen bei Ausgang
  • Problem bei der Auflösung des Domain-Namens: Der DNS-Server ist nicht näher spezifiziert


Bei Nichtauslösung der Verbindung:

In diesem Fall funktioniert nur die automatische Anmeldung nicht. Das Problem ist in der Regel auf eine schlechte Konfiguration der Zeitpläne zurückzuführen. Achtung, die ID der Zeitpläne muss eine Ganzzahl sein.

BESONDERE VERWENDUNG DES WEBDYNRF WIRELESS M-BUS-GATEWAYS

Für die Eskalation der Daten der WM-Bus-Module gehen Sie wie folgt vor:

  • Wählen Sie den Modus aus, der den verwendeten Modulen entspricht (S, T oder N)
  • Definieren Sie die Module oder Modulgruppen, die verarbeitet werden sollen

Ein Modul kann durch alle folgenden Felder eindeutig definiert werden:

  • Id
  • Manufacturer (Hersteller)
  • Version
  • Medium

Falls die Daten eines Moduls verschlüsselt werden, kann der Verschlüsselungsschlüssel für dieses Modul im Feld „Schlüssel“ festgelegt werden.

Um die Eingabe der zu verarbeitenden Module zu vereinfachen, kann eine Modulgruppe definiert werden, die die eingegebenen Felder erfüllt. Die anderen Felder bleiben dann leer (nachfolgend ein Beispiel für eine Konfiguration, mit der alle Module des Herstellers Webdyn (WDN) mit Verschlüsselungsschlüssel „00000000000000000000000000000000“ abgerufen werden können.)

  •   Id :
  •   Manufacturer (Hersteller): WDN
  •   Medium :
  •   Version :
  •   Label : Webdyn
  •   Key : 00000000000000000000000000000000

Hinweis: Damit die eingegebenen Module (Filter) berücksichtigt werden können, muss der Modus „Bypass filter“ (Bypass-Filter) deaktiviert werden.

 BESONDERE VERWENDUNG DES WAVENIS WEBDYNRF-GATEWAYS

Der Anschluss des Tools an den Hub erfolgt über den Installateurzugang (Install).

Es muss also das Passwort des Installateurs (standardmäßig „middle“) und nicht das des Administrators (standardmäßig „high“) verwendet werden.

Die Status, die vom WebdynRF-Hub eskaliert werden, sind die Rohwerte, die in den Wavenis-Modulen enthalten sind. Sie werden ohne Interpretation eskaliert. Weitere Informationen finden Sie in den Handbüchern der Coronis-Module.

Appendix and other documents

FAQ

CONFIGURATION OF THE WEBDYNRF GATEWAY

  • If the file is deleted from the directory after connecting the WebdynRF gateway, the problem is usually due to a file format error. The configuration and control files must follow the format described in the schema (XSD) files. To check schema consistency, open the XML file with the Notepad++ text editor and install the “XML Tool” add-on. Next, copy the corresponding XSD file to the XML file in the same directory, and select “Validate now” in XML Tool. Errors detected by the tool should be displayed.
  • If the file is not deleted from the server, the most common problem is that the file has not been located correctly. The file must be available on the server in the “INBOX” directory and in the sub-directory bearing the product UID name (e.g.: “/INBOX/0045CE/”).

GENERAL USE OF THE WEBDYNRF GATEWAY

The amount of data exchanged on the GPRS network varies depending on the configuration. However, the average consumption would be about 5MB / month.
The WebdynRF gateway consumes an average of about 250mA.

There are 2 firmware updating methods:
Local updating:
On the WebdynRF configuration interface, go to the “Actions” tab and select the updater in the “File upload” menu before clicking on the “Upload” button

Remote updating:
Upload the file containing the updater (file with extension “.bz2”) in the “BIN” directory to the FTP server . Next, place the update command in the INBOX directory corresponding to your gateway (“INBOX/”, with, the identifier of the gateway concerned)

The update command must follow the following format:

      updater.tar.bz2
      checksum_md5

updater.tar.bz2
checksum_md5

With:

  • updater.tar.bz2: Updater file name uploaded to the “BIN” directory
  • checksum_md5: Md5 code of the updater file

A lack of connection to the FTP server may be due to a network connection problem (Ethernet or GPRS), an FTP login problem or a failure to initiate the connection.

If you cannot connect to the network, check the following points:

  • Ethernet:
    • Modem set to “off” or “always off”
    • “Gateway” fields correctly entered
    • At least one DNS server must be configured
  • GPRS:
    • Modem set to “on”
    • APN, APN ID and APN password correctly entered
    • GPRS call number set to “*99***1#”

If you cannot log in, check the following points:

  • Incorrect FTP parameters
  • TCP port 21 closed at output
  • Domain name resolution problem: the DNS server is not specified

If the connection fails to initiate:

In this case, only the automatic connection does not work. The problem is probably caused by an incorrect schedule configuration. Please note, the schedule ID must be an integer.

 PARTICULAR APPLICATION OF THE WEBDYNRF WIRELESS M-BUS GATEWAY

For the WM-bus module data to be transmitted, you must:

  • Choose the mode corresponding to the modules used (S, T or N)
  • Define the modules or groups of modules to be processed

A module may be defined in a unique way by all the fields below:

  • Id
  • Manufacturer
  • Version
  • Medium

If a module’s data is encrypted, the encryption key for this module can be defined in the “Key” field.

To simplify the entry of the modules to be processed, a module group can be defined that conforms to the fields entered. The other fields will then be left empty (below is an example of a configuration for retrieving all Webdyn manufacturer (WDN) modules with the encryption key “00000000000000000000000000000000”.

  •   Id :
  •   Manufacturer : WDN
  •   Medium :
  •   Version :
  •   Label : Webdyn
  •   Key : 00000000000000000000000000000000

Note: In order for the modules (filters) entered to be taken into account, the “ByPass filter” mode must be deactivated.

Click here to read the media file 

Click here to read the units file 

 PARTICULAR APPLICATION OF THE WEBDYNRF WAVENIS

The tool is connected to the gateway via the installer access (install).

It is therefore necessary to use the installer password (default is “middle”), and not the administrator’s password (default is “high”)

The statuses transmitted by the WebdynRF gateway are the raw values contained in the Wavenis modules. They are transmitted without interpretation. For further details, please refer to the Coronis module manuals.

Annexes et autres documents

FAQ

CONFIGURATION DE LA GATEWAY WEBDYNRF

  • Dans le cas où le fichier est supprimé du répertoire après connexion du concentrateur WebdynRF, le problème est généralement dû à une erreur du format de fichier. Les fichiers de configuration et de commande doivent respecter le format décrit dans les fichiers schéma (XSD).
    Pour vérifier la cohérence d’un schéma, ouvrez le fichier XML avec l’éditeur de texte Notepad++ et installez le complément « XML Tool ». Copiez ensuite le fichier XSD correspondant au fichier XML dans le même répertoire, et sélectionnez dans XML Tool « Validate now ». Les erreurs détectées par l’outil doivent s’afficher.
  • Dans le cas où le fichier n’est pas supprimé du serveur, le problème le plus courant est que le fichier n’a pas été déposé au bon endroit. Le fichier doit être disponible sur le serveur dans le répertoire « INBOX », et dans le sous-répertoire ayant pour nom l’uid du produit (exemple « /INBOX/0045CE/ »).

 UTILISATION GÉNÉRALE DE LA GATEWAY WEBDYNRF

La quantité de données échangées sur le réseau GPRS varie en fonction de la configuration. Cependant, on peut estimer une consommation de l’ordre de 5Mo / mois.

Le concentrateur WebdynRF consomme en moyenne environ 250mA.

Il existe 2 modes de mise à jour de firmware :
La mise à jour locale :
Sur l’interface de configuration de la WebdynRF, accédez à l’onglet « Actions », et sélectionnez l’updater dans le menu « File upload » avant de cliquer sur le bouton « Upload »

La mise à jour à distance :
Téléchargez le serveur FTP le fichier contenant l’updater (fichier avec l’extension « .bz2 ») dans le répertoire « BIN ». Puis déposez la commande de mise à jour dans le répertoire INBOX correspondant à votre concentrateur (« INBOX/« , avec , l’identifiant du concentrateur concerné)

La commande de mise à jour doit respecter le format suivant:

      updater.tar.bz2
      checksum_md5

updater.tar.bz2
checksum_md5

Avec :

  • updater.tar.bz2 : Nom du fichier updater téléchargé dans le répertoire « BIN »
  • checksum_md5 : Code md5 du fichier updater

Une absence de connexion au serveur FTP peut s’expliquer par un problème de connexion au réseau (Ethernet ou GPRS), par un problème d’ouverture de session FTP ou par un non déclenchement de la connexion.

En cas de problème de connexion au réseau, vérifiez les points suivants:

  • Ethernet :
    • Mode du modem à « off » ou « alwaysoff »
    • Champs « Gateway » correctement saisi
    • Au moins un serveur DNS doit être configuré
  • GPRS :
    • Mode du modem à « on »
    • APN, identifiant APN et mot de passe APN correctement saisis
    • Numéro d’appel GPRS à « *99***1# »

En cas de problème d’ouverture de session, vérifiez les points suivants:

  • Paramètres FTP incorrects
  • Port TCP 21 fermé en sortie
  • Problème de résolution du nom de domaine: le serveur DNS n’est pas précisé

En cas de non déclenchement de la connexion :

Dans ce cas, seule la connexion automatique ne fonctionne pas. Le problème est généralement dû à une mauvaise configuration des schedules. Attention, l’ID des schedules doit être un entier.

 UTILISATION PARTICULIÈRE DE LA PASSERELLE WEBDYNRF WIRELESS M-BUS

Pour que les données des modules WM-bus soient remontées, il faut :

  • Choisir le mode correspondant aux modules utilisés (S, T ou N)
  • Définir les modules ou groupes de modules à traiter

Un module peut être défini de manière unique par l’ensemble des champs ci-dessous :

  • Id
  • Manufacturer
  • Version
  • Medium

Dans le cas où les données d’un module seraient cryptées, il est possible de définir la clé de cryptage de ce module dans le champ « Key ».

Afin de simplifier la saisie des modules à traiter, il possible de définir un groupe de module respectant les champs saisis. Les autres champs seront alors laissés vides (ci-dessous un exemple de configuration permettant de récupérer l’ensemble des modules du manufacturer Webdyn (WDN) avec pour clé de cryptage « 00000000000000000000000000000000 ».

  •   Id : 
  •   Manufacturer : WDN
  •   Medium :
  •   Version : 
  •   Label : Webdyn
  •   Key : 00000000000000000000000000000000

Remarque : Pour que les modules (filtres) saisis soient pris en compte, le mode « ByPass filter » doit être désactivé.

UTILISATION PARTICULIÈRE DE LA WEBDYNRF WAVENIS

La connexion de l’outil au concentrateur est réalisée via l’accès installateur (install).

Il faut donc utiliser le mot de passe installateur (par défaut « middle »), et non celui de l’administrateur (par défaut « high »)

Les statuts remontés par le concentrateur WebdynRF sont les valeurs brutes contenues dans les modules Wavenis. Elles sont remontées sans interprétation. Pour plus de détails, se référer aux manuels des modules Coronis.

Annexes et autres documents

FAQ

Annexes et autres documents

FAQ

Annexes et autres documents

FAQ

Annexes et autres documents

  • WARNING :  Pour les anciens produits qui disposent d’une carte SIM avec un code PIN à 0000 , la mise à jour vers la version 4.07.02 sera fonctionelle.

    Second cas : Si la carte SIM avec un code PIN à 0000 est utilisée dans cette version (4.07.02), le passage vers une mise à jour antérieure est interdit. 

NOTICE DE FIN DE VIE DES PRODUITS