Suchen Sie etwas anderes?
Table of Contents
Scene Details
This application note details how to configure a Titan router to give Wifi connectivity to a ETH device. We will use a PLC with Ethernet connection as an example. We need to connect the PLC to the Internet through ADSL router with Wifi connectivity. Additionally, it should be possible to access the TCP 502 port of the PLC to make a modbus TCP connection against said device.
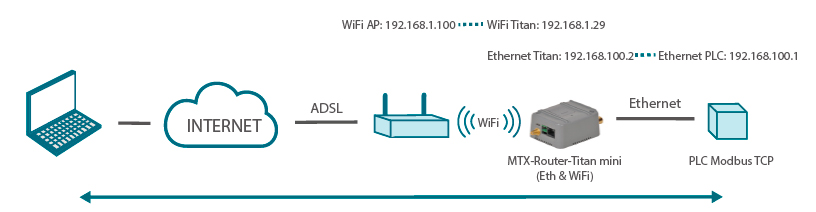
Let’s say we have ADSL router with Wifi connectivity in our office. That router will have the IP address 192.168.1.100. The Titan router will have the IP address 192.168.1.29 assigned. Regarding the Ethernet network (between the Titan router and the PLC), the IP address 192.168.100.2 will be assigned to the Titan router and the address 192.168.100.1 to the PLC.
Configuration of the Titan Router
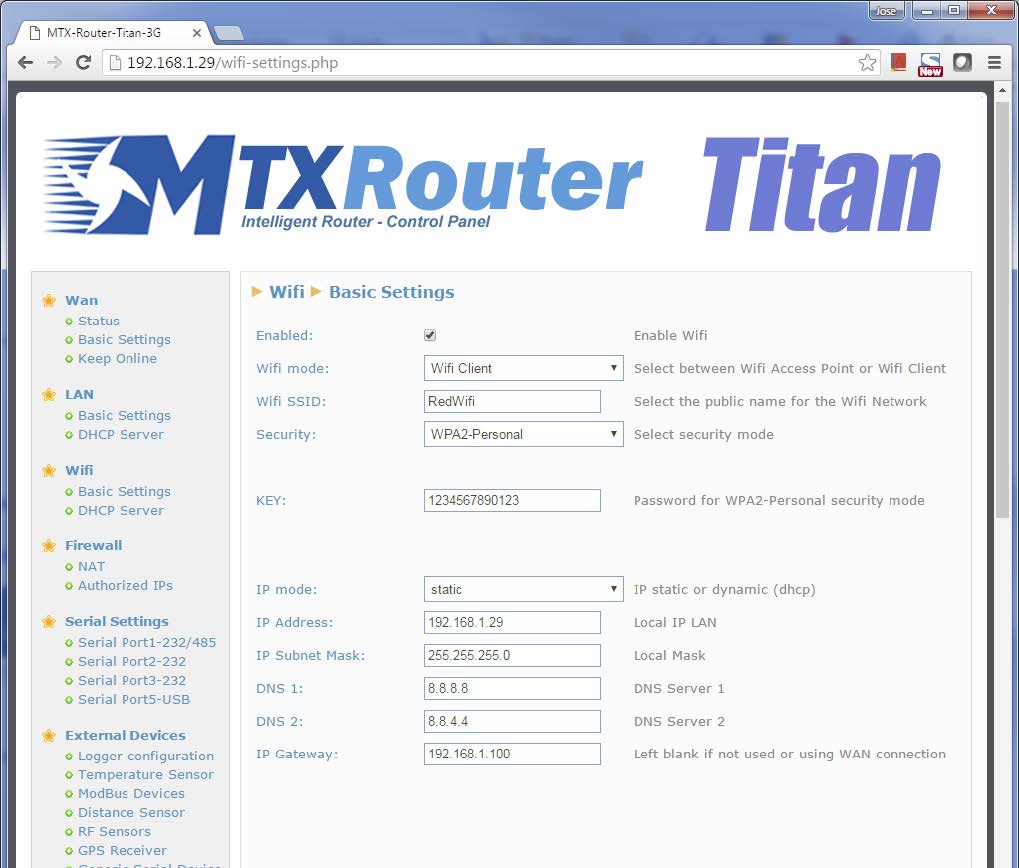
To configure the WiFi section we go to “WiFi > Basic Settings” and will configure the router as shown in the next picture, specifying the WiFi in client mode (WiFi Client), selecting the WiFi network we want the Titan router to connect to. We will specify the IP configuration that adjusts to the example we want to follow (Titan router IP WiFi 192.168.1.29, Gateway 192.168.1.100…).
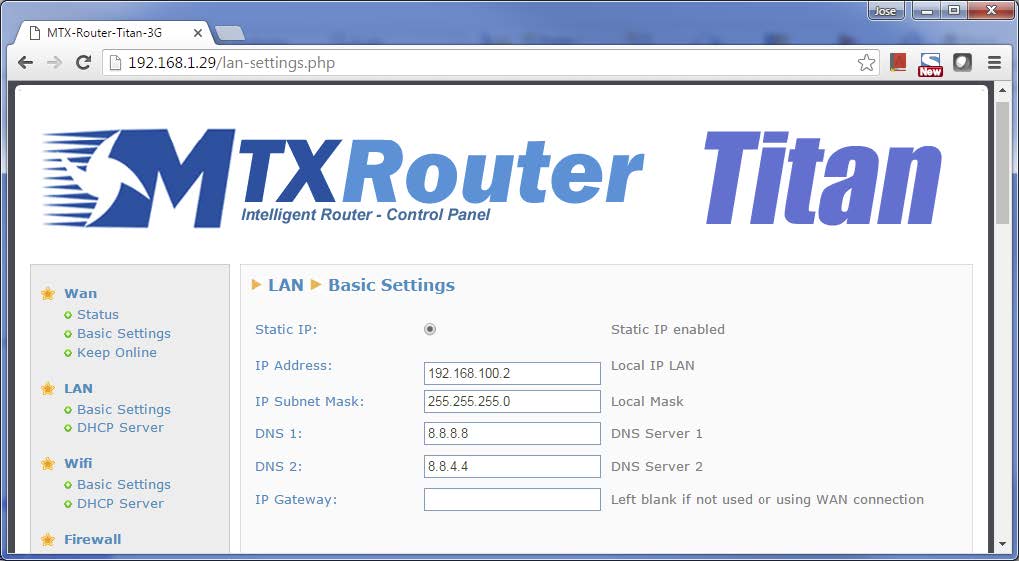
To configure the IP section of Ethernet connectivity we go to “LAN > Basic Settings”:
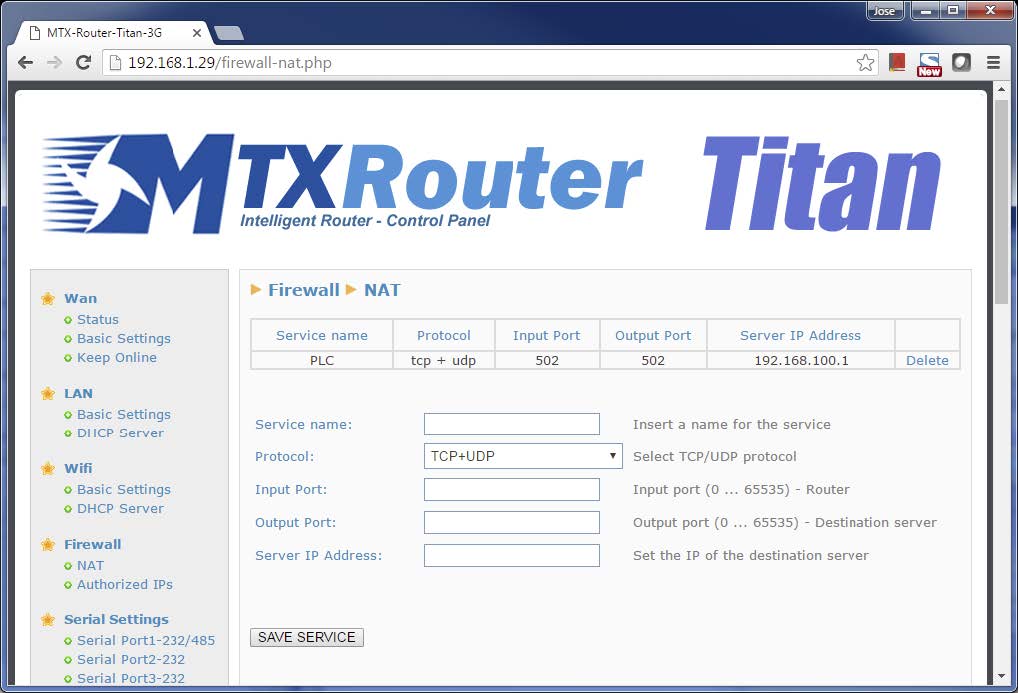
Finally, if we want to have access to the TCP 502 port (modbus) from the outside, we will make a NAT of said port to redirect all the traffic that reaches the router through the 502 port to the PLC IP address. To do that, go to the menu “Firewall > NAT”.
The last step would be to restart the router from the menu “Other > Reboot” to save the new configuration. After that, our PLC will have access to the Internet through WiFi.
Other Considerations
- The Gateway IP configuration of the PLC must point to the Ethernet IP of the Titan router, in the case of the example, the address 192.168.100.2
- In case we want to access the TCP 502 port of the PLC, we need to go to the Wifi IP address of the Titan router, in the case of the example to the IP 192.168.1.29:502 (because the traffic will be redirected with NAT to 192.168.100.1)

 Enter the “ethernet” or “modem” connection type:
 For an ethernet configuration, make sure the IP parameters are compatible with server access according to the concentrator local network configuration. For an ethernet connection, the configuration must be compatible with the concentrator’s local network topology so that it can access the servers. This configuration is done from the “Networks” configuration page (see section 3.2.2.3: “Networks”).
For a modem connection, the modem configuration must be correct before a connection can be set up. This configuration is done from the “Modem” configuration page (see section 3.2.2.4: “Modem”).
The parameters for the servers to be configured are at least the following:
For an ethernet configuration, make sure the IP parameters are compatible with server access according to the concentrator local network configuration. For an ethernet connection, the configuration must be compatible with the concentrator’s local network topology so that it can access the servers. This configuration is done from the “Networks” configuration page (see section 3.2.2.3: “Networks”).
For a modem connection, the modem configuration must be correct before a connection can be set up. This configuration is done from the “Modem” configuration page (see section 3.2.2.4: “Modem”).
The parameters for the servers to be configured are at least the following:
 Therefore the following fields need to be configured: “Interface”, “Type”, “Server type”, “Address”, “Port”, “Login” and “Password”.
The other fields can be left at the default values subject to the directories having been properly created beforehand. See section 3.1.2: “Configuration files” for more details.
Therefore the following fields need to be configured: “Interface”, “Type”, “Server type”, “Address”, “Port”, “Login” and “Password”.
The other fields can be left at the default values subject to the directories having been properly created beforehand. See section 3.1.2: “Configuration files” for more details.


 Wait. The concentrator will reboot using its factory configuration.


