Titan – AN21: W-MBus Device Data Hub (Order Management System)

Suchen Sie etwas anderes?

Introduction

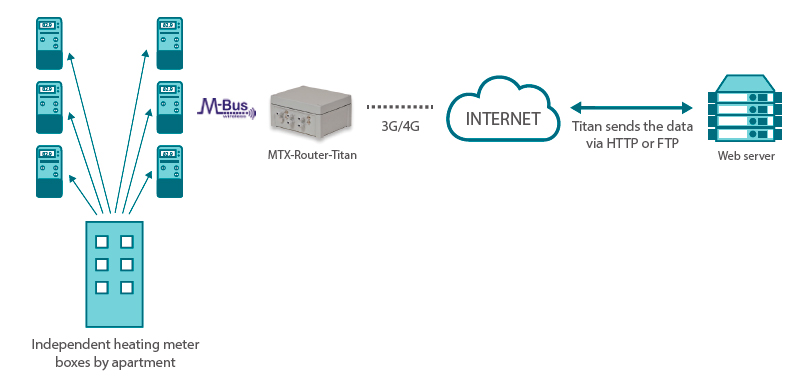
Titan routers that have the W-MBus card, which is optional, can be used as W-MBus devices data hubs (OMS). It is very appealing when it comes to metering applications, because it easily allows to gather, package and send the data coming from meter boxes with integrated W-MBus technology or regular meter boxes connected to W-MBus impulses meter boxes.

Example Scenario

This application note will clearly explain how to configure the Titan router so it functions as a W-MBus data hub. To do that, we are going to develop a complete example. Let’s say we have a residential building with centralised heating for all the apartments, which pay depending of a coefficient (m2) regardless of their consumption. But the regulation has changed and we need each apartment to pay the heating based on each one’s consumption. To do that, we will install a meter box with W-MBus technology in each apartment. The Titan router will function as a W-MBus data hub, gathering data from each meter box through a wireless connection, and sending the data to a web platform. This way, each neighbour will be able to look up their daily consumption as well as being billed independently.

WAN Configuration

In order to connect the Titan router to the Internet via 3G or 4G, we need to access the configuration screen “WAN > Basic Settings” and enter the APN, User and Password according to the SIM card being used. The following screen shows how to do that:

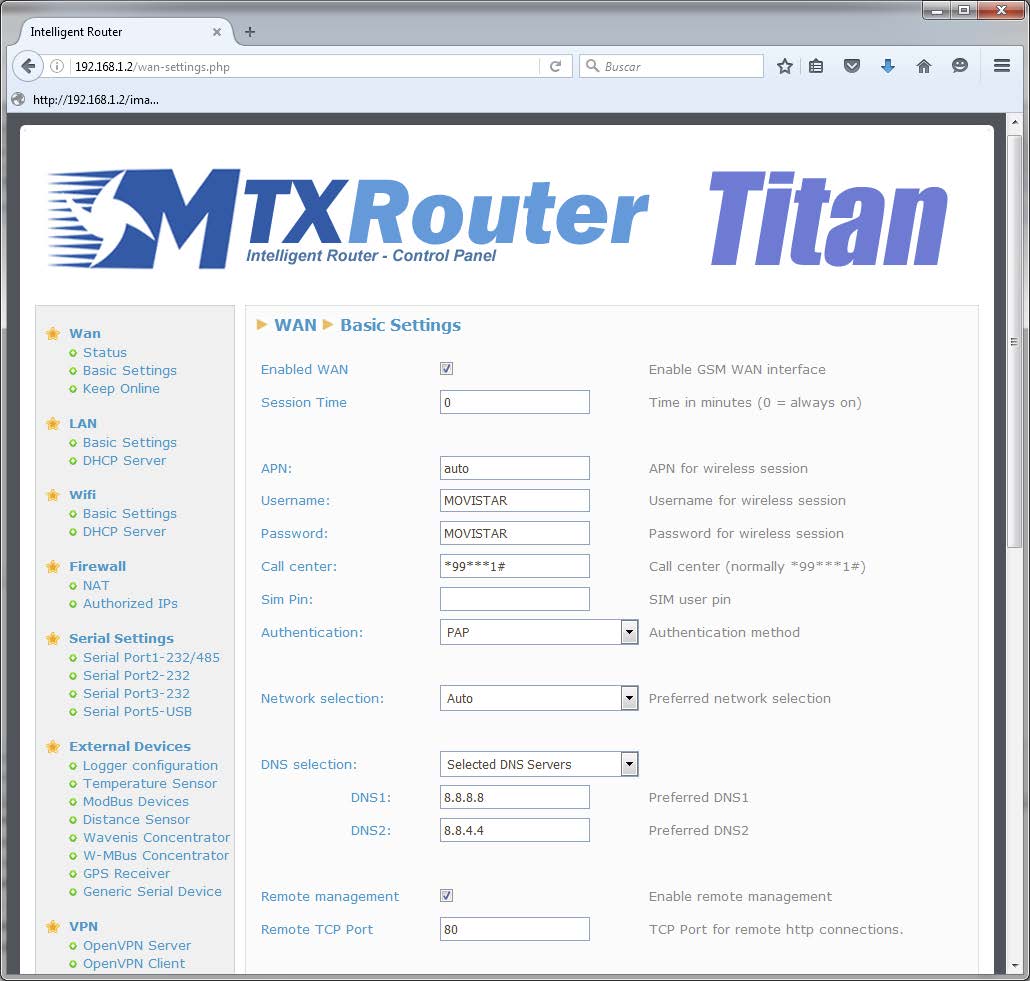
Let’s not forget to select Remote Management if we want to run the Titan router remotely via 3G/4G.

W-MBUS Card Configuration

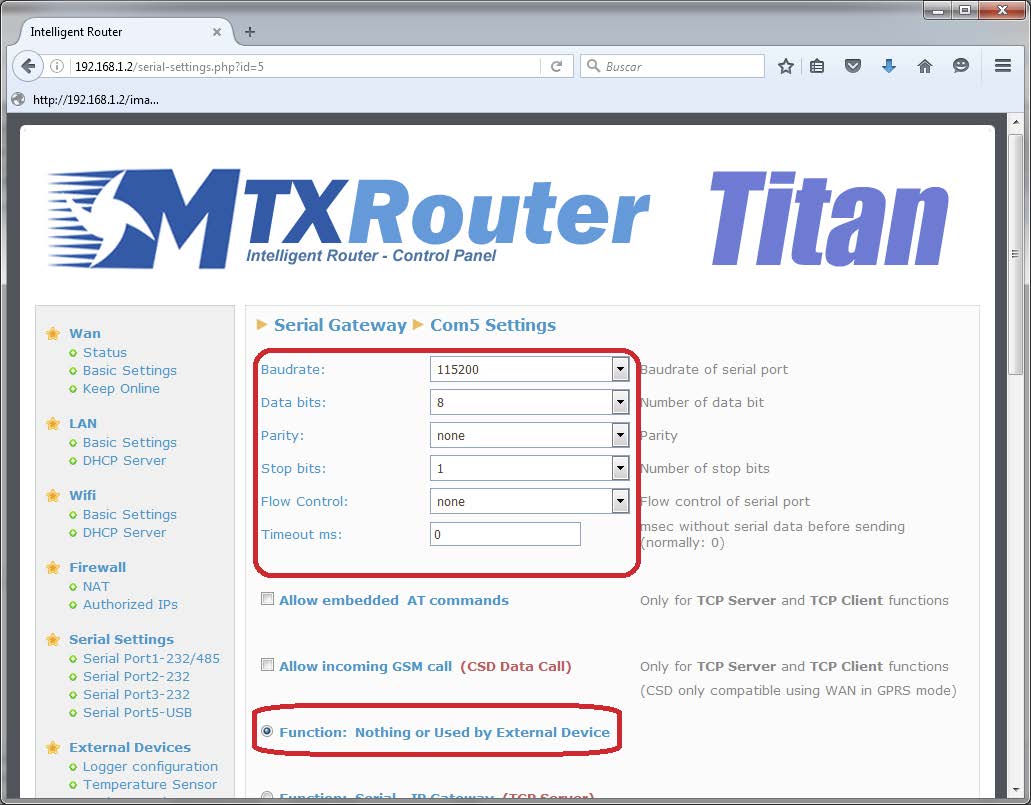
Next we will properly configure the W-MBus card of the Titan router. Since said card is connected to the USB port of the Titan router, we will go to the section “Serial Settings > Serial Port5 USB” and will configure the suitable speed, parity, etc. … so the W-MBus can work properly:

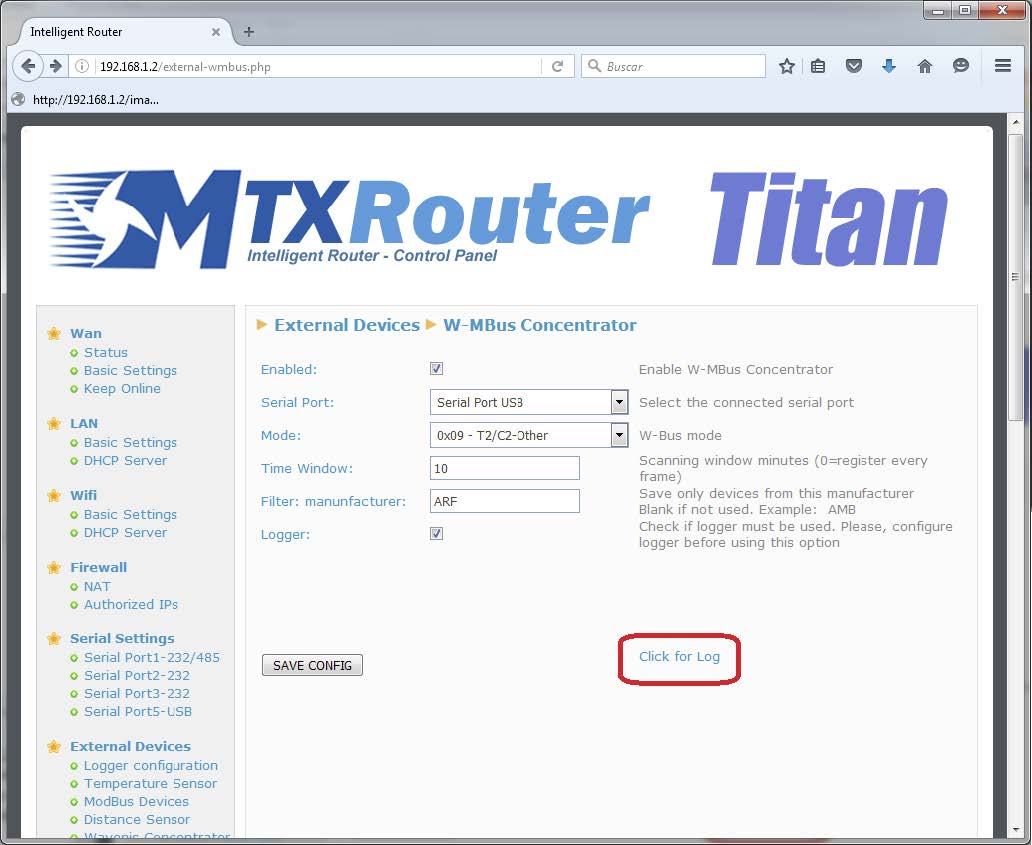
Next, we need to configure the W-MBus itself, specifying it is connected to the USB port, choosing the W-MBus mode, the time window, an optional filter to point out the meter boxes manufacturer to be managed, and then we select “Logger” to specify we want to record the gathered data on the internal memory, to send them to the web platform afterwards.

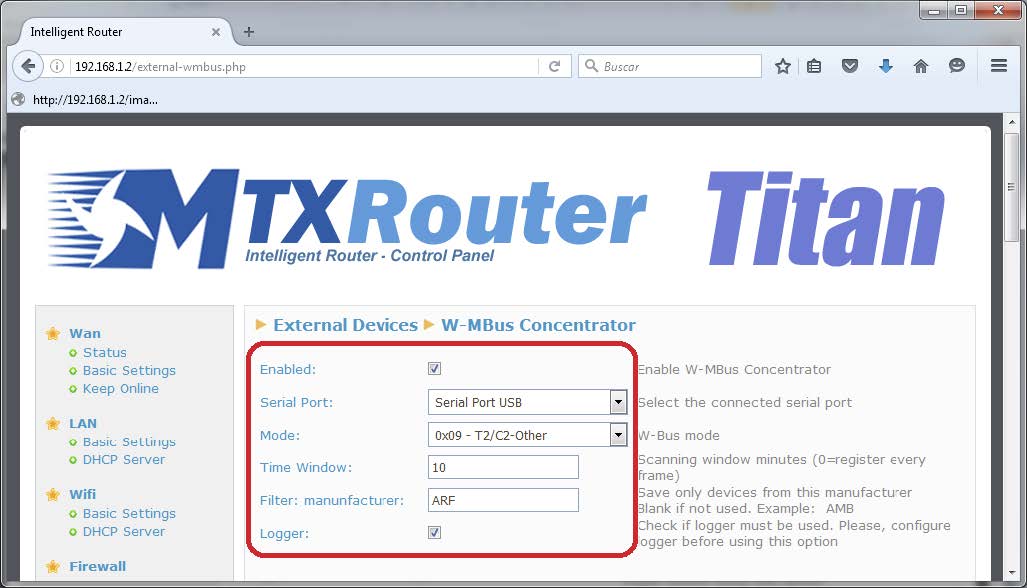
In this example we have specified a 10 minute “Time Window”. Let’s say the W-MBus meter boxes are sending the count data every 15 seconds. When we specify a 10 minute window, the Titan router will stock internally and send data only every 10 minutes (the first data it receives from the meter box every 10 minute window).

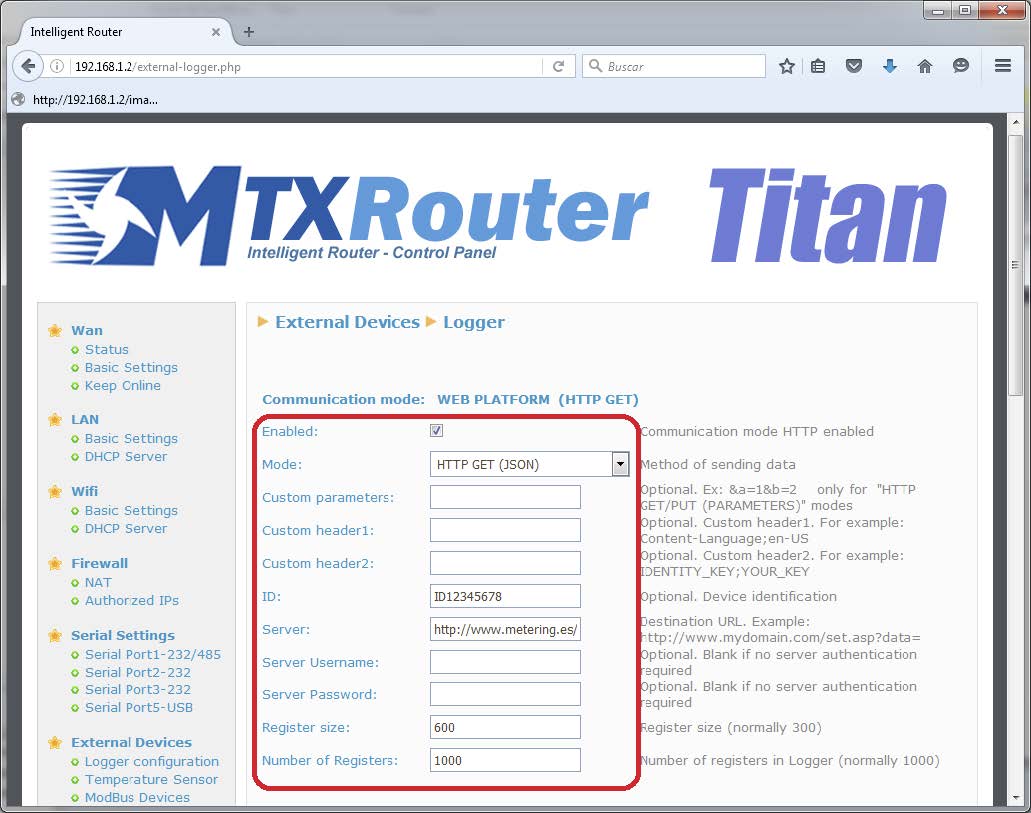
Datalogger Configuration and Sending data

We are going to configure the datalogger and the sending data URL. To do that we will activate the sending methods we need, HTTP and/or FTP. In the case of this example we will use FTP. We will also choose the method, an ID so the web platform can identify the modbus data hub sending data, the data reception server and the size of the registry (minimum 600 for this application). This is all we need to configure the Titan. Next, we will reset it from “Other > Reboot” so the Titan router restarts and uses the new configuration.

Testing the Configuration

After restarting the Titan router we can check it is reading correctly W-MBus devices. To do that, we will go to the section “External Devices > W-MBus Concentrator” and will click on the “Click for Log” link.

This action will take us to another screen where we can see a LOG with the last W-MBus network data gathered by the Titan router. If there is any activity it is a good sign and means everything is working properly.

Example of a W-MBus LOG with activity:

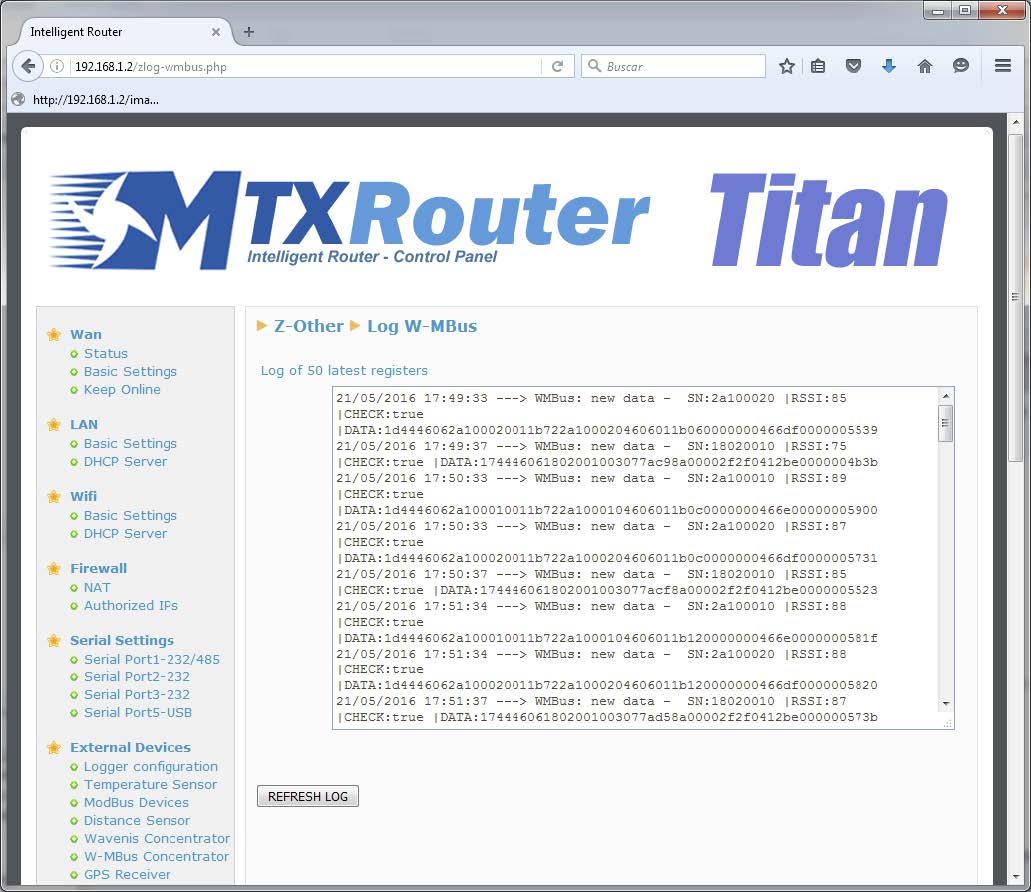
Example of data (JSON) sent to the web platform, where “TYPE” indicates the sent data are W-MBus, TS is the TimeStamp when the meter box data was read , “P” is the ID specified in the Logger configuration, “IMEI” is the Titan router IMEI, and inside DATA there is the RAM data and the W-MBus OMS network data received from the meter box.

{TYPE:WMBUS,TS:21/05/2016 15:39:37,IMEI:357044060009633,P:ID12345678,DATA:174446061802001003077abd8a00002f2f0412be0000003d39}

Avete una domanda? Avete bisogno di un preventivo? Contattateci.

  • Questo campo serve per la convalida e dovrebbe essere lasciato inalterato.

Annexes et autres documents

Anexos y otros documentos

Annexes et autres documents

Anhänge und andere Dokumente

附錄及其他文件

附錄及其他文件

附錄及其他文件

附錄及其他文件

附錄及其他文件

附錄及其他文件

FAQ

No, the concentrator is not able to decrypt data from WM-BUS equipment because it does not have a safe on board to guarantee the security of the encryption keys of your equipment. The recovered data is deposited without modification (without decryption) by the concentrator on your remote server.
Please check these items in this order:
  • the battery level: if the battery level is too low or empty, the product will not run properly or not run at all.
  • Modem reception level: a bad signal at the modem may also prevent the hub from uploading files. Look to move the product or install an external antenna to improve signal quality.
  • The last configuration file: a bad configuration file can block the product.

Remotely, by checking the regularly uploaded files if the product configuration is correct.

On site, by passing the magnet over the product, you will hear 3 short beeps.

Replace the product and inject the configuration from the old product into the new one. If a white list is used, remember to inject it into the new product as well.

附錄及其他文件

其他手冊

應用指南

FAQ

Gateway configuration:

Start by checking that the computer’s IP parameters are compatible with the WebdynSunPM IP address (by default 192.168.1.12)

Launch a web browser (Chrome, Firefox, Edge, Safari, etc.) and enter the WebdynSunPM concentrator IP address in the address bar. An authentication page is displayed:

The default accesses are:

IdentifiantMot de passe
userhighhigh

Click “Login”

There are two configuration solutions, using the web interface and using text messages:
  • Configuration using the web interface:
Start by establishing a connection to the concentrator by connecting to it to access the server configuration: Enter the “ethernet” or “modem” connection type: For an ethernet configuration, make sure the IP parameters are compatible with server access according to the concentrator local network configuration. For an ethernet connection, the configuration must be compatible with the concentrator’s local network topology so that it can access the servers. This configuration is done from the “Networks” configuration page (see section 3.2.2.3: “Networks). For a modem connection, the modem configuration must be correct before a connection can be set up. This configuration is done from the “Modem” configuration page (see section 3.2.2.4: “Modem). The parameters for the servers to be configured are at least the following: Therefore the following fields need to be configured: “Interface”, “Type”, “Server type”, “Address”, “Port”, “Login” and “Password”. The other fields can be left at the default values subject to the directories having been properly created beforehand. See section 3.1.2: “Configuration files for more details.
  • Text message configuration:
Text message configuration requires sending the following commands:
      • Apn: to configure the SIM card APN. (see section 3.2:“apn” modem configuration command)
      • Ftp: to configure the FTP server that will contain the concentration configuration (see section 3.3: “ftp” FTP configuration command”).
      • Connect: to launch the connection to the FTP server and load the configuration (see section 3.1: ““connect” connection command

Access to the FTP server depends on the selected solution.

If you have chosen a portal, it will give you the FTP server access identifiers.

If you want to use your own FTP server, contact your network administrator.

For all other configurations, and to determine the best solution, contact the Webdyn sales department which will advise you and direct you to the relevant contacts: contact@webdyn.com

General gateway use

There are 2 methods to force a concentrator factory reset:
  • Press the Factory Reset button on the concentrator for 20 seconds:
Wait. The concentrator will reboot using its factory configuration.
  • If a SIM card is installed and configured, a “factory” text message can also be used for factory reset. Just send the “factory” text message to the SIM card phone number (see section 3.7: “factory” reset command”)

It is possible to send commands to connected devices if they accept them.

The WebdynSunPM can store up to 50Mb of uncompressed data per declared device.

If there is no access to the remote server, the WebdynSunPM concentrator can store the data for several months.

The maximum data storage time varies depending on the amount of data to be collected and the configured collection frequency.

The average storage time varies from 3 to 4 months.

The average service life of the battery is 5 years.

It may vary depending on the installation environment.

All our products are guaranteed for 2 years.

For more information, read the general terms and conditions of sale.

The data volume depends on the exchanged files.

The average is about 5 MB per month but this varies from one installation to another.

Inverter compatibility

See section 1.4: “Supported devices”.

Modbus device compatibility:

Yes, different Modbus devices can be connected to the same serial port.

Device compatibility:

    • Same type of RS485 or 4 wire connection.
    • All devices should be able to be configured using identical bus specifications. Same speed, same parity, same number of stop bits and data bits on all devices and on the WebdynSunPM.
    • Each device must be assigned a unique Modbus address (between 1 and 247) on the bus. (UnitID)

附錄及其他文件

FAQ

CONFIGURATION OF THE WEBDYNSUN GATEWAY

  • Start by checking that your computer’s IP parameters are compatible with the WebdynSun’s “IP” address (the default is 192.168.1.12). 
  • Next, launch a web browser (Firefox or IE) and enter the WebdynSun’s IP address in the address bar. An authentication page will appear: 

The default accesses are:
Username: userhigh
Password: high

  • Click on “log in”  

There are two types of configuration: via the web interface or via SMS.

Configuration of the web interface:

1/ Go to the configuration page with the gateway IP address (default 192.168.1.12)

2/ Go to the Configuration tab.

3/ Select either the Ethernet or modem connection mode:

If connecting via the local network (Ethernet):

  • Edit the WebdynSun’s IP parameters by assigning it a network-compatible address.

Please note, all fields must be completed in accordance with the configuration of your local network.

If connecting via the GPRS network (Modem):

  • Change the connection settings of the GPRS modem to the settings provided by your mobile operator.

4/ Edit the FTP server parameters.

5/ Confirm the changes.

6/ Restart the WebdynSun gateway using the new settings.

7/ In the menu, click on the “installation” tab, followed by the “connection” sub-tab and start the connection.

Configuration via SMS:

This configuration method requires the use of an active SIM card with a data option and a pin code that must be either “0000” or disabled.
The SIM card must be inserted into the unit before connection to the mains supply.
After connection to the mains supply, send the following SMS messages to the number of the previously inserted SIM card:

SMS for configuring the APN:
After replacing the generic fields with those of your operator, send the following SMS*:
apn=apn_name;usr=user_name;pwd=password;

Replace the above SMS fields with the following information:

  • apn_name: APN name supplied by your mobile operator
  • user_name: APN ID supplied by your mobile operator
  • password: APN password supplied by your mobile operator

SMS for FTP configuration:
After replacing the generic fields with those of your FTP server, send the following SMS*:
Ftp=server_name:user_name:password:port;

Replace the above SMS fields with the following information:

  • server_name: FTP server address
  • user_name: FTP account ID
  • Password: FTP account password
  • Port: FTP server port (the default port is 21)

Connection SMS:

Send the word “connect” by SMS* to launch a connection to the FTP server

*Please note: the formatting of the SMS must be exactly identical to that shown above (e.g.: no spaces between characters, etc.)

There are 2 ways of resetting the gateway.

  • If connecting by Ethernet:
    • Disconnect from the mains
    • Remove the cover
    • Disconnect the battery
    • Put the DIP Switch 2 on the WebdynSun card in “ON” position
    • Start the WebdynSun by connecting it only to the mains power supply
    • Wait until all the LEDs flash and then stop flashing (3 to 5 mins).
    • Disconnect from the mains
    • Reset the Dip Switch 2 to “OFF” 
    • Reconnect the battery
    • Reconnect to the mains supply and the WebdynSun starts normally.
  • If there is a SIM card inserted in the unit:
    • Send an SMS message containing the word “factory” to the number of the inserted SIM card.

NB : Resetting the gateway restores the configuration to its original state. Please note: data will be saved but the specific settings will not. Therefore, all the settings must be reconfigured.

Commands can be sent to connected devices with the exception of certain inverters and Modbus slaves that do not accept write requests.

If the device allows it, command files can be created on the FTP server.

The WebdynSun has a memory of about 100MB.

Therefore, if the remote server cannot be accessed, the WebdynSun gateway can backup data for several months.
The maximum data backup time varies depending on the amount of data to be collected.

The average backup time ranges from 3 to 4 months.

The average battery life is 5 years.

It may vary depending on the installation environment.

Yes, data may be sent to a PLC if the latter is equipped with a Modbus protocol.
The “Report” configuration file allows the WebdynSun gateway to automatically write the values read on a Modbus slave

All our products are guaranteed for 2 years.

For further information, please see our general conditions of sale.

Files uploaded by the WebdynSun gateway are compressed in Gz format.

The data contained in these files is structured in csv format.

The data volume depends on the files exchanged.

The average is about 5 MB per month but this varies from one installation to another.

INVERTER COMPATIBILITY WITH THE WEBDYNSUN GATEWAY

Different brands of inverter may be connected to the RS485(B) port or via the Ethernet port if the inverter protocol is based on the Modbus protocol (RTU or TCP).

However, different brands of inverters cannot be connected to the same RS485(A) port.

For a list of compatible inverters, please see the product page of the WebdynSun data gateway
  • Check if the correct inverter protocol is selected before starting detection:
  • Check the wiring and configuration of the inverters by referring to the inverter appendices.
  • Check that the inverters are not in OFF or stand-by mode.
  • Check that the line end plugs on the RS 485(A) Bus are turned on.

COMPATIBILITY WITH MODBUS DEVICES

Yes, any device you wish to connect must be configured and its Modbus definition file must be created.

The configuration is mainly based on the RS485 serial bus parameters and the IP parameters.

Yes, different Modbus devices can be connected to the same RS485 (B) port.

However, they must have the same communication parameters (bus parameters or compatible IP parameters), in order for them to communicate with each other.

Appendices and other documents

Appendices and other documents

Anexos y otros documentos

Anhänge und andere Dokumente

Annexes et autres documents

Anexos y otros documentos

Anhänge und andere Dokumente

Annexes et autres documents

Anexos y otros documentos

Anhänge und andere Dokumente

Annexes et autres documents

Anexos y otros documentos

Anhänge und andere Dokumente

Annexes et autres documents

Appendices and other documents

Appendices and other documents

Appendices and other documents

Appendices and other documents

Appendices and other documents

Appendices and other documents

Appendices and other documents

Appendices and other documents

Appendices and other documents

Anexos y otros documentos

  • ADVERTENCIA: Para la versión antigua con TARJETA SIM el código pin es 0000 puedes actualizar en esta versión. Para el segundo caso: cuando inserta una TARJETA SIM con un código PIN, se usa 0000 en esta versión (4.07.02). No se permite bajar a una versión anterior.


PRODUCT END OF LIFE CYCLE

Anexos y otros documentos

Preguntas frecuentes

Anexos y otros documentos

Preguntas frecuentes

Anexos y otros documentos

Preguntas frecuentes

Anhänge und andere Dokumente

  • ACHTUNG: Für die alte Version mit SIM-Karte lautet der PIN-Code 0000. Sie können in dieser Version aktualisieren. Für den zweiten Fall: Wenn Sie eine SIM-Karte mit dem PIN-Code 0000 einlegen, der in dieser Version (4.07.02) verwendet wird, ist ein Downgrade auf eine frühere Version nicht zulässig.


PRODUCT END OF LIFE CYCLE

Anhänge und andere Dokumente

FAQ

Anhänge und andere Dokumente

FAQ

Anhänge und andere Dokumente

FAQ

Appendices and other documents

  • Warning – Firmware update V4.07.02 For the old version with SIM CARD of the pin code is 0000 you can update in this version. For the second case : When you insert a SIM CARD with pin code is 0000 used in this version (4.07.02) Downgrading to a previous version is not permitted.


PRODUCT END OF LIFE CYCLE

Appendices and other documents

  • Warning – Firmware update V4.07.02 – For the old version with SIM CARD of the pin code is 0000 you can update in this version.

    For the second case : When you insert a SIM CARD with pin code is 0000 used in this version (4.07.02) Downgrading to a previous version is not permitted.

PRODUCT END OF LIFE CYCLE

Annexes and other documents

FAQ

Annexes and other documents

FAQ

Annexes and other documents

FAQ

Anexos y otros documentos

Otros manuales

Notas de aplicación

Product End of Life Cycle

Preguntas frecuentes

Configuración de la pasarela:

Comenzar verificando que los parámetros IP del ordenador son compatibles con la dirección IP de la WebdynSunPM (por defecto 192.168.1.12)

Lanzar un navegador Web (Chrome, Firefox, Edge, Safari…) e ingresar la dirección IP del concentrador WebdynSunPM en la barra de dirección. Se visualizará una página de autentificación:

Los accesos por defecto son:

IdentificadorContraseña
userhighhigh

Hacer clic en “Login”

Existen dos soluciones de configuración, a través de la interfaz web y a través de SMS:
  • Configuración a través de la interfaz web:
Establecer en primer lugar una conexión en el concentrador conectándose en el mismo para acceder a la configuración de los servidores: Ingresar el modo de conexión “ethernet” o “módem”: En el caso de una configuración por ethernet, tener el cuidado de que los parámetros IP sean compatibles con el acceso al servidor según la configuración de la red local del concentrador. En el caso de una conexión por ethernet, la configuración debe ser compatible con la topología de la red local del concentrador para que pueda acceder a los servidores. Esta configuración se hace a través de la página de configuración “Networks”  (ver capítulo 3.2.2.3: “Redes (Networks)). En el caso de una conexión por módem, la configuración del módem debe ser correcta antes de poder efectuar una conexión. Esta configuración se hace en la página de configuración “Modem” (ver capítulo 3.2.2.4: “Módem). Los parámetros de los servidores a configurar como mínimo son los siguientes: Por lo tanto, hay que los campos: “Interface”, “Type”, “Server type”, “Address”, “Port”, “Login” y “Password”. Los otros campos se pueden dejar a los valores por defecto, a condición de que los repertorios hayan sido creados antes correctamente. (Ver capítulo 3.1.2 : “Archivos de configuración para más detalles.
  • Configuración por SMS:
La configuración por SMS necesita enviar los siguientes comandos:
    • Apn: para configurar el APN de la tarjeta SIM. (ver capítulo 3.2: “Comando de configuración del módem “apn”)
    • Ftp: para configurar el servidor FTP que tendrá la configuración del concentrador (ver capítulo 3.3: “Comando de configuración del FTP “ftp”).
    • Connect: para lanzar la conexión al servidor FTP y cargar la configuración (ver capítulo 3.1: “Comando de conexión “Connect” 

El acceso al servidor FTP depende de la solución adoptada.

Si usted ha seleccionado un portal, los identificadores de acceso al servidor FTP este se los comunica.

Si desea utilizar su propio servidor FTP, contacte con su administrador de red.

Para todas las otras configuraciones y para determinar la solución que conviene mejor, hay que contactar con el servicio comercial Webdyn que sabrá aconsejarle y redirigirlo a los interlocutores pertinentes: contact@webdyn.com

Utilización general de la pasarela

Existen 2 métodos para forzar un regreso a los parámetros de fábrica del concentrador:
  • Pulsar el botón Retour Usine del concentrador durante 20 segundos:
Esperar. El concentrador arrancará con su configuración de fábrica.
  • Si está instalada y configurada una tarjeta SIM, un SMS “factory” también permite efectuar un retorno de fábrica. Basta con enviar el SMS “factory” al número de teléfono de la tarjeta SIM (ver capítulo 3.7: “Comando de regreso de fábrica “factory”)

Es posible enviar comandos a los equipos conectados si este los acepta.

La WebdynSunPM memoriza hasta 50Mo de datos no comprimidos por equipo declarado.

En caso de no acceso al servidor distante, el concentrador WebdynSunPM puede, por esta razón, almacenar los datos durante varios mes.

El tiempo máximo de almacenamiento de datos varía en función de la cantidad de datos a recopilar y de la frecuencia de la recopilación configurada.

La duración media de salvaguardia varía entre 3 y 4 mes.

La duración de vida promedio de la batería es de 5 años.

Puede variar según el entorno de la instalación.

Todos nuestros productos tienen una garantía de 2 años.

Para más información, consulte nuestras condiciones generales de venta.

El volumen de datos depende de los archivos intercambiados.

El promedio es del orden de 5 Mo por mes y varía para cada instalación.

Compatibilidad de los inversores

Ver capítulo 1.4: “Equipos soportados”.

Compatibilidad de los equipos modbus:

Sí, es posible conectar diferentes equipos Modbus en el mismo puerto serie.

Compatibilidad de los equipos:

  • Mismo tipo de enlace RS485 2 o 4 cables.
  • Todos los equipos se deben poder configurar con características de bus idénticas. Misma velocidad, misma paridad, misma cantidad de stop bits y de data bits en todos los equipos y en la WebdynSunPM.
  • A cada equipo se le debe atribuir una dirección Modbus única (entre 1 y 247) en el bus. (UnitID)

Anhänge und andere Dokumente

Andere Bedienungsanleitungen

Anwendungshinweise

Product End of Life

FAQ

Konfigurieren des Gateways:

Prüfen Sie zunächst, ob die IP-Parameter des Computers mit der IP-Adresse von WebdynSunPM kompatibel sind (standardmäßig 192.168.1.12)

Starten Sie einen Webbrowser (Chrome, Firefox, Edge, Safari, …) und geben Sie die IP-Adresse des WebdynSunPM-Hubs in die Adresszeile ein. Eine Authentifizierungsseite wird angezeigt:

Die Standard-Login-Daten lauten:

KennungPasswort
userhighhigh

Klicken Sie auf „Login“

Die Konfiguration ist auf zwei Arten möglich, über die Web-Oberfläche und per SMS:
  • Konfiguration über die Web-Oberfläche:
Stellen Sie zunächst eine Verbindung zum Hub her, indem Sie sich anmelden, um auf die Serverkonfiguration zuzugreifen: Geben Sie den Verbindungsmodus „ethernet“ oder „modem“ ein: Stellen Sie bei einer Ethernet-Konfiguration sicher, dass die IP-Parameter mit dem Serverzugriff entsprechend der lokalen Netzwerkkonfiguration des Hubs kompatibel sind. Bei einer Ethernet-Verbindung muss die Konfiguration mit der lokalen Netztopologie des Hubs kompatibel sein, damit dieser auf die Server zugreifen kann. Diese Konfiguration erfolgt über die Konfigurationsseite „Networks“ (siehe Kapitel 3.2.2.3: „Netzwerke (Networks)“). Bei einer Modemverbindung muss das Modem korrekt konfiguriert sein, bevor eine Verbindung hergestellt werden kann. Diese Konfiguration erfolgt auf der Konfigurationsseite „Modem“ (siehe Kapitel 3.2.2.4: „Modem“). Die minimal zu konfigurierenden Serverparameter sind folgende: Diese Felder müssen konfiguriert werden: „Interface“, „Type“, „Server type“, „Address“, „Port“, „Login“ und „Password“. In den übrigen Feldern können die Standardwerte beibehalten werden, solange die Verzeichnisse zuvor korrekt angelegt wurden. Weitere Einzelheiten siehe Kapitel 3.1.2: Konfigurationsdateien“.
  • Konfiguration per SMS:
Die Konfiguration per SMS kann durch folgende Befehle vorgenommen werden:
    • Apn: zum Konfigurieren des APN der SIM-Karte. (siehe Kapitel 3.2: „Modem-Konfigurationsbefehl „apn““)
    • Ftp: zum Konfigurieren des FTP-Servers, der die Konfiguration des Hubs enthalten soll (siehe Kapitel3.3: FTP-Konfigurationsbefehl „ftp““).
    • Connect: zum Starten der Verbindung zum FTP-Server und zum Laden der Konfiguration (siehe Kapitel3.1: Verbindungsbefehl „Connect“ 

Die Zugangsdaten für den FTP-Server hängen von der gewählten Lösung ab.

Wenn Sie ein Portal gewählt haben, erhalten Sie die Zugangsdaten für den FTP-Server von diesem.

Wenn Sie einen eigenen FTP-Server verwenden möchten, wenden Sie sich bitte an Ihren Netzwerkadministrator.

Für alle anderen Konfigurationen und für die Auswahl der am besten geeigneten Lösung sollten Sie sich an die Webdyn-Vertriebsabteilung wenden, die Sie beraten und an die entsprechenden Ansprechpartner weiterleiten kann: contact@webdyn.com

Allgemeine Nutzung des Gateways

Es gibt 2 Methoden, um das Zurücksetzen auf die Werkseinstellungen des Hubs zu erzwingen:
  • Halten Sie die Taste Werksrückstellung am Hub für 20 Sekunden gedrückt:
Warten Sie. Der Hub startet nach ein paar Augenblicken mit der Werkseinstellung neu.
  • Wenn eine SIM-Karte installiert und konfiguriert ist, kann mit dem SMS-Befehl „factory“ auch eine Werksrückstellung durchgeführt werden. Senden Sie dafür einfach eine SMS mit dem Befehl „factory“ an die Rufnummer der SIM-Karte (siehe Kapitel 3.7: „Befehl Werksrückstellung „factory““)

Es ist möglich, Befehle an das angeschlossene Gerät zu senden, wenn letzteres diese akzeptiert.

Der WebdynSunPM speichert maximal 50MB unkomprimierte Daten pro definiertem Gerät.

Bei Nichtzugriff auf den Remote-Server kann der WebdynSunPM-Hub so Daten über mehrere Monate speichern.

Die maximale Datenspeicherzeit hängt von der zu erfassenden Datenmenge und der konfigurierten Erfassungshäufigkeit ab.

Die durchschnittliche Speicherzeit beträgt 3 bis 4 Monate.

Die durchschnittliche Lebensdauer der Batterie beträgt circa 5 Jahre.

Sie hängt vom Umfeld der Anlage ab.

Alle unsere Produkte haben eine Garantielaufzeit von 2 Jahren.

Weitere Informationen hierzu erhalten Sie in unseren Allgemeinen Geschäftsbedingungen.

Das Datenvolumen hängt von den ausgetauschten Dateien ab.

Der Durchschnitt liegt bei ca. 5 MB pro Monat und ist bei jeder Anlage anders.

Kompatibilität der Wechselrichter

Siehe Kapitel 1.4: „Unterstützte Geräte“.

Kompatibilität der Modbus-Geräte:

Ja, es ist möglich, verschiedene Modbus-Geräte an denselben seriellen Port anzuschließen.

Kompatibilität der Geräte:

  • Gleicher Verbindungstyp RS485 2-Draht oder 4-Draht.
  • Alle Geräte müssen mit identischen Buseigenschaften konfigurierbar sein. Gleiche Geschwindigkeit, gleiche Parität, gleiche Anzahl von Stoppbits und Datenbits auf allen Geräten und im WebdynSunPM.

Jedem Gerät muss eine eindeutige Modbus-Adresse (zwischen 1 und 247) auf dem Bus zugewiesen werden. (UnitID)

Appendices and other documents

Other manuals

Application Notes

Product End of Life Cycle

FAQ

Gateway configuration:

Start by checking that the computer’s IP parameters are compatible with the WebdynSunPM IP address (by default 192.168.1.12)

Launch a web browser (Chrome, Firefox, Edge, Safari, etc.) and enter the WebdynSunPM concentrator IP address in the address bar. An authentication page is displayed:

The default accesses are:

IdentifiantMot de passe
userhighhigh

Click “Login”

There are two configuration solutions, using the web interface and using text messages:
  • Configuration using the web interface:
Start by establishing a connection to the concentrator by connecting to it to access the server configuration: Enter the “ethernet” or “modem” connection type: For an ethernet configuration, make sure the IP parameters are compatible with server access according to the concentrator local network configuration. For an ethernet connection, the configuration must be compatible with the concentrator’s local network topology so that it can access the servers. This configuration is done from the “Networks” configuration page (see section 3.2.2.3: “Networks). For a modem connection, the modem configuration must be correct before a connection can be set up. This configuration is done from the “Modem” configuration page (see section 3.2.2.4: “Modem). The parameters for the servers to be configured are at least the following: Therefore the following fields need to be configured: “Interface”, “Type”, “Server type”, “Address”, “Port”, “Login” and “Password”. The other fields can be left at the default values subject to the directories having been properly created beforehand. See section 3.1.2: “Configuration files for more details.
  • Text message configuration:
Text message configuration requires sending the following commands:
      • Apn: to configure the SIM card APN. (see section 3.2:“apn” modem configuration command)
      • Ftp: to configure the FTP server that will contain the concentration configuration (see section 3.3: “ftp” FTP configuration command”).
      • Connect: to launch the connection to the FTP server and load the configuration (see section 3.1: ““connect” connection command

Access to the FTP server depends on the selected solution.

If you have chosen a portal, it will give you the FTP server access identifiers.

If you want to use your own FTP server, contact your network administrator.

For all other configurations, and to determine the best solution, contact the Webdyn sales department which will advise you and direct you to the relevant contacts: contact@webdyn.com

General gateway use

There are 2 methods to force a concentrator factory reset:
  • Press the Factory Reset button on the concentrator for 20 seconds:
Wait. The concentrator will reboot using its factory configuration.
  • If a SIM card is installed and configured, a “factory” text message can also be used for factory reset. Just send the “factory” text message to the SIM card phone number (see section 3.7: “factory” reset command”)

It is possible to send commands to connected devices if they accept them.

The WebdynSunPM can store up to 50Mb of uncompressed data per declared device.

If there is no access to the remote server, the WebdynSunPM concentrator can store the data for several months.

The maximum data storage time varies depending on the amount of data to be collected and the configured collection frequency.

The average storage time varies from 3 to 4 months.

The average service life of the battery is 5 years.

It may vary depending on the installation environment.

All our products are guaranteed for 2 years.

For more information, read the general terms and conditions of sale.

The data volume depends on the exchanged files.

The average is about 5 MB per month but this varies from one installation to another.

Inverter compatibility

See section 1.4: “Supported devices”.

Modbus device compatibility:

Yes, different Modbus devices can be connected to the same serial port.

Device compatibility:

    • Same type of RS485 or 4 wire connection.
    • All devices should be able to be configured using identical bus specifications. Same speed, same parity, same number of stop bits and data bits on all devices and on the WebdynSunPM.
    • Each device must be assigned a unique Modbus address (between 1 and 247) on the bus. (UnitID)

Anexos y otros documentos

Preguntas frecuentes

CONFIGURACIÓN DE LA PASARELA WEBDYNRF

  • En caso de que el archivo se elimine de la carpeta después de conectar el concentrador WebdynRF, el problema suele deberse a un error de formato de archivo. Los archivos de configuración y comando deben respetar el formato descrito en los archivos de esquema (XSD). Para comprobar la coherencia de un esquema, abra el archivo XML con el editor de texto Notepad++ e instale el complemento “XML Tool”. Luego copie el archivo XSD correspondiente al archivo XML en la misma carpeta y seleccione en XML Tool “Validate now”. Deben mostrarse los errores detectados por la herramienta.
  • En caso de que el archivo no se elimine del servidor, el problema más común es que el archivo no se ha guardado en la ubicación correcta. El archivo debe estar disponible en el servidor en la carpeta “INBOX”, y en la subcarpeta que lleva el nombre del identificador único (UID) del producto (ejemplo “/INBOX/0045CE/”).

USO GENERAL DE LA PASARELA WEBDYNRF

La cantidad de datos intercambiados en la red GPRS varía según la configuración. No obstante, puede estimarse un consumo de unos 5 MB / mes.
El concentrador WebdynRF consume en promedio alrededor de 250mA.
Hay 2 modos de actualización de firmware: Actualización local: En la interfaz de configuración de la WebdynRF, acceda a la pestaña “Actions” y seleccione el actualizador en el menú “File upload” antes de hacer clic en el botón “Upload”. Actualización remota: Descargue del servidor FTP el archivo que contiene el actualizador (archivo con la extensión “.bz2”) en la carpeta “BIN”. Luego inserte el comando de actualización en la carpeta INBOX correspondiente a su concentrador (“INBOX/”, con el identificador del concentrador respectivo) El comando de actualización debe respetar el siguiente formato: updater.tar.bz2 checksum_md5 updater.tar.bz2 checksum_md5 Con :
  • updater.tar.bz2: Nombre del archivo de actualización descargado en la carpeta “BIN”
  • checksum_md5: Código md5 del archivo de actualización

La falta de conexión con el servidor FTP puede explicarse por un problema de conexión a la red (Ethernet o GPRS), por un problema de inicio de sesión FTP o por una no activación de la conexión.

En caso de problema de conexión a la red, verifique los puntos siguientes:

  • Ethernet:
    • Modo del módem en “off” o “alwaysoff”
    • Campos “Gateway” introducidos correctamente
    • Debe configurarse al menos un servidor DNS
  • GPRS:
    • Modo del módem en “on”
    • APN, identificador APN y contraseña APN introducidos correctamente
    • Número de llamada GPRS a “* 99***1#”


En caso de problema de inicio de sesión, verifique los puntos siguientes:

  • Parámetros FTP incorrectos
  • Puerto TCP 21 cerrado en salida
  • Problema de resolución del nombre de dominio: no se ha indicado el servidor DNS


En caso de que no se active la conexión:

En este caso, solo la conexión automática no funciona. El problema suele deberse a una configuración incorrecta de los “schedules”. Atención: el ID de los schedules debe ser un número entero.

USO PARTICULAR DE LA PASARELA WEBDYNRF WIRELESS M-BUS

Para que se carguen los datos de los módulos WM-bus, es necesario

  • Elegir el modo correspondiente a los módulos utilizados (S, T o N)
  • Definir los módulos o grupos de módulos a tratar

Un módulo puede definirse de forma única por todos los campos siguientes:

  • Id
  • Manufacturer
  • Version
  • Medium

Si los datos de un módulo estuviesen encriptados, es posible definir la clave de encriptado de este módulo en el campo “Key”.

Para simplificar la introducción de los módulos a tratar, es posible definir un grupo de módulos respetando los campos introducidos. Los otros campos se dejarán vacíos (a continuación se muestra un ejemplo de configuración que permite recuperar todos los módulos del manufacturer Webdyn (WDN) con la clave de encriptado “00000000000000000000000000000000”.

  •   Id :
  •   Manufacturer : WDN
  •   Medium :
  •   Version :
  •   Label : Webdyn
  •   Key : 00000000000000000000000000000000

Nota: Para que se tengan en cuenta los módulos (filtros) introducidos, el modo “ByPass filter” debe estar desactivado.

 USO PARTICULAR DE LA WEBDYNRF WAVENIS

La herramienta se conecta al concentrador accediendo al instalador (install).

Por lo tanto, debe utilizarse la contraseña del instalador (por defecto “middle”), y no la del administrador (por defecto “high”)

Los estados cargados por el concentrador WebdynRF son los valores brutos contenidos en los módulos Wavenis. Se cargan sin interpretación. Para obtener más detalles, consulte los manuales de los módulos Coronis.

Anhänge und andere Dokumente

FAQ

 KONFIGURATION DES WEBDYNRF-GATEWAYS

  • Wenn die Datei nach dem Verbinden des WebdynRF-Hubs aus dem Verzeichnis entfernt wird, liegt das Problem in der Regel an einem Fehler im Dateiformat. Die Konfigurations- und Befehlsdateien müssen das in den Schemadateien (XSD) beschriebene Format erfüllen. Um die Konsistenz eines Schemas zu überprüfen, öffnen Sie die XML-Datei mit dem Editor Notepad++ und installieren Sie das Add-in „XML Tool“. Kopieren Sie dann die XSD-Datei, die der XML-Datei entspricht, in dasselbe Verzeichnis, und wählen Sie im XML-Tool „Validate now“ (Jetzt bestätigen) aus. Die vom Tool erkannten Fehler müssen angezeigt werden.
  • Wenn die Datei nicht vom Server gelöscht wird, besteht das Problem meist darin, dass die Datei nicht an der richtigen Stelle abgelegt wurde. Die Datei muss auf dem Server im Verzeichnis „INBOX“ und im Unterverzeichnis mit dem Namen der Produkt-UID verfügbar sein (Beispiel: „/INBOX/0045CE/“).

ALLGEMEINE NUTZUNG DES WEBDYNRF-GATEWAYS

Die Menge der über das GPRS-Netzwerk ausgetauschten Daten hängt von der Konfiguration ab. Der Verbrauch kann auf etwa 5 MB/Monat geschätzt werden.
Der WebdynRF-Hub verbraucht durchschnittlich ca. 250 mA.

Es gibt 2 Modi für die Aktualisierung der Firmware:

Die lokale Aktualisierung:
Wechseln Sie auf der WebdynRF-Konfigurationsschnittstelle zur Registerkarte „Actions“ (Aktionen) und wählen Sie im Menü „File upload“ (Datei-Upload) den Updater aus, bevor Sie auf die Schaltfläche „Upload“ (Aktualisieren) klicken

Die Remote-Aktualisierung:
Laden Sie die Datei, die den Updater enthält (Datei mit der Erweiterung „.bz2“), auf den FTP-Server in das Verzeichnis „BIN“ hoch. Geben Sie dann den Aktualisierungsbefehl in das INBOX-Verzeichnis für Ihren Hub („INBOX/“ mit dem Benutzernamen des betreffenden Hubs).


Der Aktualisierungsbefehl muss folgendem Format entsprechen:

updater.tar.bz2
checksum_md5

updater.tar.bz2
checksum_md5

Mit :

  • updater.tar.bz2: Name der Updater-Datei, die in das Verzeichnis „BIN“ geladen wurde
  • checksum_md5: md5-Code der Updater-Datei

Eine fehlende Verbindung zum FTP-Server kann durch ein Problem mit der Netzwerkverbindung (Ethernet oder GPRS), ein Problem mit der FTP-Anmeldung oder durch die Nichtauslösung der Verbindung verursacht werden.

Falls Probleme mit der Netzwerkverbindung auftreten, überprüfen Sie Folgendes:

  • Ethernet:
    • Modem-Modus auf „off“ oder „alwaysoff“
    • „Gateway“-Feld korrekt eingegeben
    • Es muss mindestens ein DNS-Server konfiguriert sein
  • GPRS:
    • Modem-Modus auf „on“
    • APN, APN-Benutzername und APN-Passwort korrekt eingegeben
    • GPRS-Rufnummer auf „*99“ *1#“


Falls Probleme bei der Anmeldung auftreten, überprüfen Sie Folgendes:

  • Falsche FTP-Einstellungen
  • TCP-Port 21 geschlossen bei Ausgang
  • Problem bei der Auflösung des Domain-Namens: Der DNS-Server ist nicht näher spezifiziert


Bei Nichtauslösung der Verbindung:

In diesem Fall funktioniert nur die automatische Anmeldung nicht. Das Problem ist in der Regel auf eine schlechte Konfiguration der Zeitpläne zurückzuführen. Achtung, die ID der Zeitpläne muss eine Ganzzahl sein.

BESONDERE VERWENDUNG DES WEBDYNRF WIRELESS M-BUS-GATEWAYS

Für die Eskalation der Daten der WM-Bus-Module gehen Sie wie folgt vor:

  • Wählen Sie den Modus aus, der den verwendeten Modulen entspricht (S, T oder N)
  • Definieren Sie die Module oder Modulgruppen, die verarbeitet werden sollen

Ein Modul kann durch alle folgenden Felder eindeutig definiert werden:

  • Id
  • Manufacturer (Hersteller)
  • Version
  • Medium

Falls die Daten eines Moduls verschlüsselt werden, kann der Verschlüsselungsschlüssel für dieses Modul im Feld „Schlüssel“ festgelegt werden.

Um die Eingabe der zu verarbeitenden Module zu vereinfachen, kann eine Modulgruppe definiert werden, die die eingegebenen Felder erfüllt. Die anderen Felder bleiben dann leer (nachfolgend ein Beispiel für eine Konfiguration, mit der alle Module des Herstellers Webdyn (WDN) mit Verschlüsselungsschlüssel „00000000000000000000000000000000“ abgerufen werden können.)

  •   Id :
  •   Manufacturer (Hersteller): WDN
  •   Medium :
  •   Version :
  •   Label : Webdyn
  •   Key : 00000000000000000000000000000000

Hinweis: Damit die eingegebenen Module (Filter) berücksichtigt werden können, muss der Modus „Bypass filter“ (Bypass-Filter) deaktiviert werden.

 BESONDERE VERWENDUNG DES WAVENIS WEBDYNRF-GATEWAYS

Der Anschluss des Tools an den Hub erfolgt über den Installateurzugang (Install).

Es muss also das Passwort des Installateurs (standardmäßig „middle“) und nicht das des Administrators (standardmäßig „high“) verwendet werden.

Die Status, die vom WebdynRF-Hub eskaliert werden, sind die Rohwerte, die in den Wavenis-Modulen enthalten sind. Sie werden ohne Interpretation eskaliert. Weitere Informationen finden Sie in den Handbüchern der Coronis-Module.

Annexes and other documents

FAQ

CONFIGURATION OF THE WEBDYNRF GATEWAY

  • If the file is deleted from the directory after connecting the WebdynRF gateway, the problem is usually due to a file format error. The configuration and control files must follow the format described in the schema (XSD) files. To check schema consistency, open the XML file with the Notepad++ text editor and install the “XML Tool” add-on. Next, copy the corresponding XSD file to the XML file in the same directory, and select “Validate now” in XML Tool. Errors detected by the tool should be displayed.
  • If the file is not deleted from the server, the most common problem is that the file has not been located correctly. The file must be available on the server in the “INBOX” directory and in the sub-directory bearing the product UID name (e.g.: “/INBOX/0045CE/”).

GENERAL USE OF THE WEBDYNRF GATEWAY

The amount of data exchanged on the GPRS network varies depending on the configuration. However, the average consumption would be about 5MB / month.
The WebdynRF gateway consumes an average of about 250mA.

There are 2 firmware updating methods:
Local updating:
On the WebdynRF configuration interface, go to the “Actions” tab and select the updater in the “File upload” menu before clicking on the “Upload” button

Remote updating:
Upload the file containing the updater (file with extension “.bz2”) in the “BIN” directory to the FTP server . Next, place the update command in the INBOX directory corresponding to your gateway (“INBOX/”, with, the identifier of the gateway concerned)

The update command must follow the following format:

      updater.tar.bz2
      checksum_md5

updater.tar.bz2
checksum_md5

With:

  • updater.tar.bz2: Updater file name uploaded to the “BIN” directory
  • checksum_md5: Md5 code of the updater file

A lack of connection to the FTP server may be due to a network connection problem (Ethernet or GPRS), an FTP login problem or a failure to initiate the connection.

If you cannot connect to the network, check the following points:

  • Ethernet:
    • Modem set to “off” or “always off”
    • “Gateway” fields correctly entered
    • At least one DNS server must be configured
  • GPRS:
    • Modem set to “on”
    • APN, APN ID and APN password correctly entered
    • GPRS call number set to “*99***1#”

If you cannot log in, check the following points:

  • Incorrect FTP parameters
  • TCP port 21 closed at output
  • Domain name resolution problem: the DNS server is not specified

If the connection fails to initiate:

In this case, only the automatic connection does not work. The problem is probably caused by an incorrect schedule configuration. Please note, the schedule ID must be an integer.

 PARTICULAR APPLICATION OF THE WEBDYNRF WIRELESS M-BUS GATEWAY