Tunnel – MODBUS configuration parameter: “MODBUS_”

Vai al contenuto principale

MODBUS_ parameters can configure MTX-Tunnel to take modbus RTU device readings. The Modbus RTU device is connected to a serial port on the modem of MTX Terminals and the internal registers are read.

It is also possible to read and write modbus variables with AT^MTXTUNNEL=GETMODBUS and AT^MTXTUNNEL=SETMODBUS commands.

MODBUS_address

Description: ModBus RTU address parameter specification.

Possible values:

  • 1… 255
  • Default value: 1

Additional notes:

  • Please use the technical support line at iotsupport@mtxm2m.com for further information
  • From MTX-Tunnel version 7.12, it is possible to create several addresses in this parameter, meaning several Modbus devices can be read with just one modem. Each address must be separated by a semi-colon “;”. For example, if you wish to read the memory table of each device with addresses 1, 2 and 3, this parameter would have the value 1;2;3.

MODBUS_start

Description: This parameter indicates the first position to read from in the Modbus register table.

Possible values:

  • 1… 65535
  • Default value: 1

Additional notes:

  • MTX-Tunnel uses 2 bytes (Word type) variable data. Different sized data need further operations to send JSON object data to your server
    From MTX-Tunnel version 7.12, it is possible to create several starting points in this parameter, meaning several ranges can be read. Each starting point must be separated by a semi-colon “;”.
  • See this example for more information and examples of scenarios. Please use technical support line at gsmsupport@matrix.es for further information

MODBUS_numWords

Description: Number of registers to be read from the ModBus device from the address indicated by the MODBUS_start parameter.

Possible values:

  • 1… 20
  • Default value: 1

Additional notes:

  • This parameter is linked together with LOGGER_registerSize, so take the time to adjust it too From MTX-Tunnel version 7.18, it is possible to establish several numbers in this parameter, meaning several ranges can be read. Each different number must be separated by a semicolon “;”.
  • See this example for more information and scenario examples. Please use technical support line at iotsupport@mtxm2m.com for further information

MODBUS_period

Description: This parameter shows after how many seconds the MTX-Tunnel must get the ModBus device to read its memory.

Possible values:

  • 30… 2592000 seconds (from 30 seconds up to 30 days)
  • Default value: 900 (15 minutes)

Additional notes:

  • Please use the technical support line at iotsupport@mtxm2m.com for further information

MODBUS_onlyChanges

Description: This parameter allows you to decide whether to send all readings from a Modbus device (set to “off”) or only send a message when there is a change in at least one of the readings (set to “on”).

Possible values:

  • on, off
  • Default Value: off (all readings are sent)

Additional notes:

  • This parameter is maintained for compatibility reasons. We ask you do not use it however. Instead, please use the parameter MODBUS_changeDiff

MODBUS_readCommand

Description: This parameter allows you to choose the Modbus read command for applications where the MTX-Tunnel acts as modbusmaster for the reading and delivery of modbus records. The command 0x03 is used in most devices, but in others it may be necessary to use the command 0x04. With this parameter you can choose between 0x03 and 0x04. From MTX-Tunnel v8.07 you can use 0x01 and 0x02 for binary inputs.

Possible values:

  • 1, 2 3, 4
  • Default value: 3

Additional notes:

  • Please write to iotsupport@mtxm2m.com if you need further help
  • If you do not know which one to choose, we recommend you specify value 3
  • You can specify a different read command for each device to read. You must specify them separated by “;”

MODBUS_logFrequency

Description: this parameter allows you to choose the frequency of data recording in the Logger internal memory, to later deliver the records via GPRS. That is, it is possible to set, for example, a MODBUS_ period at 60, which states that the reading period of the Modbus records in seconds will be 60. We can also set, for example, a MODBUS_logFrequency of 3, so one of every 3 records will be internally stored and broadcast via GPRS.

Possible values:

  • 1… 65535
  • Default value: 1 (storage frequency = MODBUS_period)

Additional notes:

  • Please write to iotsupport@mtxm2m.com if you need further help
  • This parameter is very useful in scenarios where the MTX-Tunnel must poll several devices. For example, a device can be set with MODBUS_logFrequency “1” and another with MODBUS_logFrequency “5”. If we wanted to set a MODBUS_period of 60 seconds, from one of the devices data would be stored and sent every 60 seconds, and every 300 (5×60=300 seconds) from the other one
  • This parameter is very similar to the parameter MODBUS_logType. Please consult it in this manual; you will need it to use MODBUS_logFrequency properly

MODBUS_changeDiff

Description: by using this parameter, only the readings of Modbus records in which a change, as specified in MODBUS_changeDiff, has occurred are stored/sent. For example, if you specify a parameter MODBUS_ changeDiff with a value of 10 and read the records from address 40 to 45, if one of the records 40 to 45 shows a difference (absolute value) >=10 compared to the last reading (which was stored/sent), then that reading (of records 40 to 45) will be stored in the logger to be later sent via GPRS.

Possible values:

  • 0… 65535
  • Default value: 0

Additional notes:

  • Please write to iotsupport@mtxm2m.com if you need further help
  • This parameter is very useful in those scenarios where you only want to store/send data when there are significative changes in one of the variables. For example, imagine you have an application recording temperatures from a modbus sensor. The temperature must be read every 60 seconds, but you don’t want to send the records via GPRS if the temperature doesn’t change. Then, by setting a MODBUS_changeDiff at “1”, for example, you would only send the temperature records when they differ in 1 degree
  • This parameter is very similar to the parameter MODBUS_logType. Please consult it in this manual; you will need it to use MODBUS_changeDiff properly

MODBUS_logType

Description: with this parameter you can specify if you are using MODBUS_logFrequency, MODBUS_ changeDiff or both. You can choose, for example, to store/send modbus readings from a device every MODBUS_logFrecuency, or to store/send modbus readings from the other device when one of the records changes more than specified in MODBUS_changeDiff or you can choose both at the same time.

Possible values:

  1. 0 (MODBUS_logFrecuency), 1 (MODBUS_changeDiff), 2 (MODBUS_logFrecuency y MODBUS_changeDiff)
  2. Default value: 0

Additional notes:

  • Please write to iotsupport@mtxm2m.com if you need further help

MODBUS_custom

Description: This parameter adds a new value “C” in the JSON frame. This value is completely arbitrary for the user and can be used for whatever you want. For example, it could be interesting if you want to inform the server that incoming data is binary, word, long…

Possible values:

  • User String
  • Default value: nothing

Additional notes:

  • Check this example for a better understanding of this parameter. Please write to iotsupport@mtxm2m.com if you need further help

MODBUS_regType

Description: This parameter allows us to define the type of Modbus register that is to be read automatically. Either “Word” or “DoubleWord” can be chosen.

Possible values:

  • 2 bytes (unsigned word), 4 bytes (unsigned doubleWord)
  • Default value: 2

Additional notes:

  • This parameter is available in versions from MTX-Tunnel v8.08. Before this version, the value “2” (Word) was the only option
  • Check this example for a better understanding of this parameter. Please write to gsmsupport@matrix.es if you need further help

Avete una domanda? Avete bisogno di un preventivo? Contattateci.

  • Questo campo serve per la convalida e dovrebbe essere lasciato inalterato.

Appendices and other documents

Important information

  • SMS encryption tool (new WebdynSunPM devices will only accept encrypted SMS commands)
  • If you have a firmware version 4.XXXX, download first in the product the V5.0.13 (download HERE) and then the last version.

Other manuals

Application Notes

Product End of Life Cycle

FAQ

Gateway configuration:

Start by checking that the computer’s IP parameters are compatible with the WebdynSunPM IP address (by default 192.168.1.12)

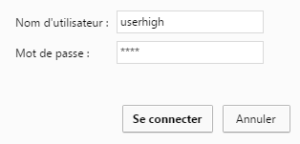
Launch a web browser (Chrome, Firefox, Edge, Safari, etc.) and enter the WebdynSunPM concentrator IP address in the address bar. An authentication page is displayed:

The default accesses are:

IdentifiantMot de passe
userhighhigh

Click “Login”

There are two configuration solutions, using the web interface and using text messages:
  • Configuration using the web interface:
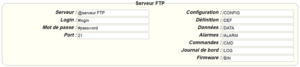
Start by establishing a connection to the concentrator by connecting to it to access the server configuration: Enter the “ethernet” or “modem” connection type: For an ethernet configuration, make sure the IP parameters are compatible with server access according to the concentrator local network configuration. For an ethernet connection, the configuration must be compatible with the concentrator’s local network topology so that it can access the servers. This configuration is done from the “Networks” configuration page (see section 3.2.2.3: “Networks). For a modem connection, the modem configuration must be correct before a connection can be set up. This configuration is done from the “Modem” configuration page (see section 3.2.2.4: “Modem). The parameters for the servers to be configured are at least the following: Therefore the following fields need to be configured: “Interface”, “Type”, “Server type”, “Address”, “Port”, “Login” and “Password”. The other fields can be left at the default values subject to the directories having been properly created beforehand. See section 3.1.2: “Configuration files for more details.
  • Text message configuration:
Text message configuration requires sending the following commands:
      • Apn: to configure the SIM card APN. (see section 3.2:“apn” modem configuration command)
      • Ftp: to configure the FTP server that will contain the concentration configuration (see section 3.3: “ftp” FTP configuration command”).
      • Connect: to launch the connection to the FTP server and load the configuration (see section 3.1: ““connect” connection command

Access to the FTP server depends on the selected solution.

If you have chosen a portal, it will give you the FTP server access identifiers.

If you want to use your own FTP server, contact your network administrator.

For all other configurations, and to determine the best solution, contact the Webdyn sales department which will advise you and direct you to the relevant contacts: contact@webdyn.com

General gateway use

There are 2 methods to force a concentrator factory reset:
  • Press the Factory Reset button on the concentrator for 20 seconds:
Wait. The concentrator will reboot using its factory configuration.
  • If a SIM card is installed and configured, a “factory” text message can also be used for factory reset. Just send the “factory” text message to the SIM card phone number (see section 3.7: “factory” reset command”)

It is possible to send commands to connected devices if they accept them.

The WebdynSunPM can store up to 50Mb of uncompressed data per declared device.

If there is no access to the remote server, the WebdynSunPM concentrator can store the data for several months.

The maximum data storage time varies depending on the amount of data to be collected and the configured collection frequency.

The average storage time varies from 3 to 4 months.

The average service life of the battery is 5 years.

It may vary depending on the installation environment.

All our products are guaranteed for 2 years.

For more information, read the general terms and conditions of sale.

The data volume depends on the exchanged files.

The average is about 5 MB per month but this varies from one installation to another.

Inverter compatibility

See section 1.4: “Supported devices”.

Modbus device compatibility:

Yes, different Modbus devices can be connected to the same serial port.

Device compatibility:

    • Same type of RS485 or 4 wire connection.
    • All devices should be able to be configured using identical bus specifications. Same speed, same parity, same number of stop bits and data bits on all devices and on the WebdynSunPM.
    • Each device must be assigned a unique Modbus address (between 1 and 247) on the bus. (UnitID)

Appendices and other documents

Product End of Life cycle

FAQ

No, the concentrator is not able to decrypt data from WM-BUS equipment because it does not have a safe on board to guarantee the security of the encryption keys of your equipment. The recovered data is deposited without modification (without decryption) by the concentrator on your remote server.
Please check these items in this order:
  • the battery level: if the battery level is too low or empty, the product will not run properly or not run at all.
  • Modem reception level: a bad signal at the modem may also prevent the hub from uploading files. Look to move the product or install an external antenna to improve signal quality.
  • The last configuration file: a bad configuration file can block the product.

Remotely, by checking the regularly uploaded files if the product configuration is correct.

On site, by passing the magnet over the product, you will hear 3 short beeps.

Replace the product and inject the configuration from the old product into the new one. If a white list is used, remember to inject it into the new product as well.

Annexes et autres documents

Anexos y otros documentos

Annexes et autres documents

Anhänge und andere Dokumente

附錄及其他文件

附錄及其他文件

附錄及其他文件

附錄及其他文件

附錄及其他文件

Appendices and other documents

Product End of Life Cycle

FAQ

CONFIGURATION OF THE WEBDYNSUN GATEWAY

  • Start by checking that your computer’s IP parameters are compatible with the WebdynSun’s “IP” address (the default is 192.168.1.12). 
  • Next, launch a web browser (Firefox or IE) and enter the WebdynSun’s IP address in the address bar. An authentication page will appear: 

The default accesses are:
Username: userhigh
Password: high

  • Click on “log in”  

There are two types of configuration: via the web interface or via SMS.

Configuration of the web interface:

1/ Go to the configuration page with the gateway IP address (default 192.168.1.12)

2/ Go to the Configuration tab.

3/ Select either the Ethernet or modem connection mode:

If connecting via the local network (Ethernet):

  • Edit the WebdynSun’s IP parameters by assigning it a network-compatible address.

Please note, all fields must be completed in accordance with the configuration of your local network.

If connecting via the GPRS network (Modem):

  • Change the connection settings of the GPRS modem to the settings provided by your mobile operator.

4/ Edit the FTP server parameters.

5/ Confirm the changes.

6/ Restart the WebdynSun gateway using the new settings.

7/ In the menu, click on the “installation” tab, followed by the “connection” sub-tab and start the connection.

Configuration via SMS:

This configuration method requires the use of an active SIM card with a data option and a pin code that must be either “0000” or disabled.
The SIM card must be inserted into the unit before connection to the mains supply.
After connection to the mains supply, send the following SMS messages to the number of the previously inserted SIM card:

SMS for configuring the APN:
After replacing the generic fields with those of your operator, send the following SMS*:
apn=apn_name;usr=user_name;pwd=password;

Replace the above SMS fields with the following information:

  • apn_name: APN name supplied by your mobile operator
  • user_name: APN ID supplied by your mobile operator
  • password: APN password supplied by your mobile operator

SMS for FTP configuration:
After replacing the generic fields with those of your FTP server, send the following SMS*:
Ftp=server_name:user_name:password:port;

Replace the above SMS fields with the following information:

  • server_name: FTP server address
  • user_name: FTP account ID
  • Password: FTP account password
  • Port: FTP server port (the default port is 21)

Connection SMS:

Send the word “connect” by SMS* to launch a connection to the FTP server

*Please note: the formatting of the SMS must be exactly identical to that shown above (e.g.: no spaces between characters, etc.)

There are 2 ways of resetting the gateway.

  • If connecting by Ethernet:
    • Disconnect from the mains
    • Remove the cover
    • Disconnect the battery
    • Put the DIP Switch 2 on the WebdynSun card in “ON” position
    • Start the WebdynSun by connecting it only to the mains power supply
    • Wait until all the LEDs flash and then stop flashing (3 to 5 mins).
    • Disconnect from the mains
    • Reset the Dip Switch 2 to “OFF” 
    • Reconnect the battery
    • Reconnect to the mains supply and the WebdynSun starts normally.
  • If there is a SIM card inserted in the unit:
    • Send an SMS message containing the word “factory” to the number of the inserted SIM card.

NB : Resetting the gateway restores the configuration to its original state. Please note: data will be saved but the specific settings will not. Therefore, all the settings must be reconfigured.

Commands can be sent to connected devices with the exception of certain inverters and Modbus slaves that do not accept write requests.

If the device allows it, command files can be created on the FTP server.

The WebdynSun has a memory of about 100MB.

Therefore, if the remote server cannot be accessed, the WebdynSun gateway can backup data for several months.
The maximum data backup time varies depending on the amount of data to be collected.

The average backup time ranges from 3 to 4 months.

The average battery life is 5 years.

It may vary depending on the installation environment.

Yes, data may be sent to a PLC if the latter is equipped with a Modbus protocol.
The “Report” configuration file allows the WebdynSun gateway to automatically write the values read on a Modbus slave

All our products are guaranteed for 2 years.

For further information, please see our general conditions of sale.

Files uploaded by the WebdynSun gateway are compressed in Gz format.

The data contained in these files is structured in csv format.

The data volume depends on the files exchanged.

The average is about 5 MB per month but this varies from one installation to another.

INVERTER COMPATIBILITY WITH THE WEBDYNSUN GATEWAY

Different brands of inverter may be connected to the RS485(B) port or via the Ethernet port if the inverter protocol is based on the Modbus protocol (RTU or TCP).

However, different brands of inverters cannot be connected to the same RS485(A) port.

For a list of compatible inverters, please see the product page of the WebdynSun data gateway
  • Check if the correct inverter protocol is selected before starting detection:
  • Check the wiring and configuration of the inverters by referring to the inverter appendices.
  • Check that the inverters are not in OFF or stand-by mode.
  • Check that the line end plugs on the RS 485(A) Bus are turned on.

COMPATIBILITY WITH MODBUS DEVICES

Yes, any device you wish to connect must be configured and its Modbus definition file must be created.

The configuration is mainly based on the RS485 serial bus parameters and the IP parameters.

Yes, different Modbus devices can be connected to the same RS485 (B) port.

However, they must have the same communication parameters (bus parameters or compatible IP parameters), in order for them to communicate with each other.

Appendices and other documents

Appendices and other documents

Anexos y otros documentos

Anhänge und andere Dokumente

Annexes et autres documents

Anexos y otros documentos

Anhänge und andere Dokumente

Annexes et autres documents

Anexos y otros documentos

Anhänge und andere Dokumente

Annexes et autres documents

Anexos y otros documentos

Anhänge und andere Dokumente

Annexes et autres documents

Appendices and other documents

Appendices and other documents

Appendices and other documents

Appendices and other documents

Appendices and other documents

Appendices and other documents

Appendices and other documents

Appendices and other documents

Appendices and other documents

Appendices and other documents

  • Warning – Firmware update V4.07.02 For the old version with SIM CARD of the pin code is 0000 you can update in this version. For the second case : When you insert a SIM CARD with pin code is 0000 used in this version (4.07.02) Downgrading to a previous version is not permitted.


PRODUCT END OF LIFE CYCLE

Appendices and other documents

  • Warning – Firmware update V4.07.02 – For the old version with SIM CARD of the pin code is 0000 you can update in this version.

    For the second case : When you insert a SIM CARD with pin code is 0000 used in this version (4.07.02) Downgrading to a previous version is not permitted.

PRODUCT END OF LIFE CYCLE

Anexos y otros documentos

Preguntas frecuentes

Anexos y otros documentos

Preguntas frecuentes

Anexos y otros documentos

Preguntas frecuentes

Anhänge und andere Dokumente

FAQ

Anhänge und andere Dokumente

FAQ

Anhänge und andere Dokumente

FAQ

Annexes and other documents

FAQ

Annexes and other documents

FAQ

Annexes and other documents

FAQ

Anexos y otros documentos

Preguntas frecuentes

CONFIGURACIÓN DE LA PASARELA WEBDYNRF

  • En caso de que el archivo se elimine de la carpeta después de conectar el concentrador WebdynRF, el problema suele deberse a un error de formato de archivo. Los archivos de configuración y comando deben respetar el formato descrito en los archivos de esquema (XSD). Para comprobar la coherencia de un esquema, abra el archivo XML con el editor de texto Notepad++ e instale el complemento “XML Tool”. Luego copie el archivo XSD correspondiente al archivo XML en la misma carpeta y seleccione en XML Tool “Validate now”. Deben mostrarse los errores detectados por la herramienta.
  • En caso de que el archivo no se elimine del servidor, el problema más común es que el archivo no se ha guardado en la ubicación correcta. El archivo debe estar disponible en el servidor en la carpeta “INBOX”, y en la subcarpeta que lleva el nombre del identificador único (UID) del producto (ejemplo “/INBOX/0045CE/”).

USO GENERAL DE LA PASARELA WEBDYNRF

La cantidad de datos intercambiados en la red GPRS varía según la configuración. No obstante, puede estimarse un consumo de unos 5 MB / mes.
El concentrador WebdynRF consume en promedio alrededor de 250mA.
Hay 2 modos de actualización de firmware: Actualización local: En la interfaz de configuración de la WebdynRF, acceda a la pestaña “Actions” y seleccione el actualizador en el menú “File upload” antes de hacer clic en el botón “Upload”. Actualización remota: Descargue del servidor FTP el archivo que contiene el actualizador (archivo con la extensión “.bz2”) en la carpeta “BIN”. Luego inserte el comando de actualización en la carpeta INBOX correspondiente a su concentrador (“INBOX/”, con el identificador del concentrador respectivo) El comando de actualización debe respetar el siguiente formato: updater.tar.bz2 checksum_md5 updater.tar.bz2 checksum_md5 Con :
  • updater.tar.bz2: Nombre del archivo de actualización descargado en la carpeta “BIN”
  • checksum_md5: Código md5 del archivo de actualización

La falta de conexión con el servidor FTP puede explicarse por un problema de conexión a la red (Ethernet o GPRS), por un problema de inicio de sesión FTP o por una no activación de la conexión.

En caso de problema de conexión a la red, verifique los puntos siguientes:

  • Ethernet:
    • Modo del módem en “off” o “alwaysoff”
    • Campos “Gateway” introducidos correctamente
    • Debe configurarse al menos un servidor DNS
  • GPRS:
    • Modo del módem en “on”
    • APN, identificador APN y contraseña APN introducidos correctamente
    • Número de llamada GPRS a “* 99***1#”


En caso de problema de inicio de sesión, verifique los puntos siguientes:

  • Parámetros FTP incorrectos
  • Puerto TCP 21 cerrado en salida
  • Problema de resolución del nombre de dominio: no se ha indicado el servidor DNS


En caso de que no se active la conexión:

En este caso, solo la conexión automática no funciona. El problema suele deberse a una configuración incorrecta de los “schedules”. Atención: el ID de los schedules debe ser un número entero.

USO PARTICULAR DE LA PASARELA WEBDYNRF WIRELESS M-BUS

Para que se carguen los datos de los módulos WM-bus, es necesario

  • Elegir el modo correspondiente a los módulos utilizados (S, T o N)
  • Definir los módulos o grupos de módulos a tratar

Un módulo puede definirse de forma única por todos los campos siguientes:

  • Id
  • Manufacturer
  • Version
  • Medium

Si los datos de un módulo estuviesen encriptados, es posible definir la clave de encriptado de este módulo en el campo “Key”.

Para simplificar la introducción de los módulos a tratar, es posible definir un grupo de módulos respetando los campos introducidos. Los otros campos se dejarán vacíos (a continuación se muestra un ejemplo de configuración que permite recuperar todos los módulos del manufacturer Webdyn (WDN) con la clave de encriptado “00000000000000000000000000000000”.

  •   Id :
  •   Manufacturer : WDN
  •   Medium :
  •   Version :
  •   Label : Webdyn
  •   Key : 00000000000000000000000000000000

Nota: Para que se tengan en cuenta los módulos (filtros) introducidos, el modo “ByPass filter” debe estar desactivado.

 USO PARTICULAR DE LA WEBDYNRF WAVENIS

La herramienta se conecta al concentrador accediendo al instalador (install).

Por lo tanto, debe utilizarse la contraseña del instalador (por defecto “middle”), y no la del administrador (por defecto “high”)

Los estados cargados por el concentrador WebdynRF son los valores brutos contenidos en los módulos Wavenis. Se cargan sin interpretación. Para obtener más detalles, consulte los manuales de los módulos Coronis.

Anhänge und andere Dokumente

FAQ

 KONFIGURATION DES WEBDYNRF-GATEWAYS

  • Wenn die Datei nach dem Verbinden des WebdynRF-Hubs aus dem Verzeichnis entfernt wird, liegt das Problem in der Regel an einem Fehler im Dateiformat. Die Konfigurations- und Befehlsdateien müssen das in den Schemadateien (XSD) beschriebene Format erfüllen. Um die Konsistenz eines Schemas zu überprüfen, öffnen Sie die XML-Datei mit dem Editor Notepad++ und installieren Sie das Add-in „XML Tool“. Kopieren Sie dann die XSD-Datei, die der XML-Datei entspricht, in dasselbe Verzeichnis, und wählen Sie im XML-Tool „Validate now“ (Jetzt bestätigen) aus. Die vom Tool erkannten Fehler müssen angezeigt werden.
  • Wenn die Datei nicht vom Server gelöscht wird, besteht das Problem meist darin, dass die Datei nicht an der richtigen Stelle abgelegt wurde. Die Datei muss auf dem Server im Verzeichnis „INBOX“ und im Unterverzeichnis mit dem Namen der Produkt-UID verfügbar sein (Beispiel: „/INBOX/0045CE/“).

ALLGEMEINE NUTZUNG DES WEBDYNRF-GATEWAYS

Die Menge der über das GPRS-Netzwerk ausgetauschten Daten hängt von der Konfiguration ab. Der Verbrauch kann auf etwa 5 MB/Monat geschätzt werden.
Der WebdynRF-Hub verbraucht durchschnittlich ca. 250 mA.

Es gibt 2 Modi für die Aktualisierung der Firmware:

Die lokale Aktualisierung:
Wechseln Sie auf der WebdynRF-Konfigurationsschnittstelle zur Registerkarte „Actions“ (Aktionen) und wählen Sie im Menü „File upload“ (Datei-Upload) den Updater aus, bevor Sie auf die Schaltfläche „Upload“ (Aktualisieren) klicken

Die Remote-Aktualisierung:
Laden Sie die Datei, die den Updater enthält (Datei mit der Erweiterung „.bz2“), auf den FTP-Server in das Verzeichnis „BIN“ hoch. Geben Sie dann den Aktualisierungsbefehl in das INBOX-Verzeichnis für Ihren Hub („INBOX/“ mit dem Benutzernamen des betreffenden Hubs).


Der Aktualisierungsbefehl muss folgendem Format entsprechen:

updater.tar.bz2
checksum_md5

updater.tar.bz2
checksum_md5

Mit :

  • updater.tar.bz2: Name der Updater-Datei, die in das Verzeichnis „BIN“ geladen wurde
  • checksum_md5: md5-Code der Updater-Datei

Eine fehlende Verbindung zum FTP-Server kann durch ein Problem mit der Netzwerkverbindung (Ethernet oder GPRS), ein Problem mit der FTP-Anmeldung oder durch die Nichtauslösung der Verbindung verursacht werden.

Falls Probleme mit der Netzwerkverbindung auftreten, überprüfen Sie Folgendes:

  • Ethernet:
    • Modem-Modus auf „off“ oder „alwaysoff“
    • „Gateway“-Feld korrekt eingegeben
    • Es muss mindestens ein DNS-Server konfiguriert sein
  • GPRS:
    • Modem-Modus auf „on“
    • APN, APN-Benutzername und APN-Passwort korrekt eingegeben
    • GPRS-Rufnummer auf „*99“ *1#“


Falls Probleme bei der Anmeldung auftreten, überprüfen Sie Folgendes:

  • Falsche FTP-Einstellungen
  • TCP-Port 21 geschlossen bei Ausgang
  • Problem bei der Auflösung des Domain-Namens: Der DNS-Server ist nicht näher spezifiziert


Bei Nichtauslösung der Verbindung:

In diesem Fall funktioniert nur die automatische Anmeldung nicht. Das Problem ist in der Regel auf eine schlechte Konfiguration der Zeitpläne zurückzuführen. Achtung, die ID der Zeitpläne muss eine Ganzzahl sein.

BESONDERE VERWENDUNG DES WEBDYNRF WIRELESS M-BUS-GATEWAYS

Für die Eskalation der Daten der WM-Bus-Module gehen Sie wie folgt vor:

  • Wählen Sie den Modus aus, der den verwendeten Modulen entspricht (S, T oder N)
  • Definieren Sie die Module oder Modulgruppen, die verarbeitet werden sollen

Ein Modul kann durch alle folgenden Felder eindeutig definiert werden:

  • Id
  • Manufacturer (Hersteller)
  • Version
  • Medium

Falls die Daten eines Moduls verschlüsselt werden, kann der Verschlüsselungsschlüssel für dieses Modul im Feld „Schlüssel“ festgelegt werden.

Um die Eingabe der zu verarbeitenden Module zu vereinfachen, kann eine Modulgruppe definiert werden, die die eingegebenen Felder erfüllt. Die anderen Felder bleiben dann leer (nachfolgend ein Beispiel für eine Konfiguration, mit der alle Module des Herstellers Webdyn (WDN) mit Verschlüsselungsschlüssel „00000000000000000000000000000000“ abgerufen werden können.)

  •   Id :
  •   Manufacturer (Hersteller): WDN
  •   Medium :
  •   Version :
  •   Label : Webdyn
  •   Key : 00000000000000000000000000000000

Hinweis: Damit die eingegebenen Module (Filter) berücksichtigt werden können, muss der Modus „Bypass filter“ (Bypass-Filter) deaktiviert werden.

 BESONDERE VERWENDUNG DES WAVENIS WEBDYNRF-GATEWAYS

Der Anschluss des Tools an den Hub erfolgt über den Installateurzugang (Install).

Es muss also das Passwort des Installateurs (standardmäßig „middle“) und nicht das des Administrators (standardmäßig „high“) verwendet werden.

Die Status, die vom WebdynRF-Hub eskaliert werden, sind die Rohwerte, die in den Wavenis-Modulen enthalten sind. Sie werden ohne Interpretation eskaliert. Weitere Informationen finden Sie in den Handbüchern der Coronis-Module.

Annexes and other documents

FAQ

CONFIGURATION OF THE WEBDYNRF GATEWAY

  • If the file is deleted from the directory after connecting the WebdynRF gateway, the problem is usually due to a file format error. The configuration and control files must follow the format described in the schema (XSD) files. To check schema consistency, open the XML file with the Notepad++ text editor and install the “XML Tool” add-on. Next, copy the corresponding XSD file to the XML file in the same directory, and select “Validate now” in XML Tool. Errors detected by the tool should be displayed.
  • If the file is not deleted from the server, the most common problem is that the file has not been located correctly. The file must be available on the server in the “INBOX” directory and in the sub-directory bearing the product UID name (e.g.: “/INBOX/0045CE/”).

GENERAL USE OF THE WEBDYNRF GATEWAY

The amount of data exchanged on the GPRS network varies depending on the configuration. However, the average consumption would be about 5MB / month.
The WebdynRF gateway consumes an average of about 250mA.

There are 2 firmware updating methods:
Local updating:
On the WebdynRF configuration interface, go to the “Actions” tab and select the updater in the “File upload” menu before clicking on the “Upload” button

Remote updating:
Upload the file containing the updater (file with extension “.bz2”) in the “BIN” directory to the FTP server . Next, place the update command in the INBOX directory corresponding to your gateway (“INBOX/”, with, the identifier of the gateway concerned)

The update command must follow the following format:

      updater.tar.bz2
      checksum_md5

updater.tar.bz2
checksum_md5

With:

  • updater.tar.bz2: Updater file name uploaded to the “BIN” directory
  • checksum_md5: Md5 code of the updater file

A lack of connection to the FTP server may be due to a network connection problem (Ethernet or GPRS), an FTP login problem or a failure to initiate the connection.

If you cannot connect to the network, check the following points:

  • Ethernet:
    • Modem set to “off” or “always off”
    • “Gateway” fields correctly entered
    • At least one DNS server must be configured
  • GPRS:
    • Modem set to “on”
    • APN, APN ID and APN password correctly entered
    • GPRS call number set to “*99***1#”

If you cannot log in, check the following points:

  • Incorrect FTP parameters
  • TCP port 21 closed at output
  • Domain name resolution problem: the DNS server is not specified

If the connection fails to initiate:

In this case, only the automatic connection does not work. The problem is probably caused by an incorrect schedule configuration. Please note, the schedule ID must be an integer.

 PARTICULAR APPLICATION OF THE WEBDYNRF WIRELESS M-BUS GATEWAY

For the WM-bus module data to be transmitted, you must:

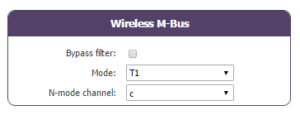
  • Choose the mode corresponding to the modules used (S, T or N)
  • Define the modules or groups of modules to be processed

A module may be defined in a unique way by all the fields below:

  • Id
  • Manufacturer
  • Version
  • Medium

If a module’s data is encrypted, the encryption key for this module can be defined in the “Key” field.

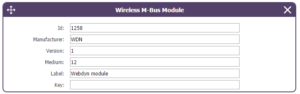
To simplify the entry of the modules to be processed, a module group can be defined that conforms to the fields entered. The other fields will then be left empty (below is an example of a configuration for retrieving all Webdyn manufacturer (WDN) modules with the encryption key “00000000000000000000000000000000”.

  •   Id :
  •   Manufacturer : WDN
  •   Medium :
  •   Version :
  •   Label : Webdyn
  •   Key : 00000000000000000000000000000000

Note: In order for the modules (filters) entered to be taken into account, the “ByPass filter” mode must be deactivated.

Click here to read the media file 

Click here to read the units file 

 PARTICULAR APPLICATION OF THE WEBDYNRF WAVENIS

The tool is connected to the gateway via the installer access (install).

It is therefore necessary to use the installer password (default is “middle”), and not the administrator’s password (default is “high”)

The statuses transmitted by the WebdynRF gateway are the raw values contained in the Wavenis modules. They are transmitted without interpretation. For further details, please refer to the Coronis module manuals.

Anexos y otros documentos

Preguntas frecuentes

CONFIGURACIÓN DE LA PASARELA WEBDYNRF

  • En caso de que el archivo se elimine de la carpeta después de conectar el concentrador WebdynRF, el problema suele deberse a un error de formato de archivo. Los archivos de configuración y comando deben respetar el formato descrito en los archivos de esquema (XSD). Para comprobar la coherencia de un esquema, abra el archivo XML con el editor de texto Notepad++ e instale el complemento “XML Tool”. Luego copie el archivo XSD correspondiente al archivo XML en la misma carpeta y seleccione en XML Tool “Validate now”. Deben mostrarse los errores detectados por la herramienta.
  • En caso de que el archivo no se elimine del servidor, el problema más común es que el archivo no se ha guardado en la ubicación correcta. El archivo debe estar disponible en el servidor en la carpeta “INBOX”, y en la subcarpeta que lleva el nombre del identificador único (UID) del producto (ejemplo “/INBOX/0045CE/”).

USO GENERAL DE LA PASARELA WEBDYNRF

La cantidad de datos intercambiados en la red GPRS varía según la configuración. No obstante, puede estimarse un consumo de unos 5 MB / mes.
El concentrador WebdynRF consume en promedio alrededor de 250mA.
Hay 2 modos de actualización de firmware: Actualización local: En la interfaz de configuración de la WebdynRF, acceda a la pestaña “Actions” y seleccione el actualizador en el menú “File upload” antes de hacer clic en el botón “Upload”. Actualización remota: Descargue del servidor FTP el archivo que contiene el actualizador (archivo con la extensión “.bz2”) en la carpeta “BIN”. Luego inserte el comando de actualización en la carpeta INBOX correspondiente a su concentrador (“INBOX/”, con el identificador del concentrador respectivo) El comando de actualización debe respetar el siguiente formato: updater.tar.bz2 checksum_md5 updater.tar.bz2 checksum_md5 Con :
  • updater.tar.bz2: Nombre del archivo de actualización descargado en la carpeta “BIN”
  • checksum_md5: Código md5 del archivo de actualización

La falta de conexión con el servidor FTP puede explicarse por un problema de conexión a la red (Ethernet o GPRS), por un problema de inicio de sesión FTP o por una no activación de la conexión.

En caso de problema de conexión a la red, verifique los puntos siguientes:

  • Ethernet:
    • Modo del módem en “off” o “alwaysoff”
    • Campos “Gateway” introducidos correctamente
    • Debe configurarse al menos un servidor DNS
  • GPRS:
    • Modo del módem en “on”
    • APN, identificador APN y contraseña APN introducidos correctamente
    • Número de llamada GPRS a “* 99***1#”


En caso de problema de inicio de sesión, verifique los puntos siguientes:

  • Parámetros FTP incorrectos
  • Puerto TCP 21 cerrado en salida
  • Problema de resolución del nombre de dominio: no se ha indicado el servidor DNS


En caso de que no se active la conexión:

En este caso, solo la conexión automática no funciona. El problema suele deberse a una configuración incorrecta de los “schedules”. Atención: el ID de los schedules debe ser un número entero.

USO PARTICULAR DE LA PASARELA WEBDYNRF WIRELESS M-BUS

Para que se carguen los datos de los módulos WM-bus, es necesario

  • Elegir el modo correspondiente a los módulos utilizados (S, T o N)
  • Definir los módulos o grupos de módulos a tratar

Un módulo puede definirse de forma única por todos los campos siguientes:

  • Id
  • Manufacturer
  • Version
  • Medium

Si los datos de un módulo estuviesen encriptados, es posible definir la clave de encriptado de este módulo en el campo “Key”.

Para simplificar la introducción de los módulos a tratar, es posible definir un grupo de módulos respetando los campos introducidos. Los otros campos se dejarán vacíos (a continuación se muestra un ejemplo de configuración que permite recuperar todos los módulos del manufacturer Webdyn (WDN) con la clave de encriptado “00000000000000000000000000000000”.

  •   Id :
  •   Manufacturer : WDN
  •   Medium :
  •   Version :
  •   Label : Webdyn
  •   Key : 00000000000000000000000000000000

Nota: Para que se tengan en cuenta los módulos (filtros) introducidos, el modo “ByPass filter” debe estar desactivado.

 USO PARTICULAR DE LA WEBDYNRF WAVENIS

La herramienta se conecta al concentrador accediendo al instalador (install).

Por lo tanto, debe utilizarse la contraseña del instalador (por defecto “middle”), y no la del administrador (por defecto “high”)

Los estados cargados por el concentrador WebdynRF son los valores brutos contenidos en los módulos Wavenis. Se cargan sin interpretación. Para obtener más detalles, consulte los manuales de los módulos Coronis.

Anhänge und andere Dokumente

FAQ

 KONFIGURATION DES WEBDYNRF-GATEWAYS

  • Wenn die Datei nach dem Verbinden des WebdynRF-Hubs aus dem Verzeichnis entfernt wird, liegt das Problem in der Regel an einem Fehler im Dateiformat. Die Konfigurations- und Befehlsdateien müssen das in den Schemadateien (XSD) beschriebene Format erfüllen. Um die Konsistenz eines Schemas zu überprüfen, öffnen Sie die XML-Datei mit dem Editor Notepad++ und installieren Sie das Add-in „XML Tool“. Kopieren Sie dann die XSD-Datei, die der XML-Datei entspricht, in dasselbe Verzeichnis, und wählen Sie im XML-Tool „Validate now“ (Jetzt bestätigen) aus. Die vom Tool erkannten Fehler müssen angezeigt werden.
  • Wenn die Datei nicht vom Server gelöscht wird, besteht das Problem meist darin, dass die Datei nicht an der richtigen Stelle abgelegt wurde. Die Datei muss auf dem Server im Verzeichnis „INBOX“ und im Unterverzeichnis mit dem Namen der Produkt-UID verfügbar sein (Beispiel: „/INBOX/0045CE/“).

ALLGEMEINE NUTZUNG DES WEBDYNRF-GATEWAYS

Die Menge der über das GPRS-Netzwerk ausgetauschten Daten hängt von der Konfiguration ab. Der Verbrauch kann auf etwa 5 MB/Monat geschätzt werden.
Der WebdynRF-Hub verbraucht durchschnittlich ca. 250 mA.

Es gibt 2 Modi für die Aktualisierung der Firmware:

Die lokale Aktualisierung:
Wechseln Sie auf der WebdynRF-Konfigurationsschnittstelle zur Registerkarte „Actions“ (Aktionen) und wählen Sie im Menü „File upload“ (Datei-Upload) den Updater aus, bevor Sie auf die Schaltfläche „Upload“ (Aktualisieren) klicken

Die Remote-Aktualisierung:
Laden Sie die Datei, die den Updater enthält (Datei mit der Erweiterung „.bz2“), auf den FTP-Server in das Verzeichnis „BIN“ hoch. Geben Sie dann den Aktualisierungsbefehl in das INBOX-Verzeichnis für Ihren Hub („INBOX/“ mit dem Benutzernamen des betreffenden Hubs).


Der Aktualisierungsbefehl muss folgendem Format entsprechen:

updater.tar.bz2
checksum_md5

updater.tar.bz2
checksum_md5

Mit :

  • updater.tar.bz2: Name der Updater-Datei, die in das Verzeichnis „BIN“ geladen wurde
  • checksum_md5: md5-Code der Updater-Datei

Eine fehlende Verbindung zum FTP-Server kann durch ein Problem mit der Netzwerkverbindung (Ethernet oder GPRS), ein Problem mit der FTP-Anmeldung oder durch die Nichtauslösung der Verbindung verursacht werden.

Falls Probleme mit der Netzwerkverbindung auftreten, überprüfen Sie Folgendes:

  • Ethernet:
    • Modem-Modus auf „off“ oder „alwaysoff“
    • „Gateway“-Feld korrekt eingegeben
    • Es muss mindestens ein DNS-Server konfiguriert sein
  • GPRS:
    • Modem-Modus auf „on“
    • APN, APN-Benutzername und APN-Passwort korrekt eingegeben
    • GPRS-Rufnummer auf „*99“ *1#“


Falls Probleme bei der Anmeldung auftreten, überprüfen Sie Folgendes:

  • Falsche FTP-Einstellungen
  • TCP-Port 21 geschlossen bei Ausgang
  • Problem bei der Auflösung des Domain-Namens: Der DNS-Server ist nicht näher spezifiziert


Bei Nichtauslösung der Verbindung:

In diesem Fall funktioniert nur die automatische Anmeldung nicht. Das Problem ist in der Regel auf eine schlechte Konfiguration der Zeitpläne zurückzuführen. Achtung, die ID der Zeitpläne muss eine Ganzzahl sein.

BESONDERE VERWENDUNG DES WEBDYNRF WIRELESS M-BUS-GATEWAYS

Für die Eskalation der Daten der WM-Bus-Module gehen Sie wie folgt vor:

  • Wählen Sie den Modus aus, der den verwendeten Modulen entspricht (S, T oder N)
  • Definieren Sie die Module oder Modulgruppen, die verarbeitet werden sollen

Ein Modul kann durch alle folgenden Felder eindeutig definiert werden:

  • Id
  • Manufacturer (Hersteller)
  • Version
  • Medium

Falls die Daten eines Moduls verschlüsselt werden, kann der Verschlüsselungsschlüssel für dieses Modul im Feld „Schlüssel“ festgelegt werden.

Um die Eingabe der zu verarbeitenden Module zu vereinfachen, kann eine Modulgruppe definiert werden, die die eingegebenen Felder erfüllt. Die anderen Felder bleiben dann leer (nachfolgend ein Beispiel für eine Konfiguration, mit der alle Module des Herstellers Webdyn (WDN) mit Verschlüsselungsschlüssel „00000000000000000000000000000000“ abgerufen werden können.)

  •   Id :
  •   Manufacturer (Hersteller): WDN
  •   Medium :
  •   Version :
  •   Label : Webdyn
  •   Key : 00000000000000000000000000000000

Hinweis: Damit die eingegebenen Module (Filter) berücksichtigt werden können, muss der Modus „Bypass filter“ (Bypass-Filter) deaktiviert werden.

 BESONDERE VERWENDUNG DES WAVENIS WEBDYNRF-GATEWAYS

Der Anschluss des Tools an den Hub erfolgt über den Installateurzugang (Install).

Es muss also das Passwort des Installateurs (standardmäßig „middle“) und nicht das des Administrators (standardmäßig „high“) verwendet werden.

Die Status, die vom WebdynRF-Hub eskaliert werden, sind die Rohwerte, die in den Wavenis-Modulen enthalten sind. Sie werden ohne Interpretation eskaliert. Weitere Informationen finden Sie in den Handbüchern der Coronis-Module.

Appendix and other documents

FAQ

CONFIGURATION OF THE WEBDYNRF GATEWAY

  • If the file is deleted from the directory after connecting the WebdynRF gateway, the problem is usually due to a file format error. The configuration and control files must follow the format described in the schema (XSD) files. To check schema consistency, open the XML file with the Notepad++ text editor and install the “XML Tool” add-on. Next, copy the corresponding XSD file to the XML file in the same directory, and select “Validate now” in XML Tool. Errors detected by the tool should be displayed.
  • If the file is not deleted from the server, the most common problem is that the file has not been located correctly. The file must be available on the server in the “INBOX” directory and in the sub-directory bearing the product UID name (e.g.: “/INBOX/0045CE/”).

GENERAL USE OF THE WEBDYNRF GATEWAY

The amount of data exchanged on the GPRS network varies depending on the configuration. However, the average consumption would be about 5MB / month.
The WebdynRF gateway consumes an average of about 250mA.

There are 2 firmware updating methods:
Local updating:
On the WebdynRF configuration interface, go to the “Actions” tab and select the updater in the “File upload” menu before clicking on the “Upload” button

Remote updating:
Upload the file containing the updater (file with extension “.bz2”) in the “BIN” directory to the FTP server . Next, place the update command in the INBOX directory corresponding to your gateway (“INBOX/”, with, the identifier of the gateway concerned)

The update command must follow the following format:

      updater.tar.bz2
      checksum_md5

updater.tar.bz2
checksum_md5

With:

  • updater.tar.bz2: Updater file name uploaded to the “BIN” directory
  • checksum_md5: Md5 code of the updater file

A lack of connection to the FTP server may be due to a network connection problem (Ethernet or GPRS), an FTP login problem or a failure to initiate the connection.

If you cannot connect to the network, check the following points:

  • Ethernet:
    • Modem set to “off” or “always off”
    • “Gateway” fields correctly entered
    • At least one DNS server must be configured
  • GPRS:
    • Modem set to “on”
    • APN, APN ID and APN password correctly entered
    • GPRS call number set to “*99***1#”

If you cannot log in, check the following points:

  • Incorrect FTP parameters
  • TCP port 21 closed at output
  • Domain name resolution problem: the DNS server is not specified

If the connection fails to initiate:

In this case, only the automatic connection does not work. The problem is probably caused by an incorrect schedule configuration. Please note, the schedule ID must be an integer.

 PARTICULAR APPLICATION OF THE WEBDYNRF WIRELESS M-BUS GATEWAY

For the WM-bus module data to be transmitted, you must:

  • Choose the mode corresponding to the modules used (S, T or N)
  • Define the modules or groups of modules to be processed

A module may be defined in a unique way by all the fields below:

  • Id
  • Manufacturer
  • Version
  • Medium

If a module’s data is encrypted, the encryption key for this module can be defined in the “Key” field.

To simplify the entry of the modules to be processed, a module group can be defined that conforms to the fields entered. The other fields will then be left empty (below is an example of a configuration for retrieving all Webdyn manufacturer (WDN) modules with the encryption key “00000000000000000000000000000000”.

  •   Id :
  •   Manufacturer : WDN
  •   Medium :
  •   Version :
  •   Label : Webdyn
  •   Key : 00000000000000000000000000000000

Note: In order for the modules (filters) entered to be taken into account, the “ByPass filter” mode must be deactivated.

Click here to read the media file 

Click here to read the units file 

 PARTICULAR APPLICATION OF THE WEBDYNRF WAVENIS

The tool is connected to the gateway via the installer access (install).

It is therefore necessary to use the installer password (default is “middle”), and not the administrator’s password (default is “high”)

The statuses transmitted by the WebdynRF gateway are the raw values contained in the Wavenis modules. They are transmitted without interpretation. For further details, please refer to the Coronis module manuals.

Annexes et autres documents

FAQ

CONFIGURATION DE LA GATEWAY WEBDYNRF

  • Dans le cas où le fichier est supprimé du répertoire après connexion du concentrateur WebdynRF, le problème est généralement dû à une erreur du format de fichier. Les fichiers de configuration et de commande doivent respecter le format décrit dans les fichiers schéma (XSD).
    Pour vérifier la cohérence d’un schéma, ouvrez le fichier XML avec l’éditeur de texte Notepad++ et installez le complément « XML Tool ». Copiez ensuite le fichier XSD correspondant au fichier XML dans le même répertoire, et sélectionnez dans XML Tool « Validate now ». Les erreurs détectées par l’outil doivent s’afficher.
  • Dans le cas où le fichier n’est pas supprimé du serveur, le problème le plus courant est que le fichier n’a pas été déposé au bon endroit. Le fichier doit être disponible sur le serveur dans le répertoire « INBOX », et dans le sous-répertoire ayant pour nom l’uid du produit (exemple « /INBOX/0045CE/ »).

 UTILISATION GÉNÉRALE DE LA GATEWAY WEBDYNRF

La quantité de données échangées sur le réseau GPRS varie en fonction de la configuration. Cependant, on peut estimer une consommation de l’ordre de 5Mo / mois.

Le concentrateur WebdynRF consomme en moyenne environ 250mA.

Il existe 2 modes de mise à jour de firmware :
La mise à jour locale :
Sur l’interface de configuration de la WebdynRF, accédez à l’onglet « Actions », et sélectionnez l’updater dans le menu « File upload » avant de cliquer sur le bouton « Upload »

La mise à jour à distance :
Téléchargez le serveur FTP le fichier contenant l’updater (fichier avec l’extension « .bz2 ») dans le répertoire « BIN ». Puis déposez la commande de mise à jour dans le répertoire INBOX correspondant à votre concentrateur (« INBOX/« , avec , l’identifiant du concentrateur concerné)

La commande de mise à jour doit respecter le format suivant:

      updater.tar.bz2
      checksum_md5

updater.tar.bz2
checksum_md5

Avec :

  • updater.tar.bz2 : Nom du fichier updater téléchargé dans le répertoire « BIN »
  • checksum_md5 : Code md5 du fichier updater

Une absence de connexion au serveur FTP peut s’expliquer par un problème de connexion au réseau (Ethernet ou GPRS), par un problème d’ouverture de session FTP ou par un non déclenchement de la connexion.

En cas de problème de connexion au réseau, vérifiez les points suivants:

  • Ethernet :
    • Mode du modem à « off » ou « alwaysoff »
    • Champs « Gateway » correctement saisi
    • Au moins un serveur DNS doit être configuré
  • GPRS :
    • Mode du modem à « on »
    • APN, identifiant APN et mot de passe APN correctement saisis
    • Numéro d’appel GPRS à « *99***1# »

En cas de problème d’ouverture de session, vérifiez les points suivants:

  • Paramètres FTP incorrects
  • Port TCP 21 fermé en sortie
  • Problème de résolution du nom de domaine: le serveur DNS n’est pas précisé

En cas de non déclenchement de la connexion :

Dans ce cas, seule la connexion automatique ne fonctionne pas. Le problème est généralement dû à une mauvaise configuration des schedules. Attention, l’ID des schedules doit être un entier.

 UTILISATION PARTICULIÈRE DE LA PASSERELLE WEBDYNRF WIRELESS M-BUS

Pour que les données des modules WM-bus soient remontées, il faut :

  • Choisir le mode correspondant aux modules utilisés (S, T ou N)
  • Définir les modules ou groupes de modules à traiter

Un module peut être défini de manière unique par l’ensemble des champs ci-dessous :

  • Id
  • Manufacturer
  • Version
  • Medium

Dans le cas où les données d’un module seraient cryptées, il est possible de définir la clé de cryptage de ce module dans le champ « Key ».

Afin de simplifier la saisie des modules à traiter, il possible de définir un groupe de module respectant les champs saisis. Les autres champs seront alors laissés vides (ci-dessous un exemple de configuration permettant de récupérer l’ensemble des modules du manufacturer Webdyn (WDN) avec pour clé de cryptage « 00000000000000000000000000000000 ».

  •   Id : 
  •   Manufacturer : WDN
  •   Medium :
  •   Version : 
  •   Label : Webdyn
  •   Key : 00000000000000000000000000000000

Remarque : Pour que les modules (filtres) saisis soient pris en compte, le mode « ByPass filter » doit être désactivé.

UTILISATION PARTICULIÈRE DE LA WEBDYNRF WAVENIS

La connexion de l’outil au concentrateur est réalisée via l’accès installateur (install).

Il faut donc utiliser le mot de passe installateur (par défaut « middle »), et non celui de l’administrateur (par défaut « high »)

Les statuts remontés par le concentrateur WebdynRF sont les valeurs brutes contenues dans les modules Wavenis. Elles sont remontées sans interprétation. Pour plus de détails, se référer aux manuels des modules Coronis.

Annexes et autres documents

FAQ

CONFIGURATION DE LA GATEWAY WEBDYNRF

  • Dans le cas où le fichier est supprimé du répertoire après connexion du concentrateur WebdynRF, le problème est généralement dû à une erreur du format de fichier. Les fichiers de configuration et de commande doivent respecter le format décrit dans les fichiers schéma (XSD).
    Pour vérifier la cohérence d’un schéma, ouvrez le fichier XML avec l’éditeur de texte Notepad++ et installez le complément « XML Tool ». Copiez ensuite le fichier XSD correspondant au fichier XML dans le même répertoire, et sélectionnez dans XML Tool « Validate now ». Les erreurs détectées par l’outil doivent s’afficher.
  • Dans le cas où le fichier n’est pas supprimé du serveur, le problème le plus courant est que le fichier n’a pas été déposé au bon endroit. Le fichier doit être disponible sur le serveur dans le répertoire « INBOX », et dans le sous-répertoire ayant pour nom l’uid du produit (exemple « /INBOX/0045CE/ »).

 UTILISATION GÉNÉRALE DE LA GATEWAY WEBDYNRF

La quantité de données échangées sur le réseau GPRS varie en fonction de la configuration. Cependant, on peut estimer une consommation de l’ordre de 5Mo / mois.

Le concentrateur WebdynRF consomme en moyenne environ 250mA.

Il existe 2 modes de mise à jour de firmware :
La mise à jour locale :
Sur l’interface de configuration de la WebdynRF, accédez à l’onglet « Actions », et sélectionnez l’updater dans le menu « File upload » avant de cliquer sur le bouton « Upload »

La mise à jour à distance :
Téléchargez le serveur FTP le fichier contenant l’updater (fichier avec l’extension « .bz2 ») dans le répertoire « BIN ». Puis déposez la commande de mise à jour dans le répertoire INBOX correspondant à votre concentrateur (« INBOX/« , avec , l’identifiant du concentrateur concerné)

La commande de mise à jour doit respecter le format suivant:

      updater.tar.bz2
      checksum_md5

updater.tar.bz2
checksum_md5

Avec :

  • updater.tar.bz2 : Nom du fichier updater téléchargé dans le répertoire « BIN »
  • checksum_md5 : Code md5 du fichier updater

Une absence de connexion au serveur FTP peut s’expliquer par un problème de connexion au réseau (Ethernet ou GPRS), par un problème d’ouverture de session FTP ou par un non déclenchement de la connexion.

En cas de problème de connexion au réseau, vérifiez les points suivants:

  • Ethernet :
    • Mode du modem à « off » ou « alwaysoff »
    • Champs « Gateway » correctement saisi
    • Au moins un serveur DNS doit être configuré
  • GPRS :
    • Mode du modem à « on »
    • APN, identifiant APN et mot de passe APN correctement saisis
    • Numéro d’appel GPRS à « *99***1# »

En cas de problème d’ouverture de session, vérifiez les points suivants:

  • Paramètres FTP incorrects
  • Port TCP 21 fermé en sortie
  • Problème de résolution du nom de domaine: le serveur DNS n’est pas précisé

En cas de non déclenchement de la connexion :

Dans ce cas, seule la connexion automatique ne fonctionne pas. Le problème est généralement dû à une mauvaise configuration des schedules. Attention, l’ID des schedules doit être un entier.

 UTILISATION PARTICULIÈRE DE LA PASSERELLE WEBDYNRF WIRELESS M-BUS

Pour que les données des modules WM-bus soient remontées, il faut :

  • Choisir le mode correspondant aux modules utilisés (S, T ou N)
  • Définir les modules ou groupes de modules à traiter

Un module peut être défini de manière unique par l’ensemble des champs ci-dessous :

  • Id
  • Manufacturer
  • Version
  • Medium

Dans le cas où les données d’un module seraient cryptées, il est possible de définir la clé de cryptage de ce module dans le champ « Key ».

Afin de simplifier la saisie des modules à traiter, il possible de définir un groupe de module respectant les champs saisis. Les autres champs seront alors laissés vides (ci-dessous un exemple de configuration permettant de récupérer l’ensemble des modules du manufacturer Webdyn (WDN) avec pour clé de cryptage « 00000000000000000000000000000000 ».

  •   Id : 
  •   Manufacturer : WDN
  •   Medium :
  •   Version : 
  •   Label : Webdyn
  •   Key : 00000000000000000000000000000000

Remarque : Pour que les modules (filtres) saisis soient pris en compte, le mode « ByPass filter » doit être désactivé.

UTILISATION PARTICULIÈRE DE LA WEBDYNRF WAVENIS

La connexion de l’outil au concentrateur est réalisée via l’accès installateur (install).

Il faut donc utiliser le mot de passe installateur (par défaut « middle »), et non celui de l’administrateur (par défaut « high »)

Les statuts remontés par le concentrateur WebdynRF sont les valeurs brutes contenues dans les modules Wavenis. Elles sont remontées sans interprétation. Pour plus de détails, se référer aux manuels des modules Coronis.

Annexes et autres documents

FAQ

Annexes et autres documents

FAQ

Annexes et autres documents

FAQ

Annexes et autres documents

  • WARNING :  Pour les anciens produits qui disposent d’une carte SIM avec un code PIN à 0000 , la mise à jour vers la version 4.07.02 sera fonctionelle.

    Second cas : Si la carte SIM avec un code PIN à 0000 est utilisée dans cette version (4.07.02), le passage vers une mise à jour antérieure est interdit. 

NOTICE DE FIN DE VIE DES PRODUITS